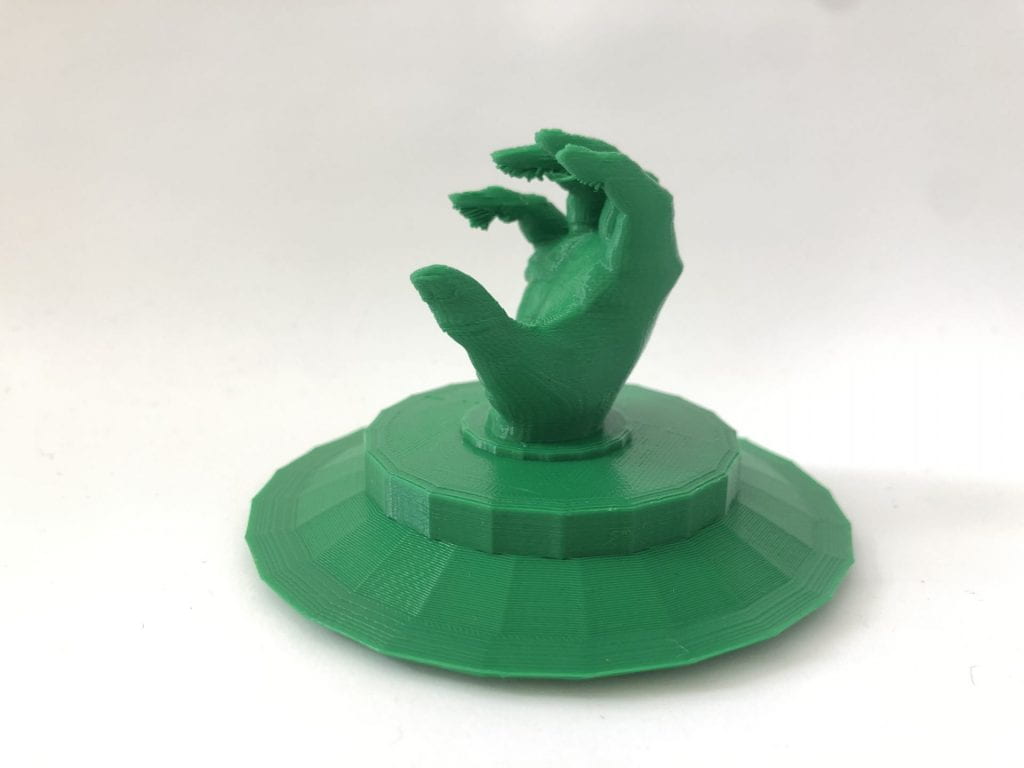
This is an everyday kitchen sink stopper or plug. It is inserted in the drain to prevent water from going down and to help fill the sink. It is an object that I interact with on a daily basis, and I think it could use a little pizzazz.
My design features a hand as the plug’s topper. Since the plug is used to stop up the drain and fill the sink with water, I thought it would be humorous to add a hand at the top that looks as though it is drowning and reaching for help above the water. The design functions similarly to the original, expect when pulling the plug, you are reaching for the “hand” to help pull it out.
Iterations
I used Scandy to take a 3D scan of my friend’s hand for this project. There were some difficulties getting a full scan, but after multiple attempts I got one that worked for me. I put the scan in Tinkercad and added a base to the “plug”. I made sure to take measurements of my current sink plug so that it would fit properly and still serve it’s function. I didn’t find many problems with this print other than the size. However, when I got my hands on this print, another idea came into mind:
A key chain holder.
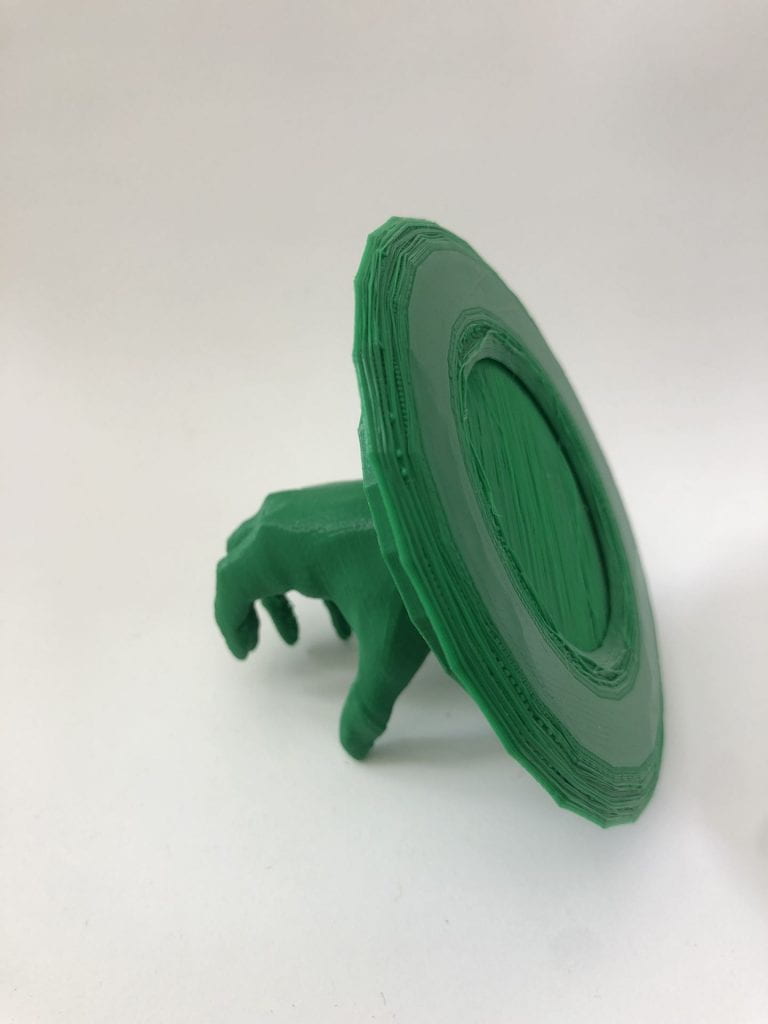
In my second iteration I flatted the base and added two hole at the top and bottom for screws. I also increased the size of the hand so that it could support the weight of a keychain. Below is my updated Tinkercad file and my final attempt at the print.
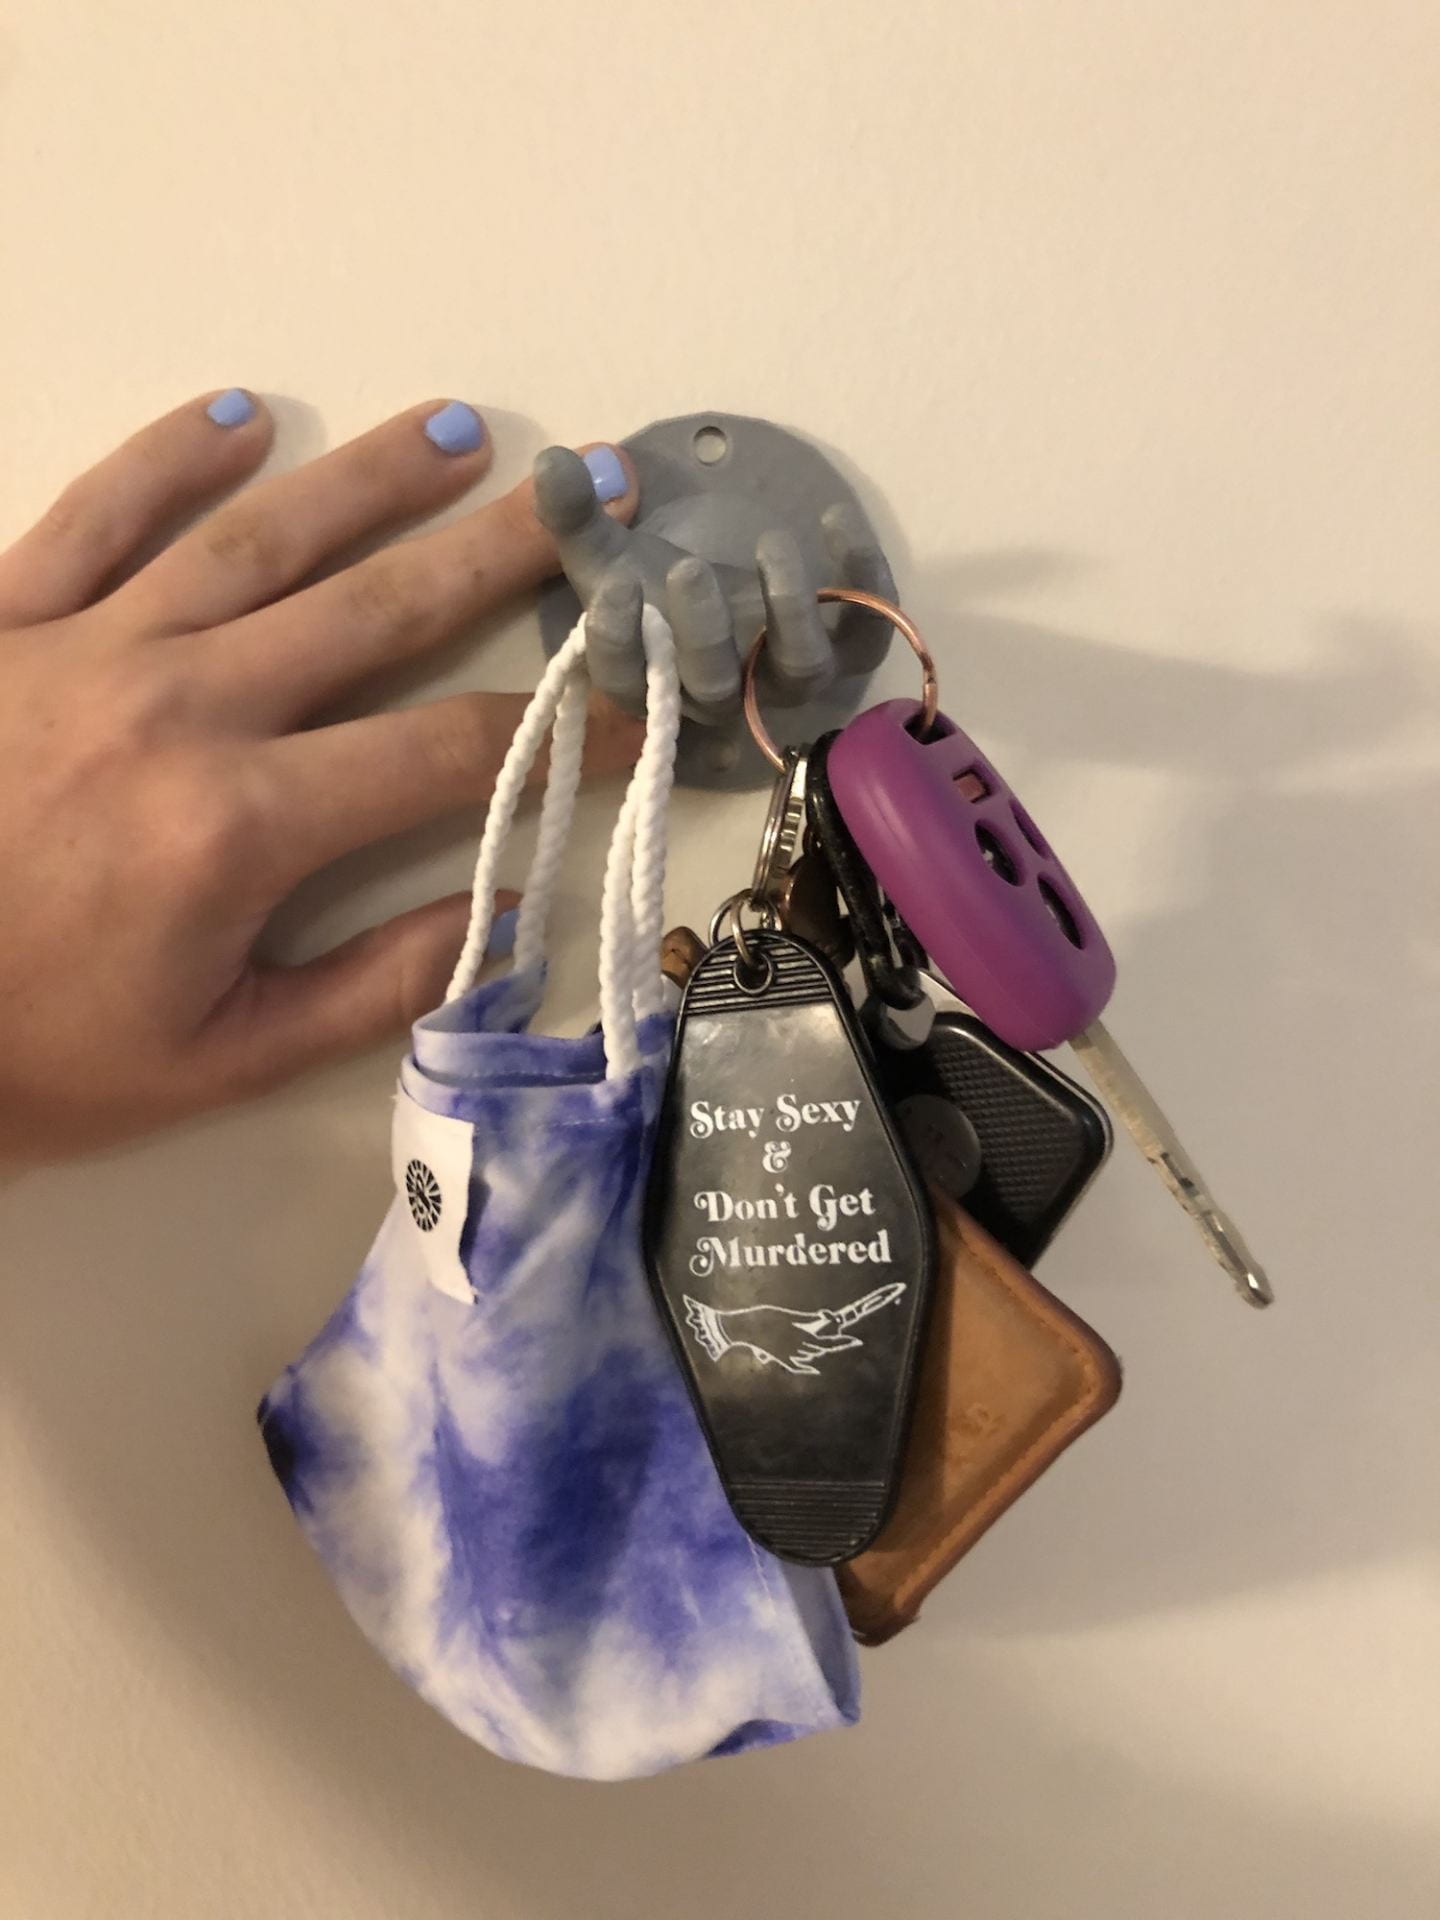
Increasing the size of the print (mainly the scan of the hand) allowed for better detail quality and overall finish. I liked the idea of the sink plug, but after hold it in my hands, this idea made more sense to me. The hand reaches out of the wall and acts as the hooks or bowl to support the keychains. Overall I’m very satisfied with my final project and am glad I took it in a different direction.
Conclusion
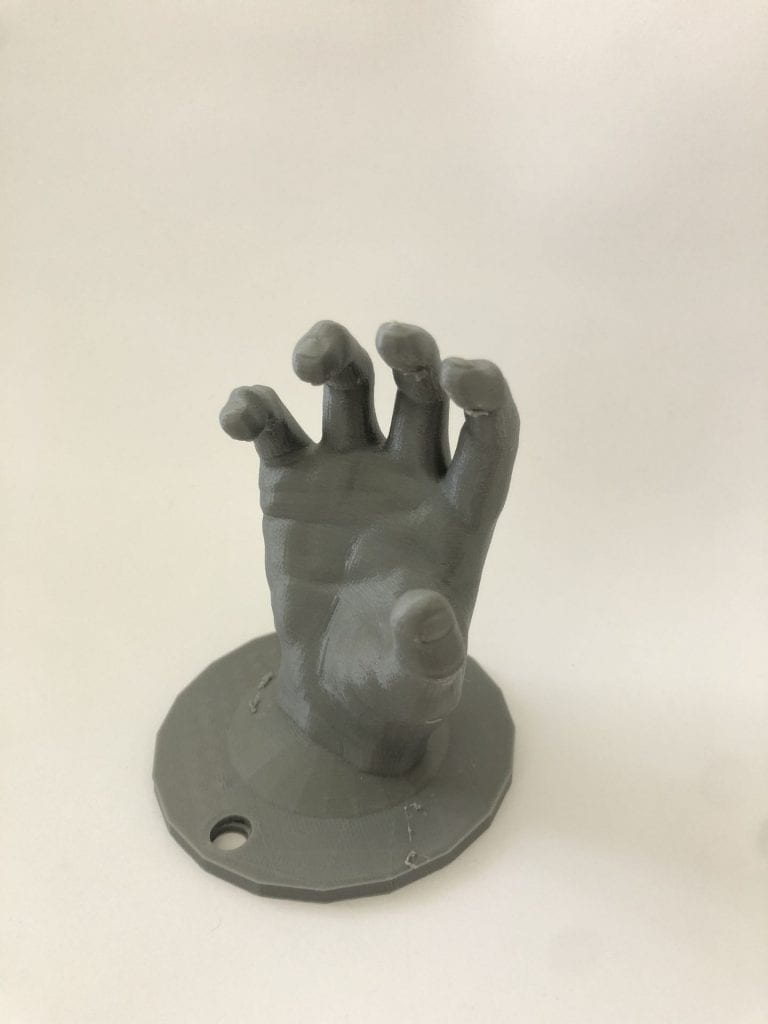
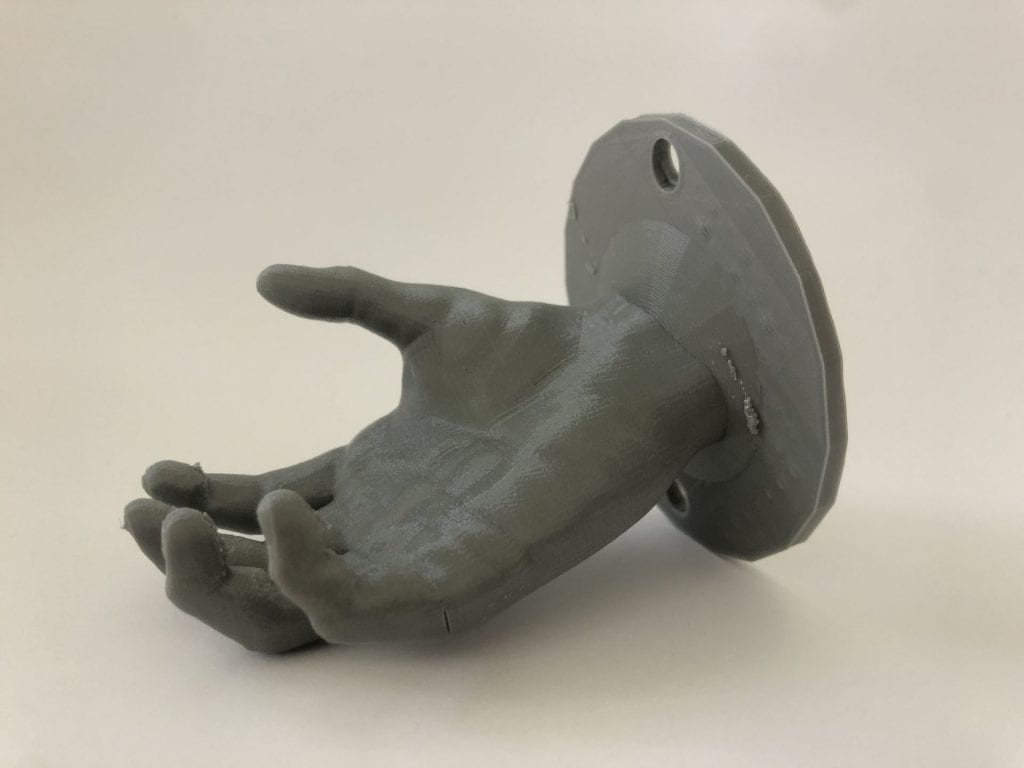
My second trial ended up being my final print. Considering the finish, I think I couldn’t have asked for a better turnout. There are some rough edges that can be filed down, and one slight crack in the hand. Above you can see what it would look like in use (I did not want to actually screw it into my wall because I live in an apartment complex). The only change I would make would be in the hand size, perhaps make it scale to a life-sized hand. However, I personally enjoy it more at it’s current size and shape.
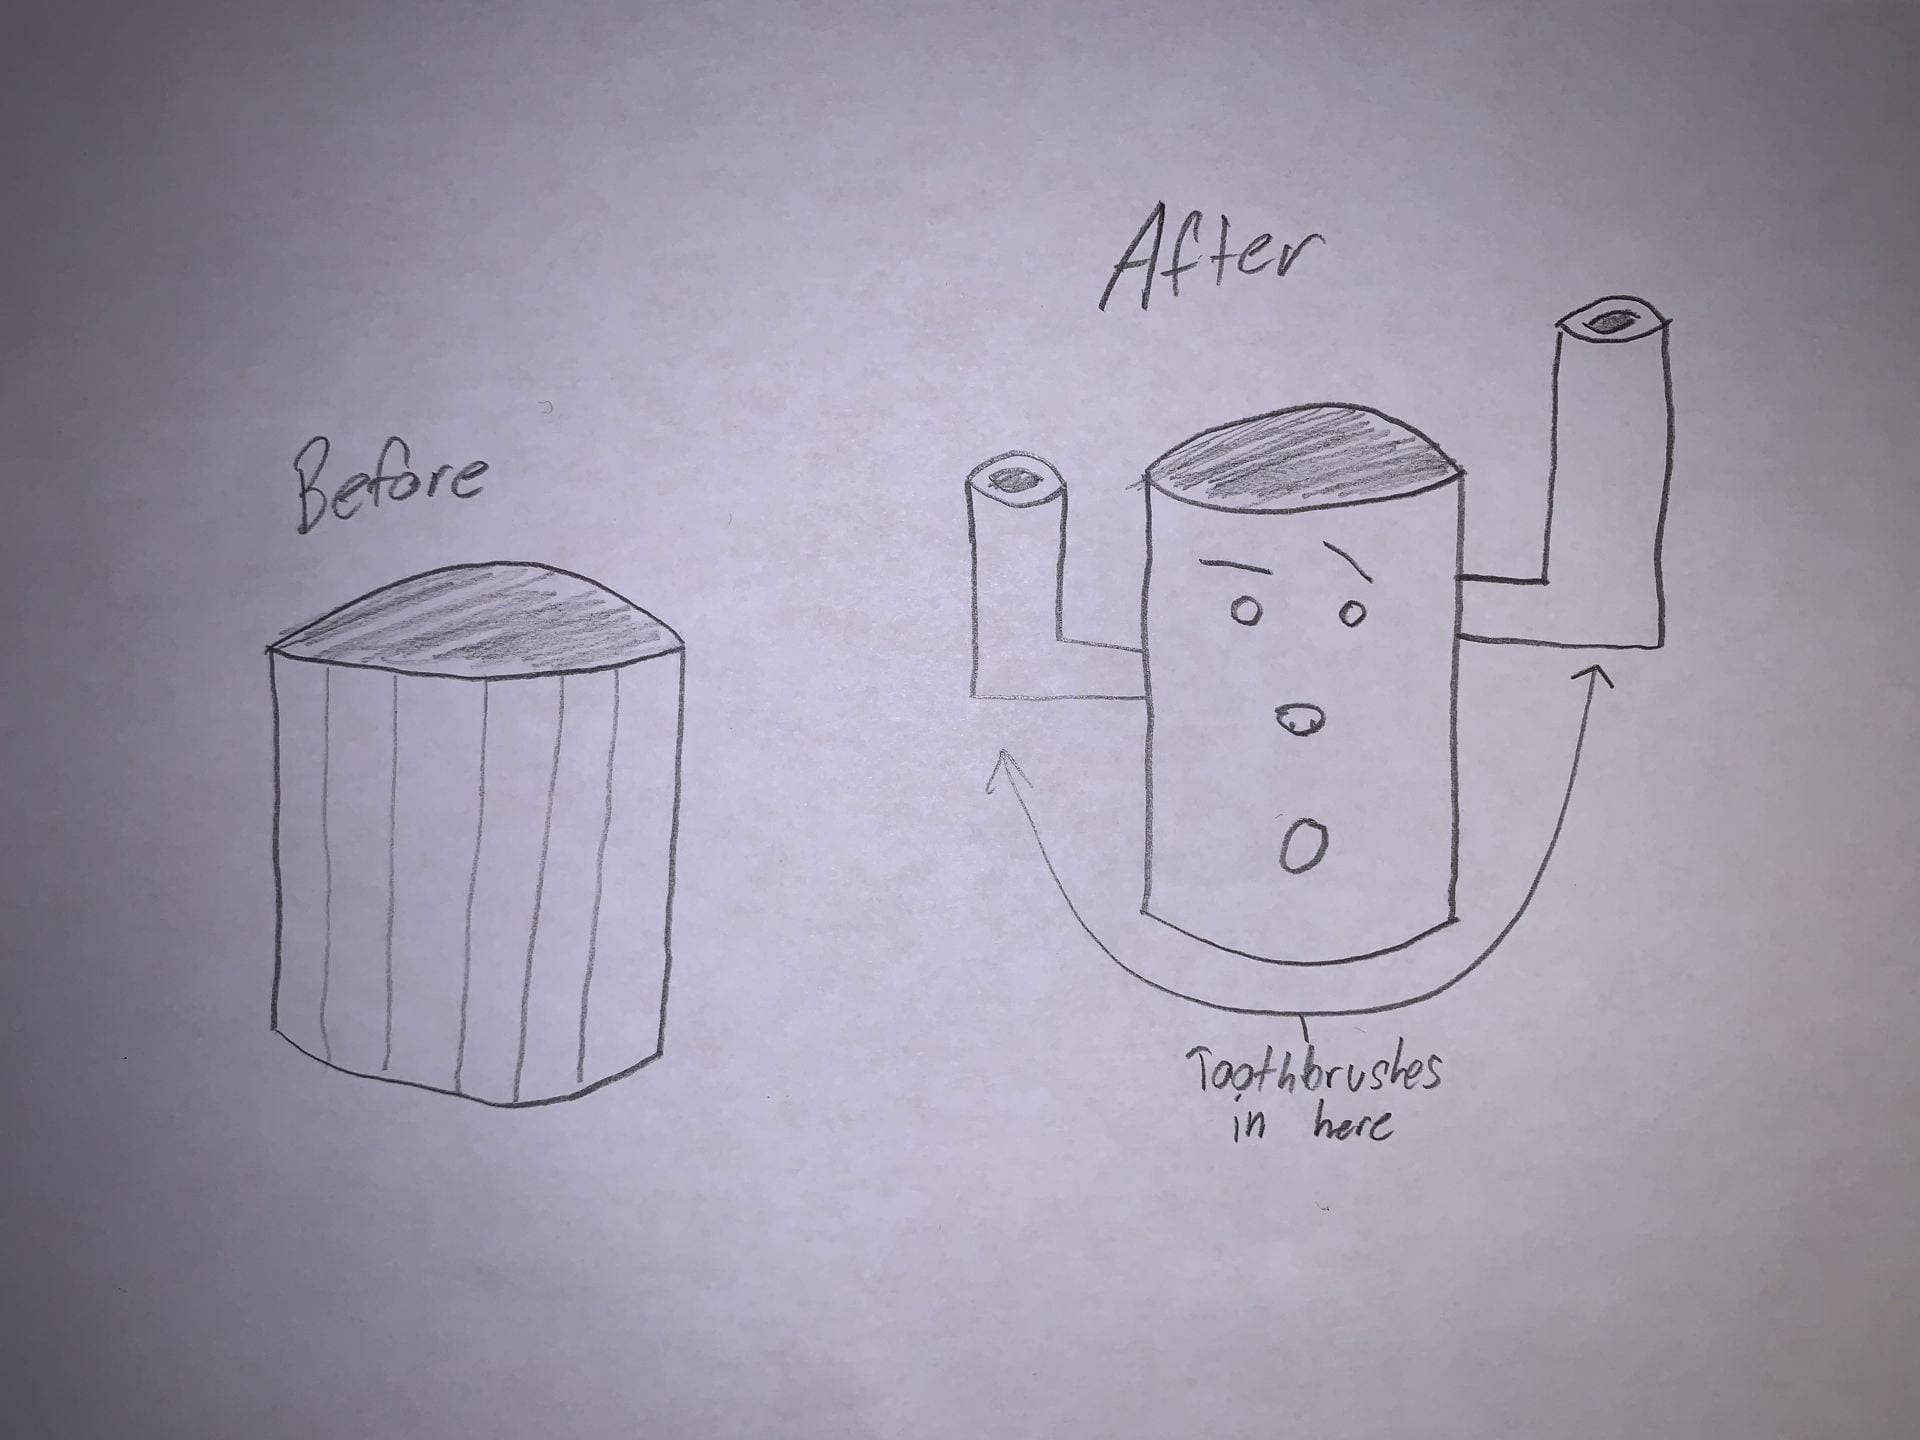
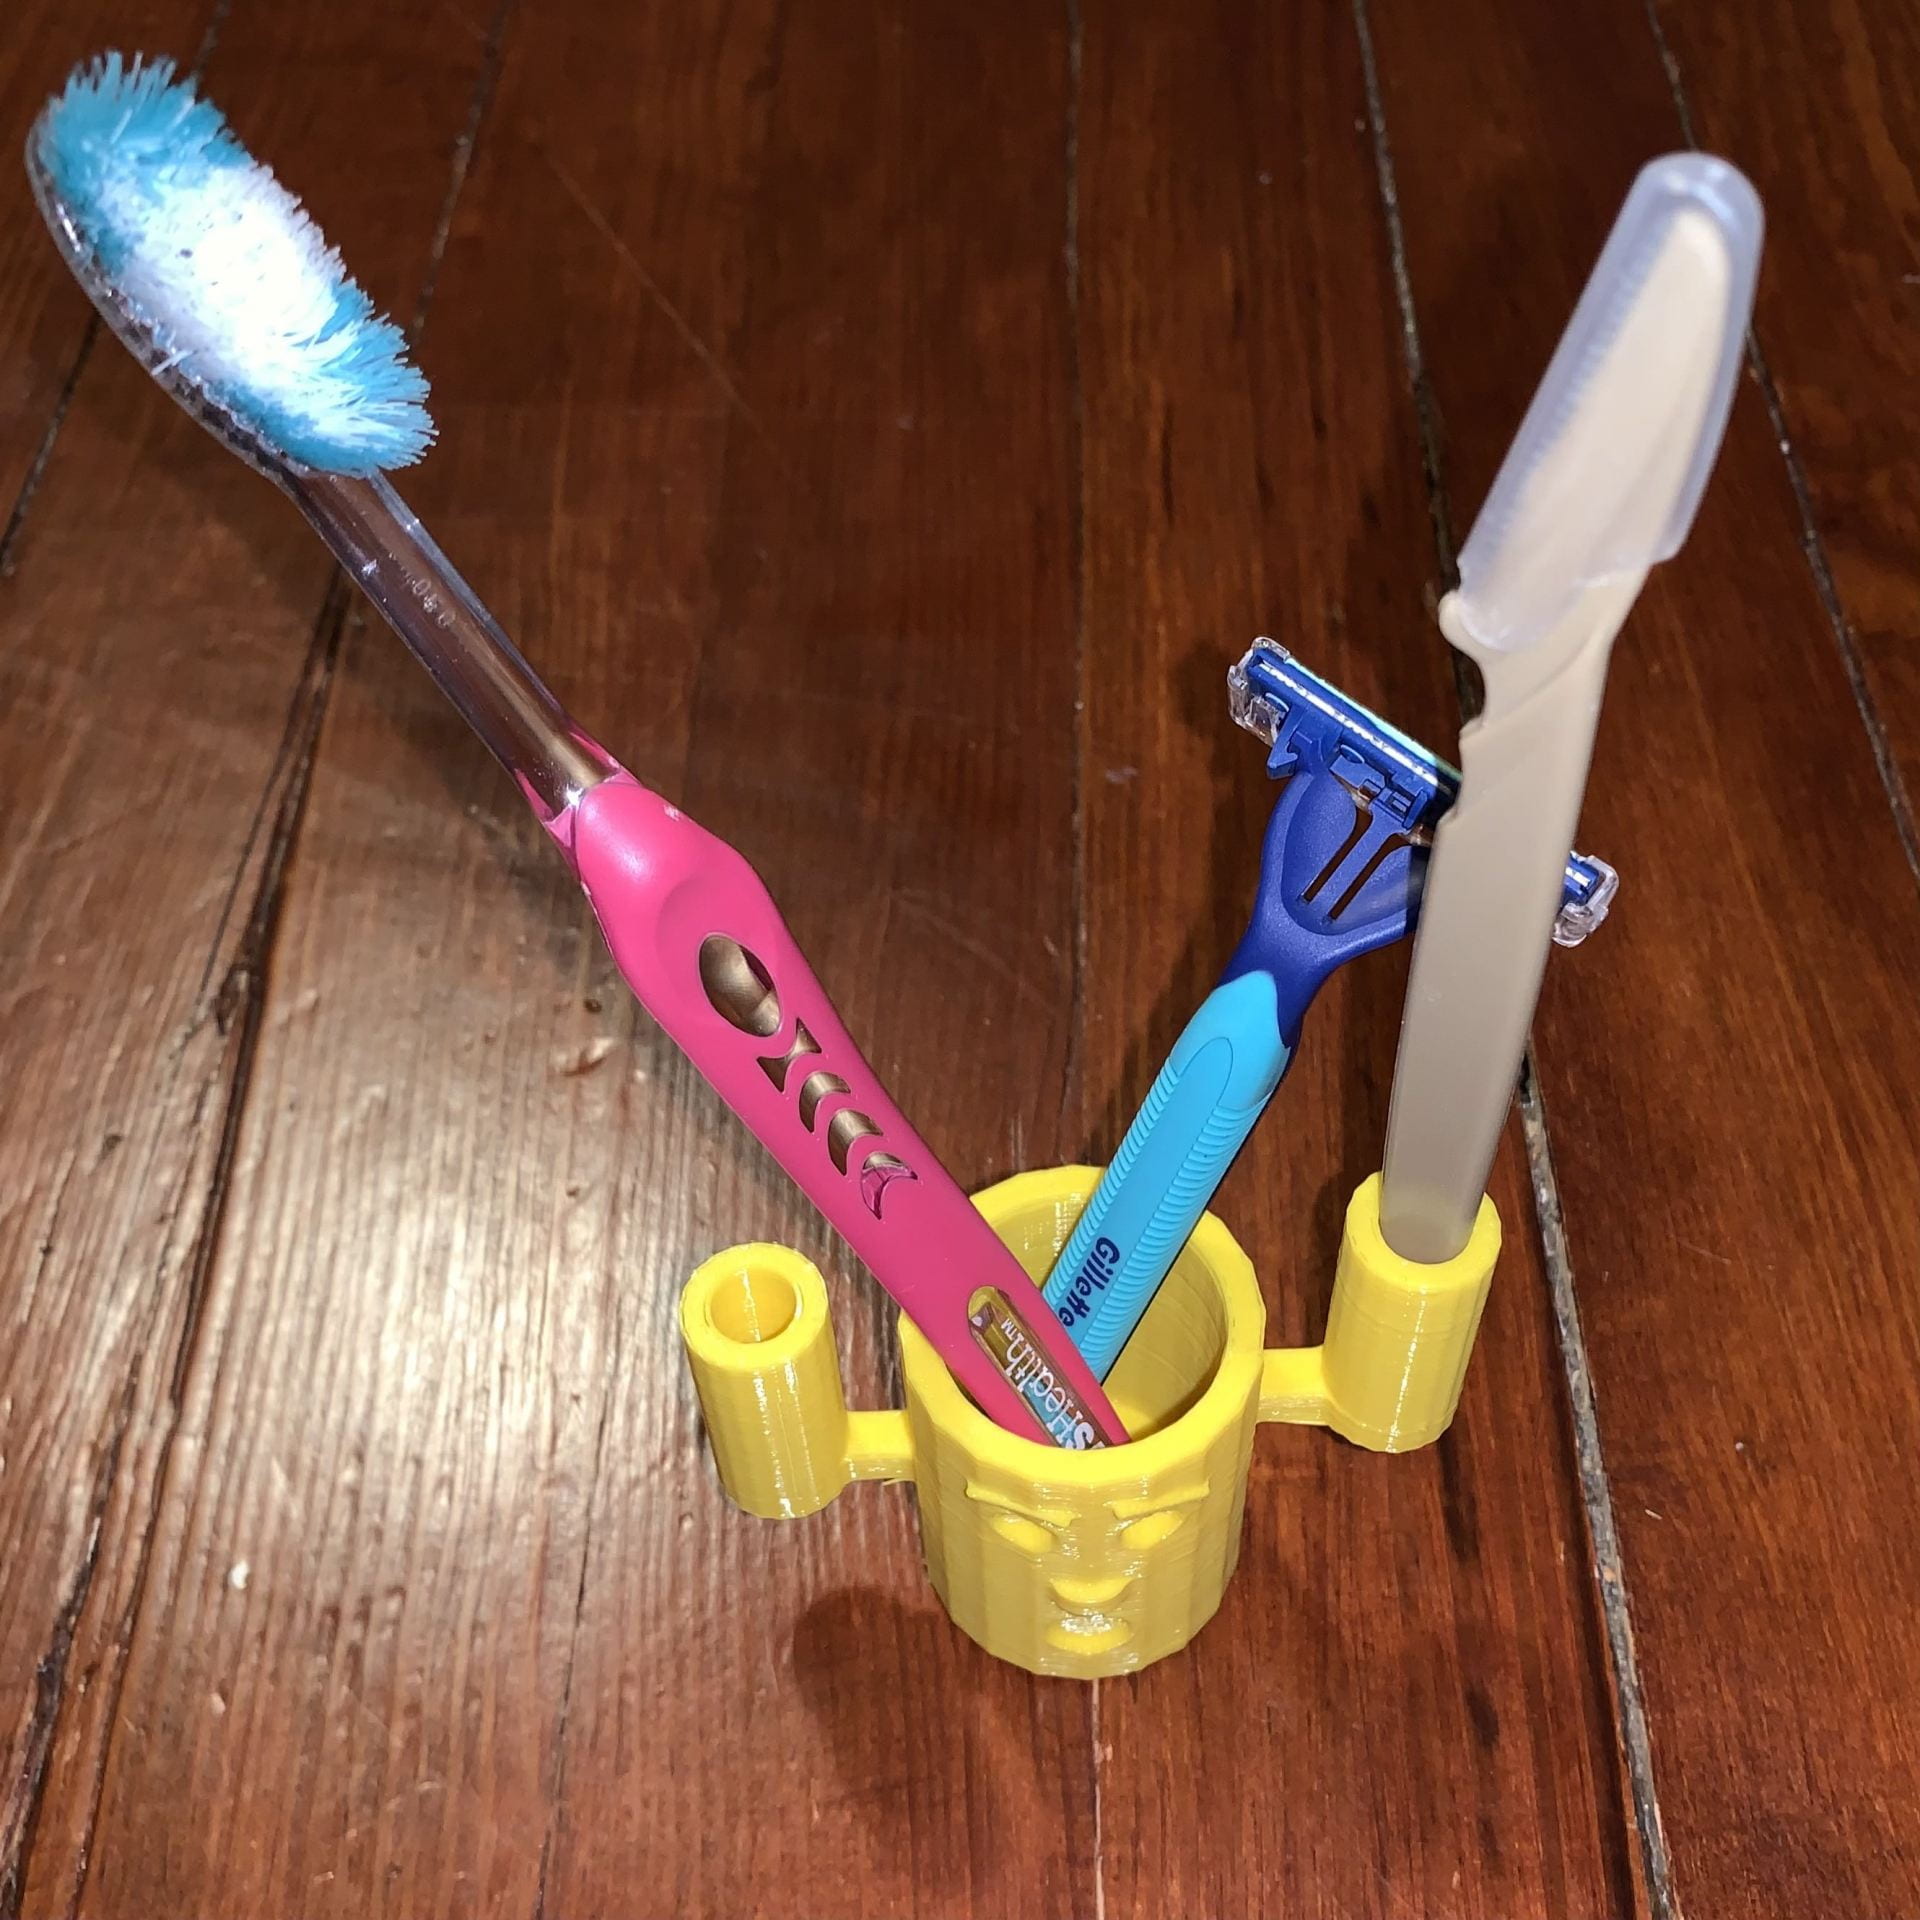
Most toothbrush holders are very basic looking. They’re either a big cup or a rectangle with a couple holes to separate toothbrushes. They could use more personality that could make it more playful such as incorporating the toothbrush into the design. Even turning the design of the holder into something like a cactus would make it more delightful to look at.
This leads directly into my concept; I wanted to design a toothbrush holder that would have different arms holding the toothbrushes. The inspiration for my design was a cactus I saw online, which inspired me to make two big and tall arms that would be just the right size for a toothbrush to stand up straight. Not only does this look whimsical, but it prevents the heads of toothbrushes from touching each other, making it functional as well. The center cup could either hold a tube of toothpaste or other things like eyebrow razors or normal razors. I also added a funny face to give it more personality.
Iterations
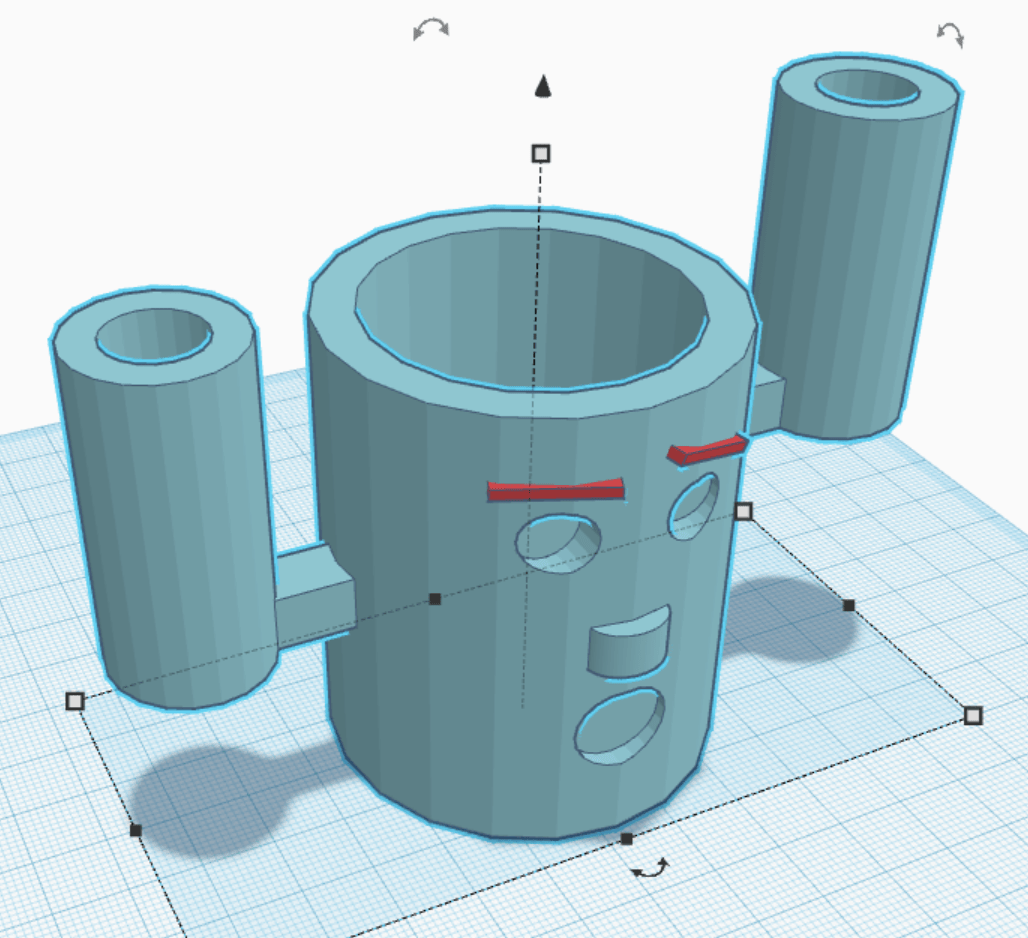
Below is the model I constructed on Tinkercad.
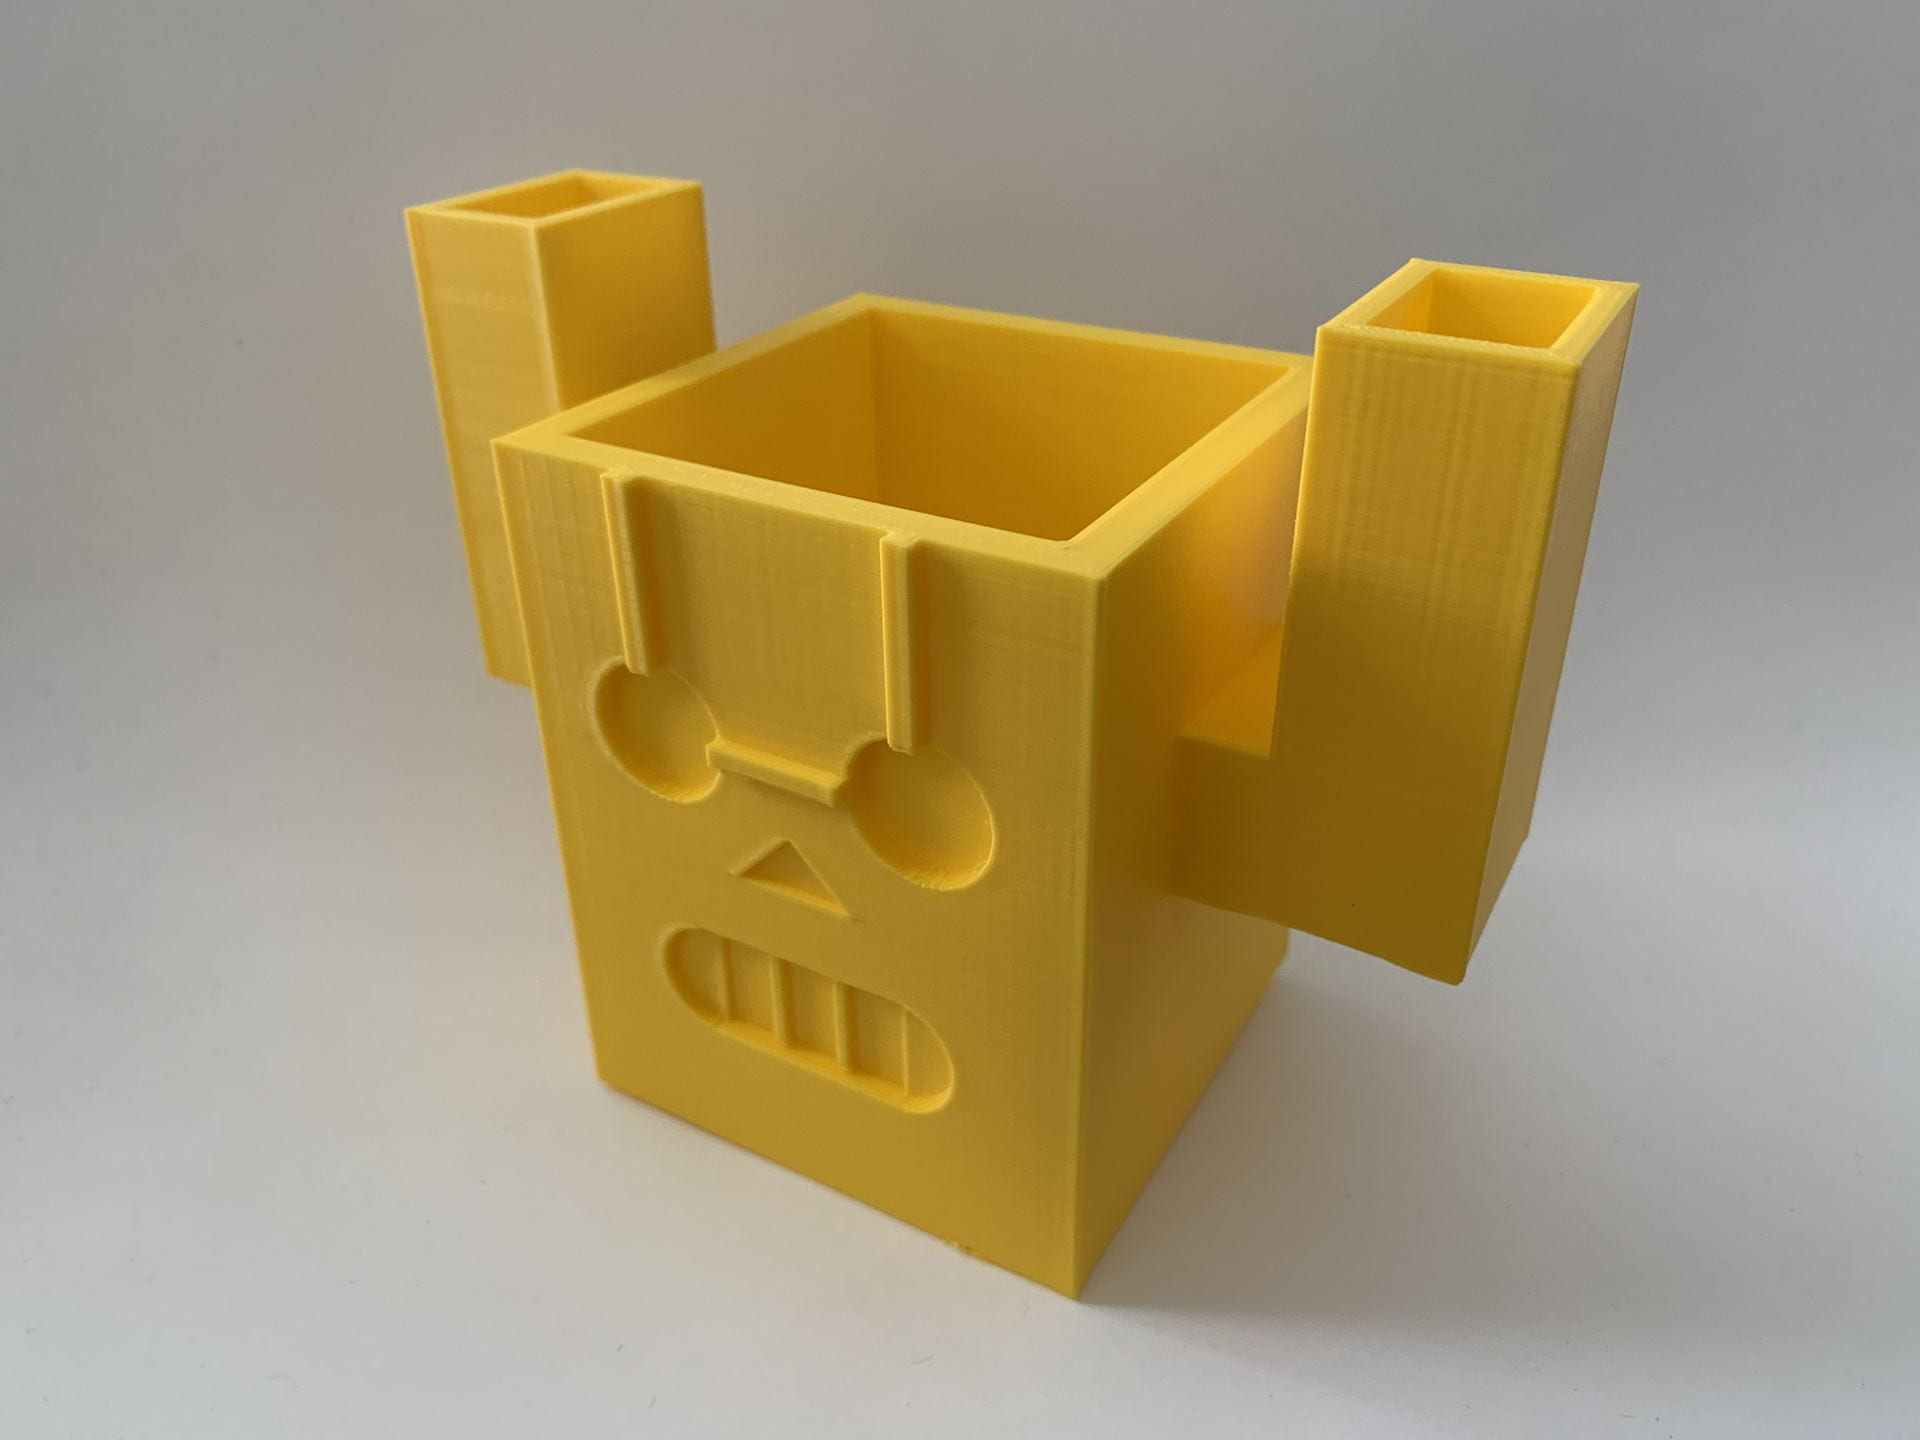
I used shapes for the nose and eyebrows. Holes were used for the arms, cup, mouth, and eyes.
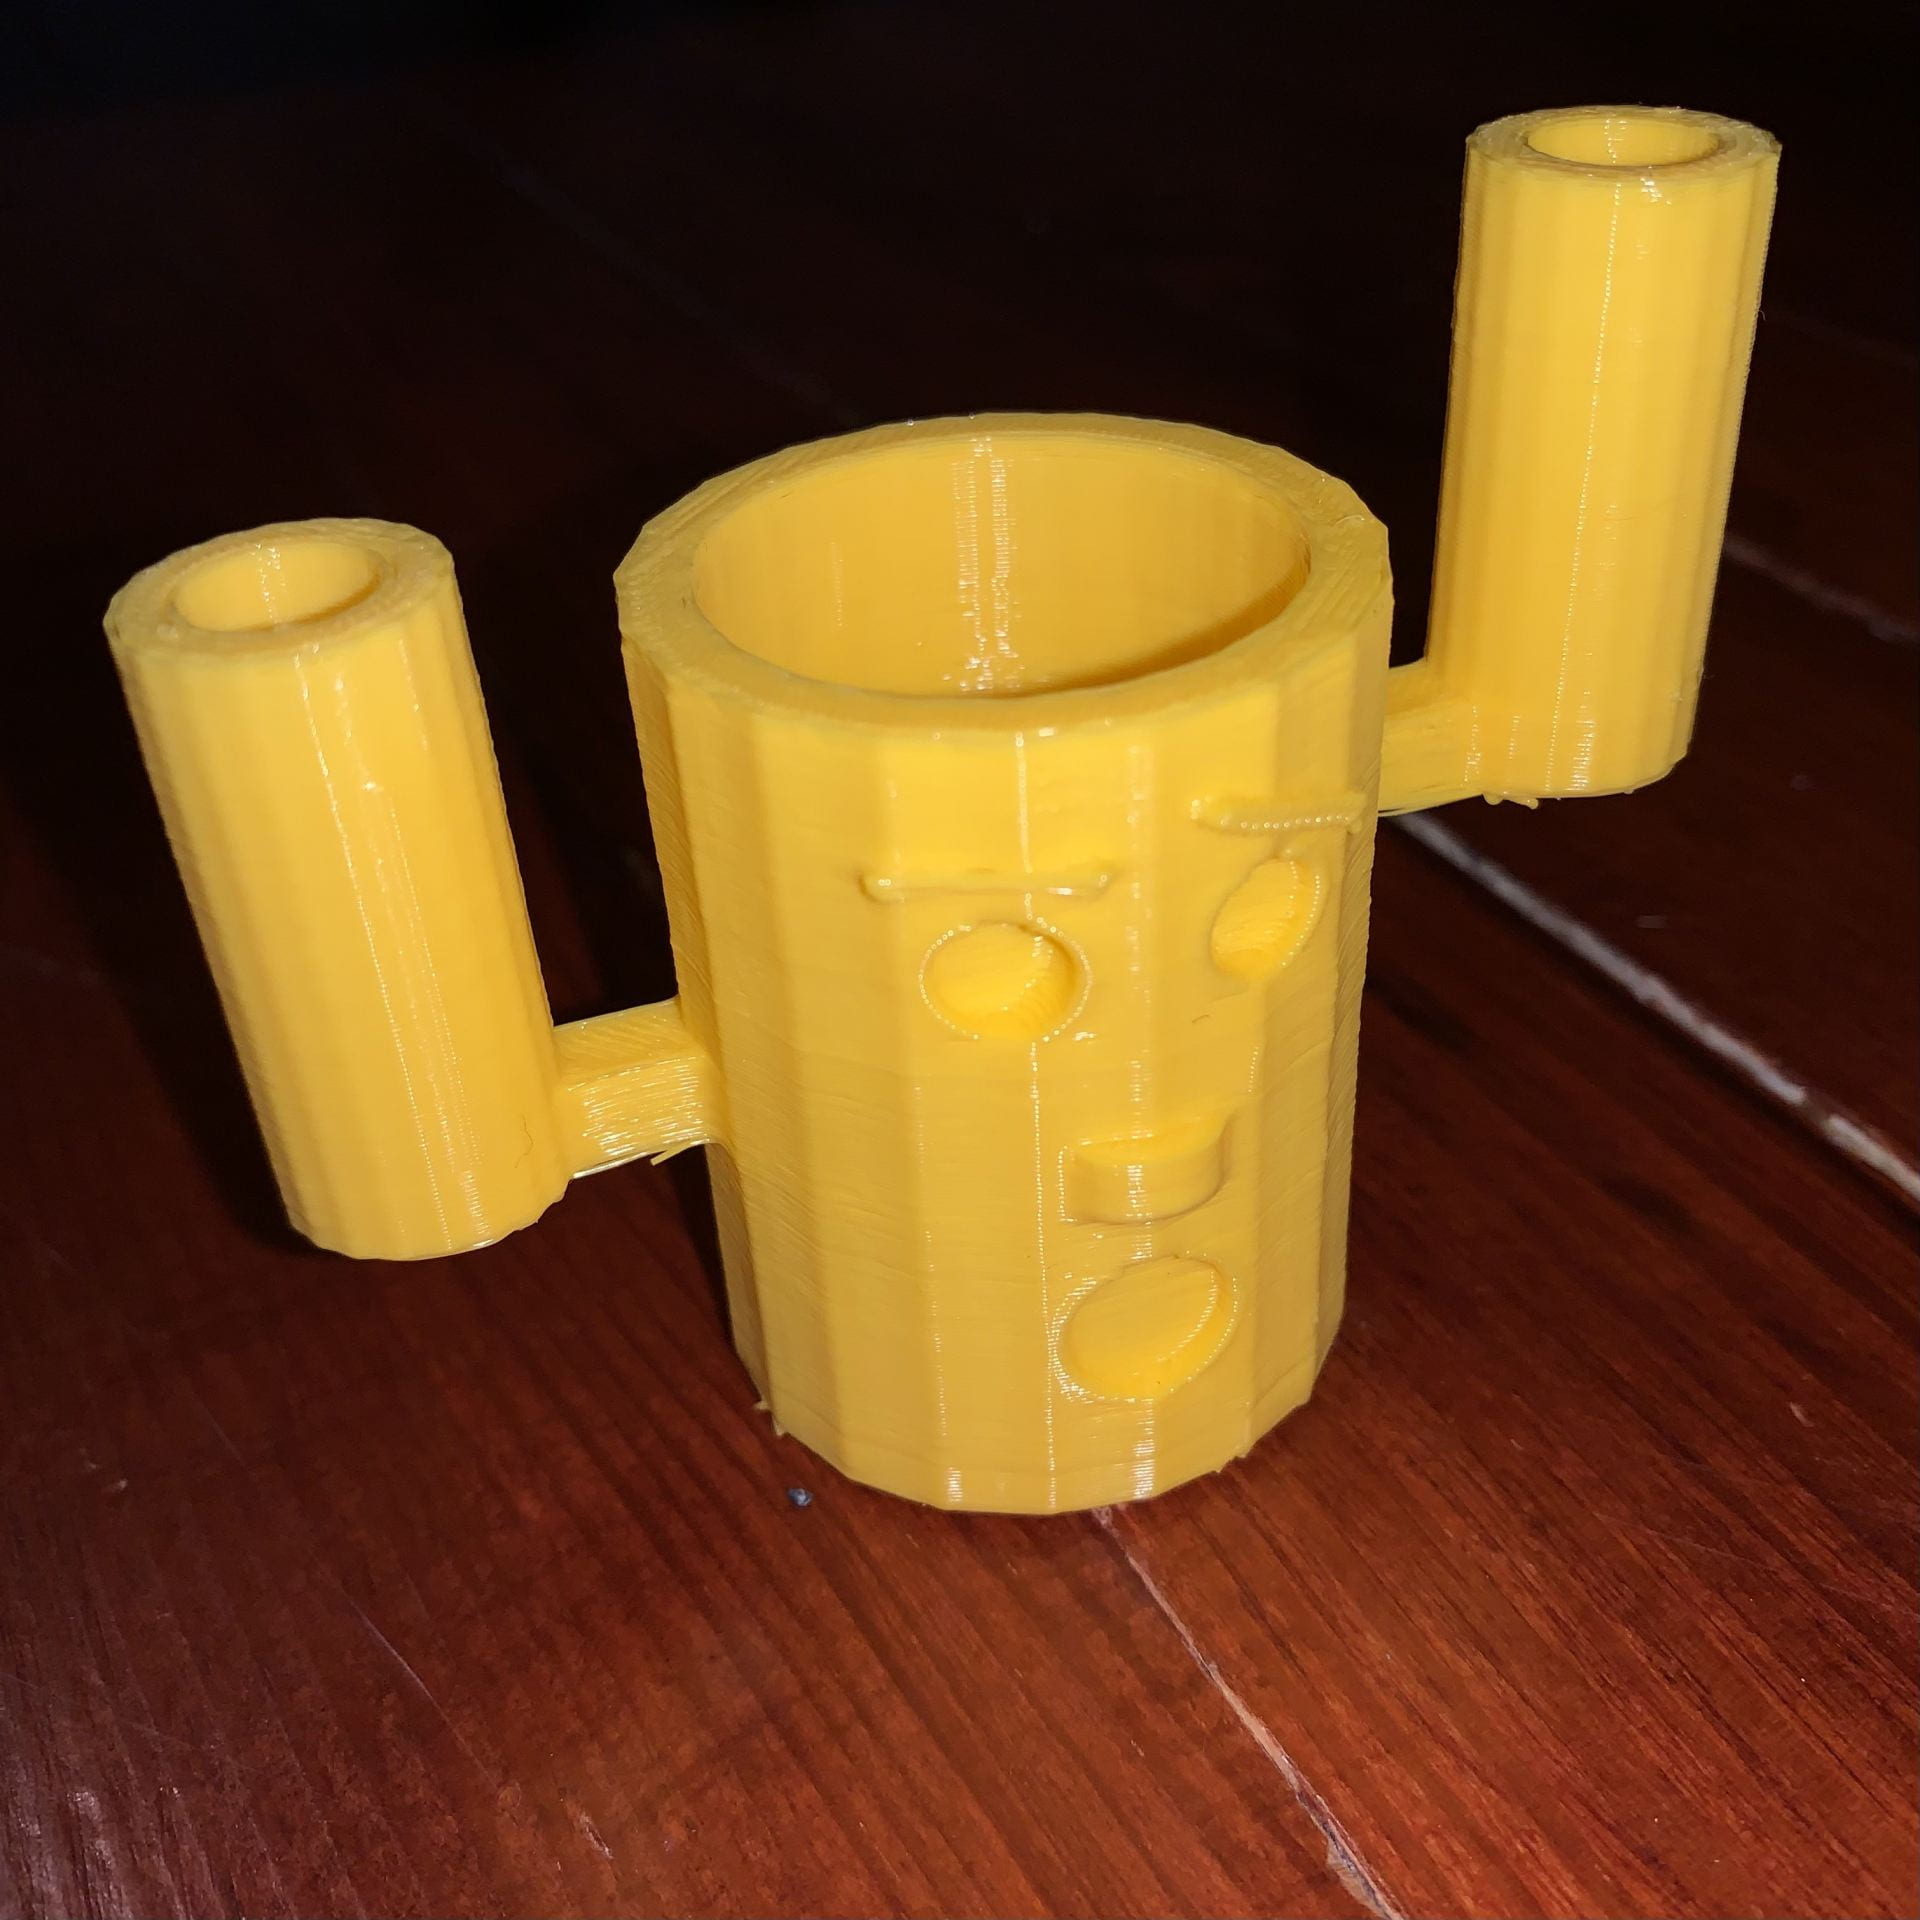
I tried to get my model as close to the concept sketch as I could. I was having a hard time with measurements and I miscalculated the scale of the object by a pretty decent margin. I tried to make a second print of the same model that was significantly larger and sturdier but something went wrong and the entire print was unrecognizable. Unfortunately I wasn’t able to get another one done in time.
I think I’m on the right track with this design. Like I stated before, I need to up the scale a good bit so that I can fit toothbrushes in their designated spots. I also need to make the arms connecting the toothbrush holders to the cup thicker and maybe even cylindrical because it doesn’t look so much like a cactus. It doesn’t help that it’s yellow. Otherwise, it’s still accomplishing the goal that a toothbrush holder is supposed to accomplish. I’m able to put the things I use regularly in it but it would be nice if I could put my toothpaste in the center with my toothbrush and maybe my razor in the arms.
Final Print and Reflection
My biggest problem prior to this print was my lack of direction. My previous attempt looked like a robot but was inspired by a cactus and it wasnt pretty. The last one was also tiny. I overcompensated in Tinkercad to the point where I had to scale the whole model down in Cura just to print it.
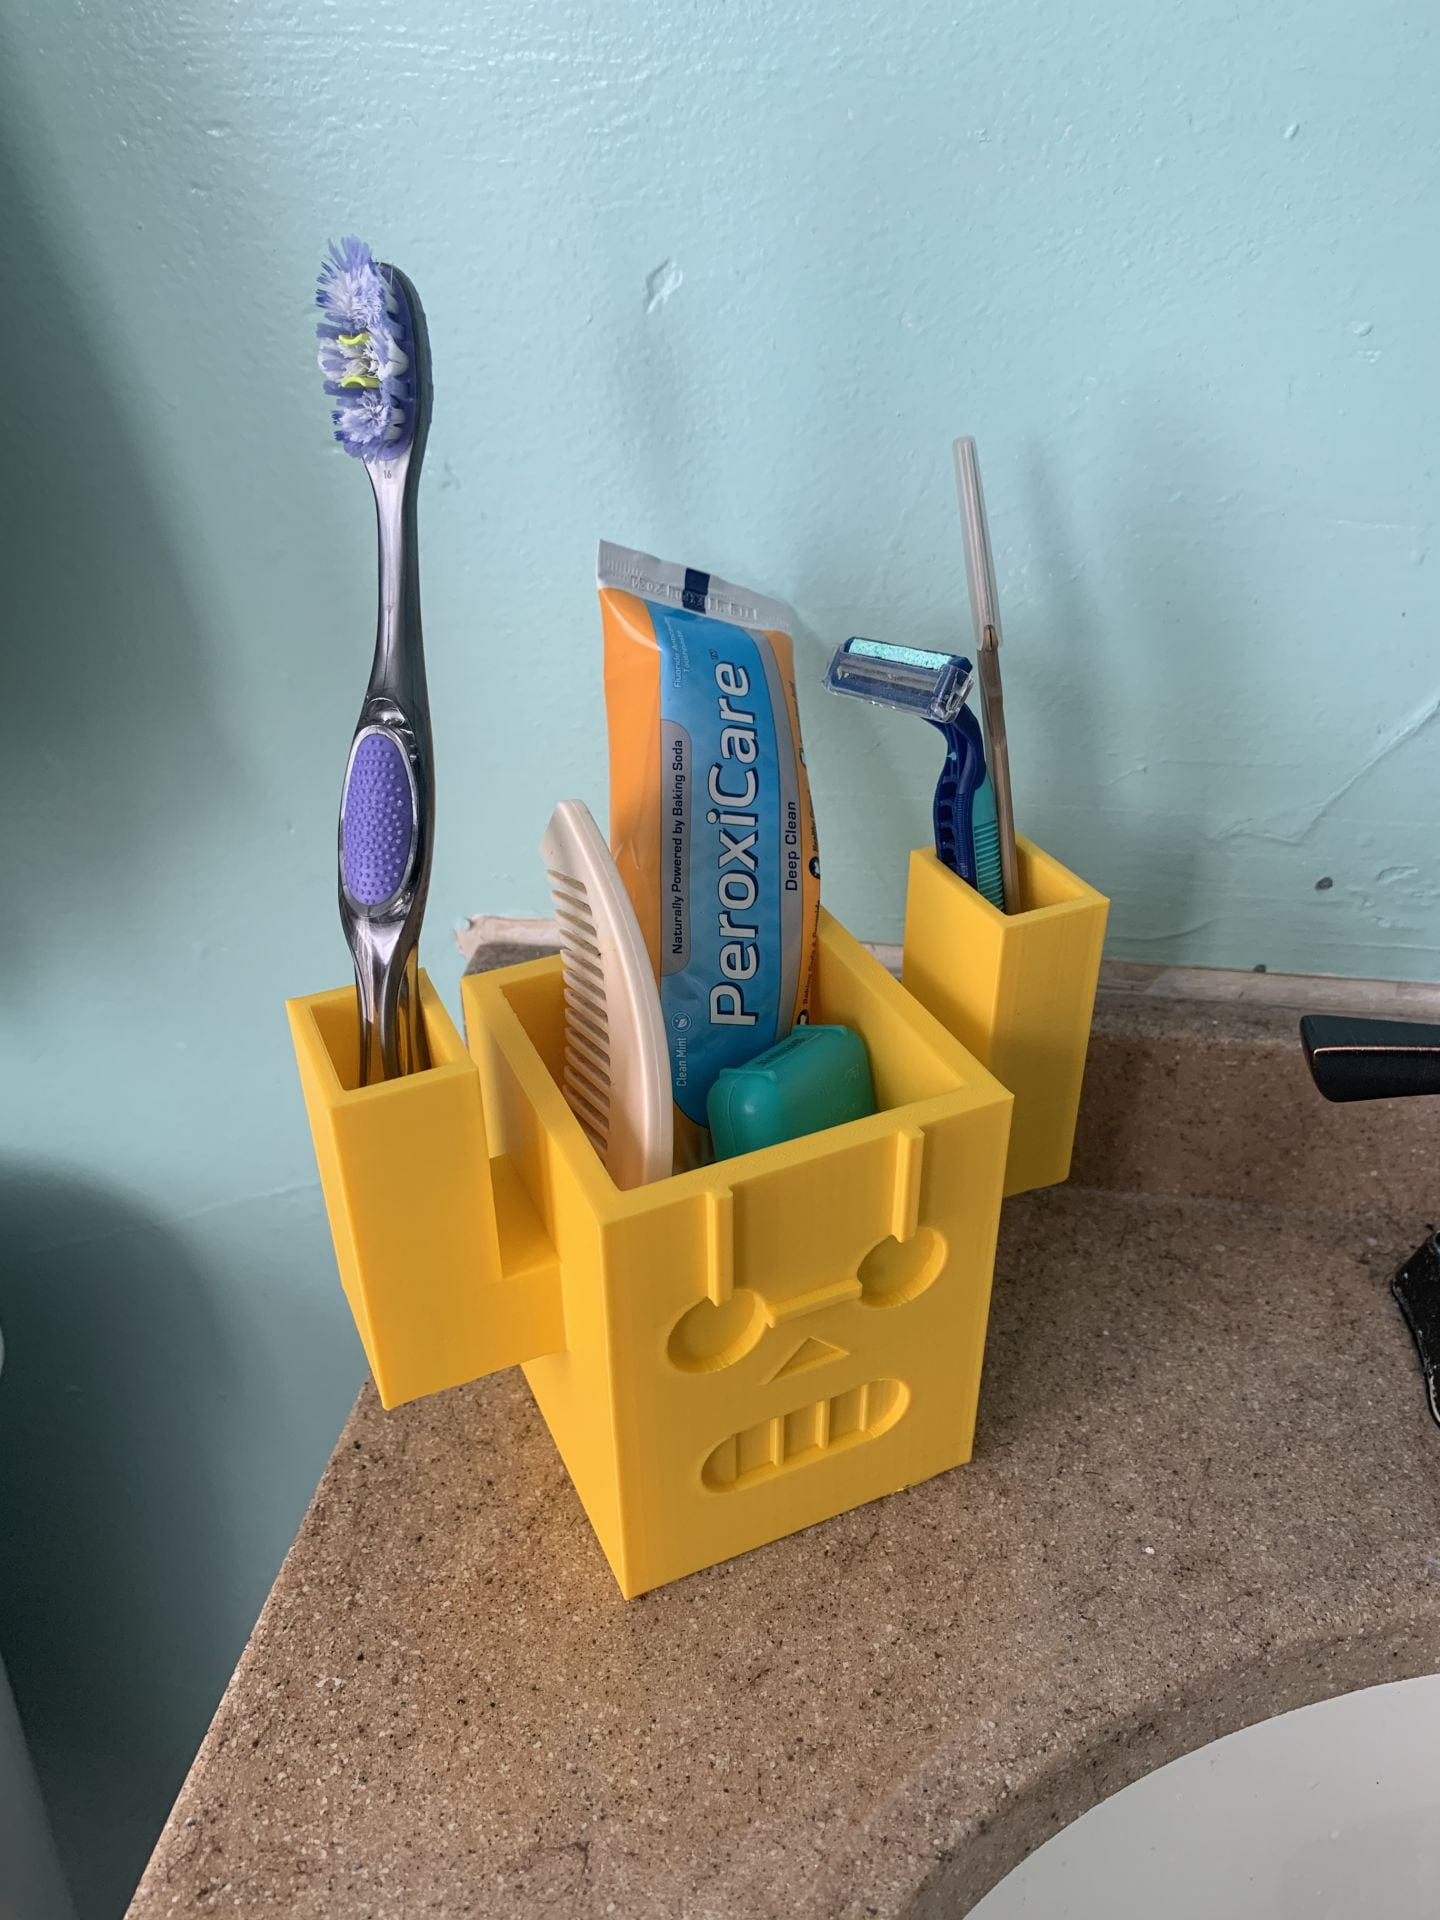
Thanks to feedback, I decided to make its teeth look more prominent and have the body and arms be squared off. It was a pretty decent struggle for me to make a toothbrush holder that looked like a robot. I didn’t want it to be too boring but I didn’t want it to be too detailed because the point is for it to be whimsical. I increased the size of it by a lot. Instead of the center hole being only for the toothpaste, I made it so that it would fit multiple things. If I didn’t live in a house with four other people, I would probably use this to hold my stuff; it’s pretty convenient.
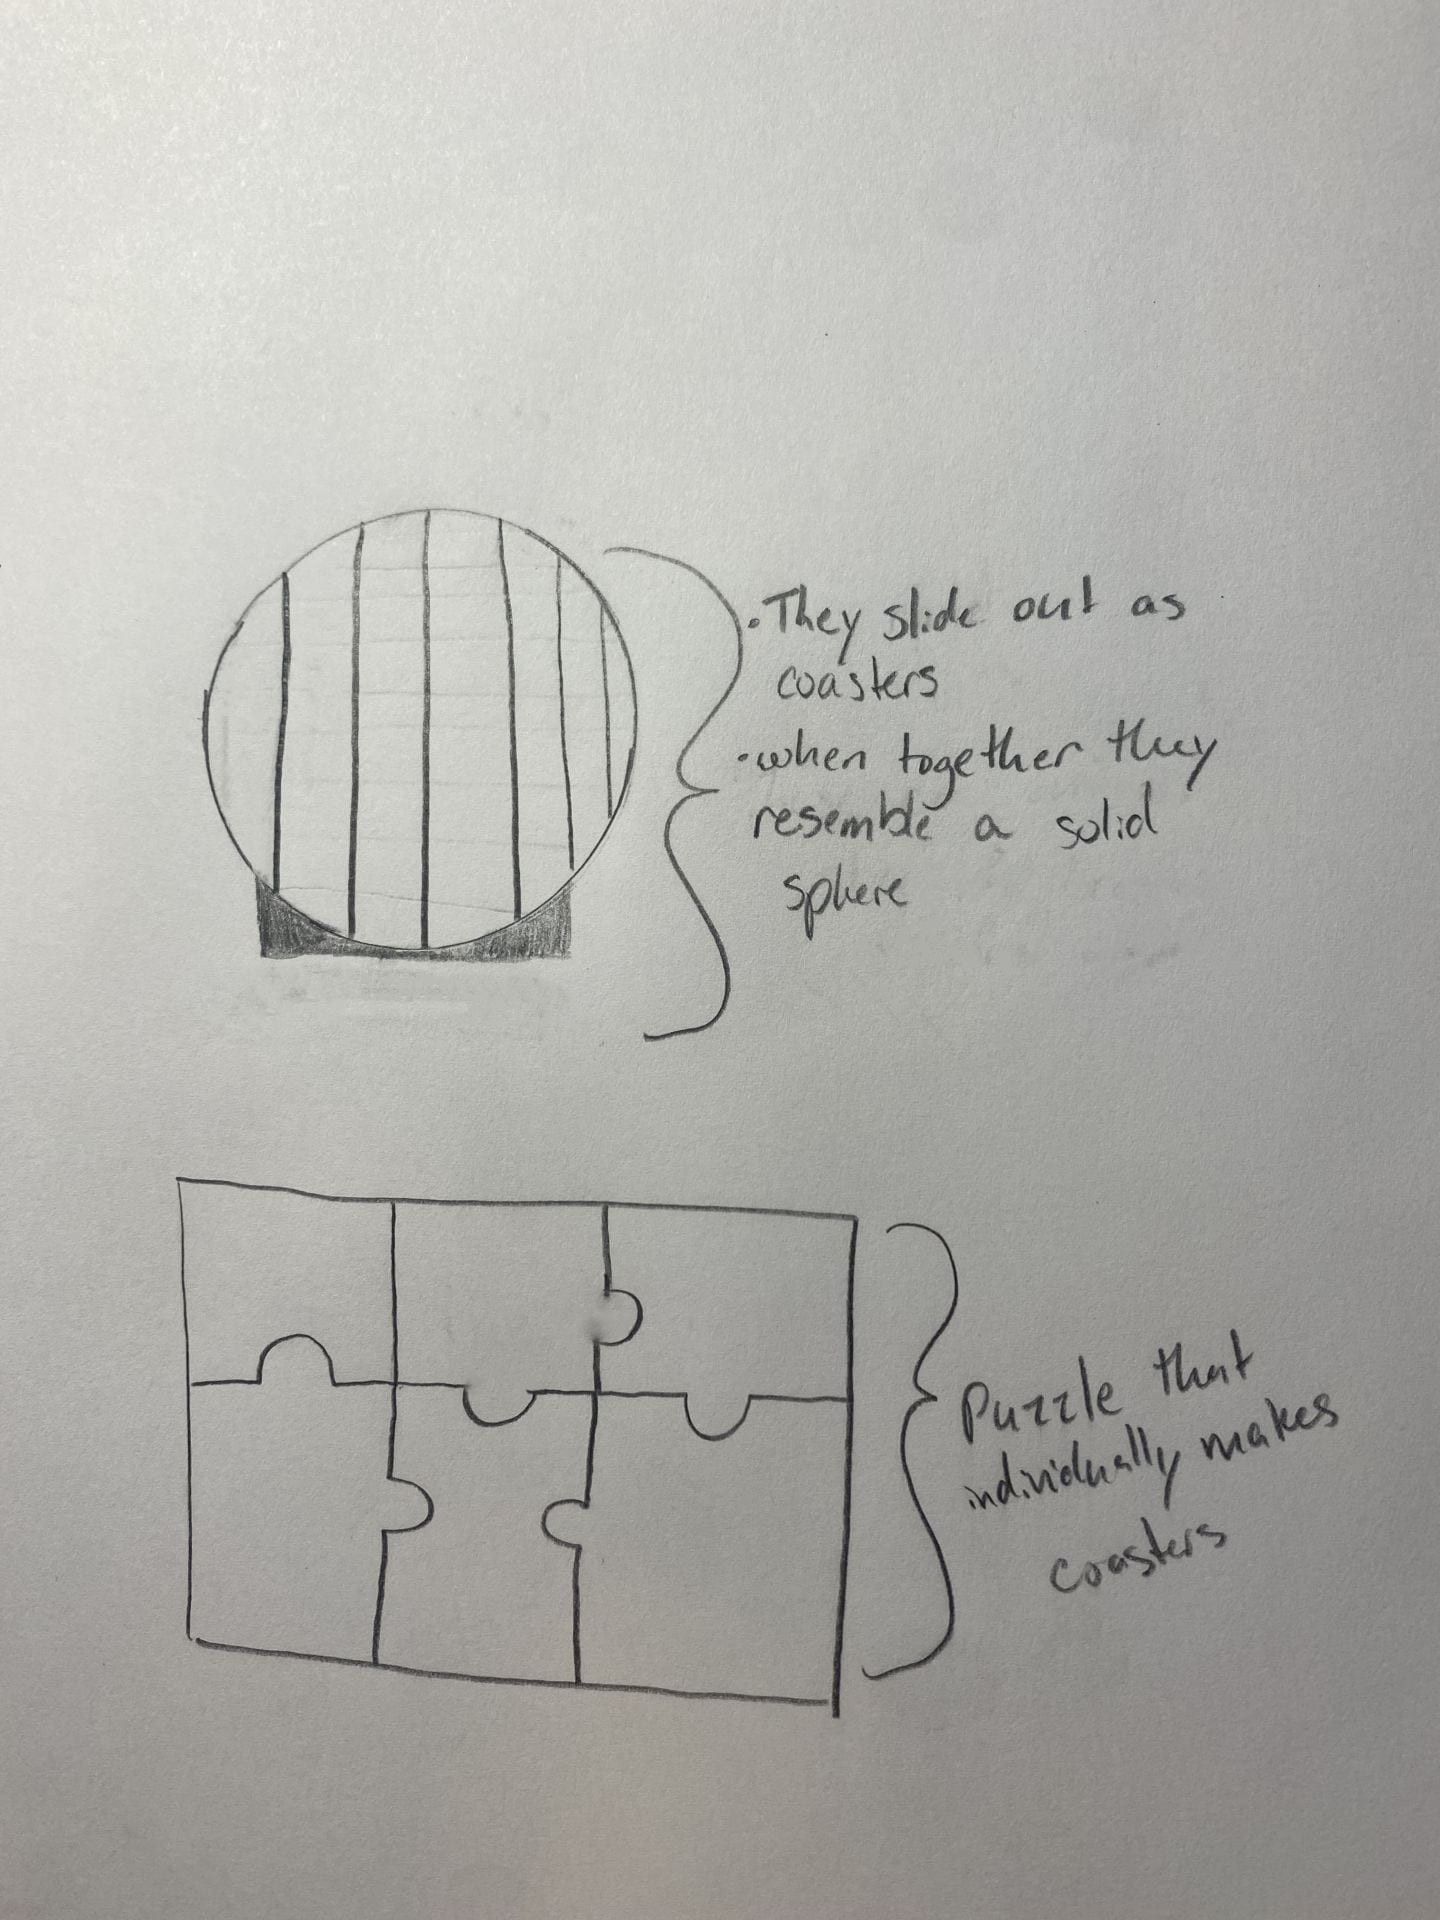
While trying to think of an object to make more playful while still adding to its functionality, I had a bit of a hard time thinking of something until I started thinking about basic, boring items that one may have around their house. Then the idea struck me to do coasters! Typically coasters tend to be pretty boring and simple, like the coasters pictured above from Wayfair. In order to spice up the design a little bit, I decided to turn the coasters into a different shape and make them fit together seamlessly so they look cool when not in use too.
Pictured above are two of the sketches I came up with for redesigning coasters. When trying to figure out how to make it more whimsical I came up with two different base designs of a sphere and puzzle.
The sphere will turn the coasters on their side like slides and fit together to make a perfect ball with little to no gaps. This will add a slight playful aspect to the design while keeping its functionality. As for the look of the sphere as a whole, I am still debating between turning it into a globe or leaving it as a plain sphere.
As for the puzzle design, the coasters will come together to create an image or phrase that guests can smirk at when reaching for a coaster or play with to finish the puzzle. This will add that slight playfulness act that maintains the functionality of the object.
Iterations:
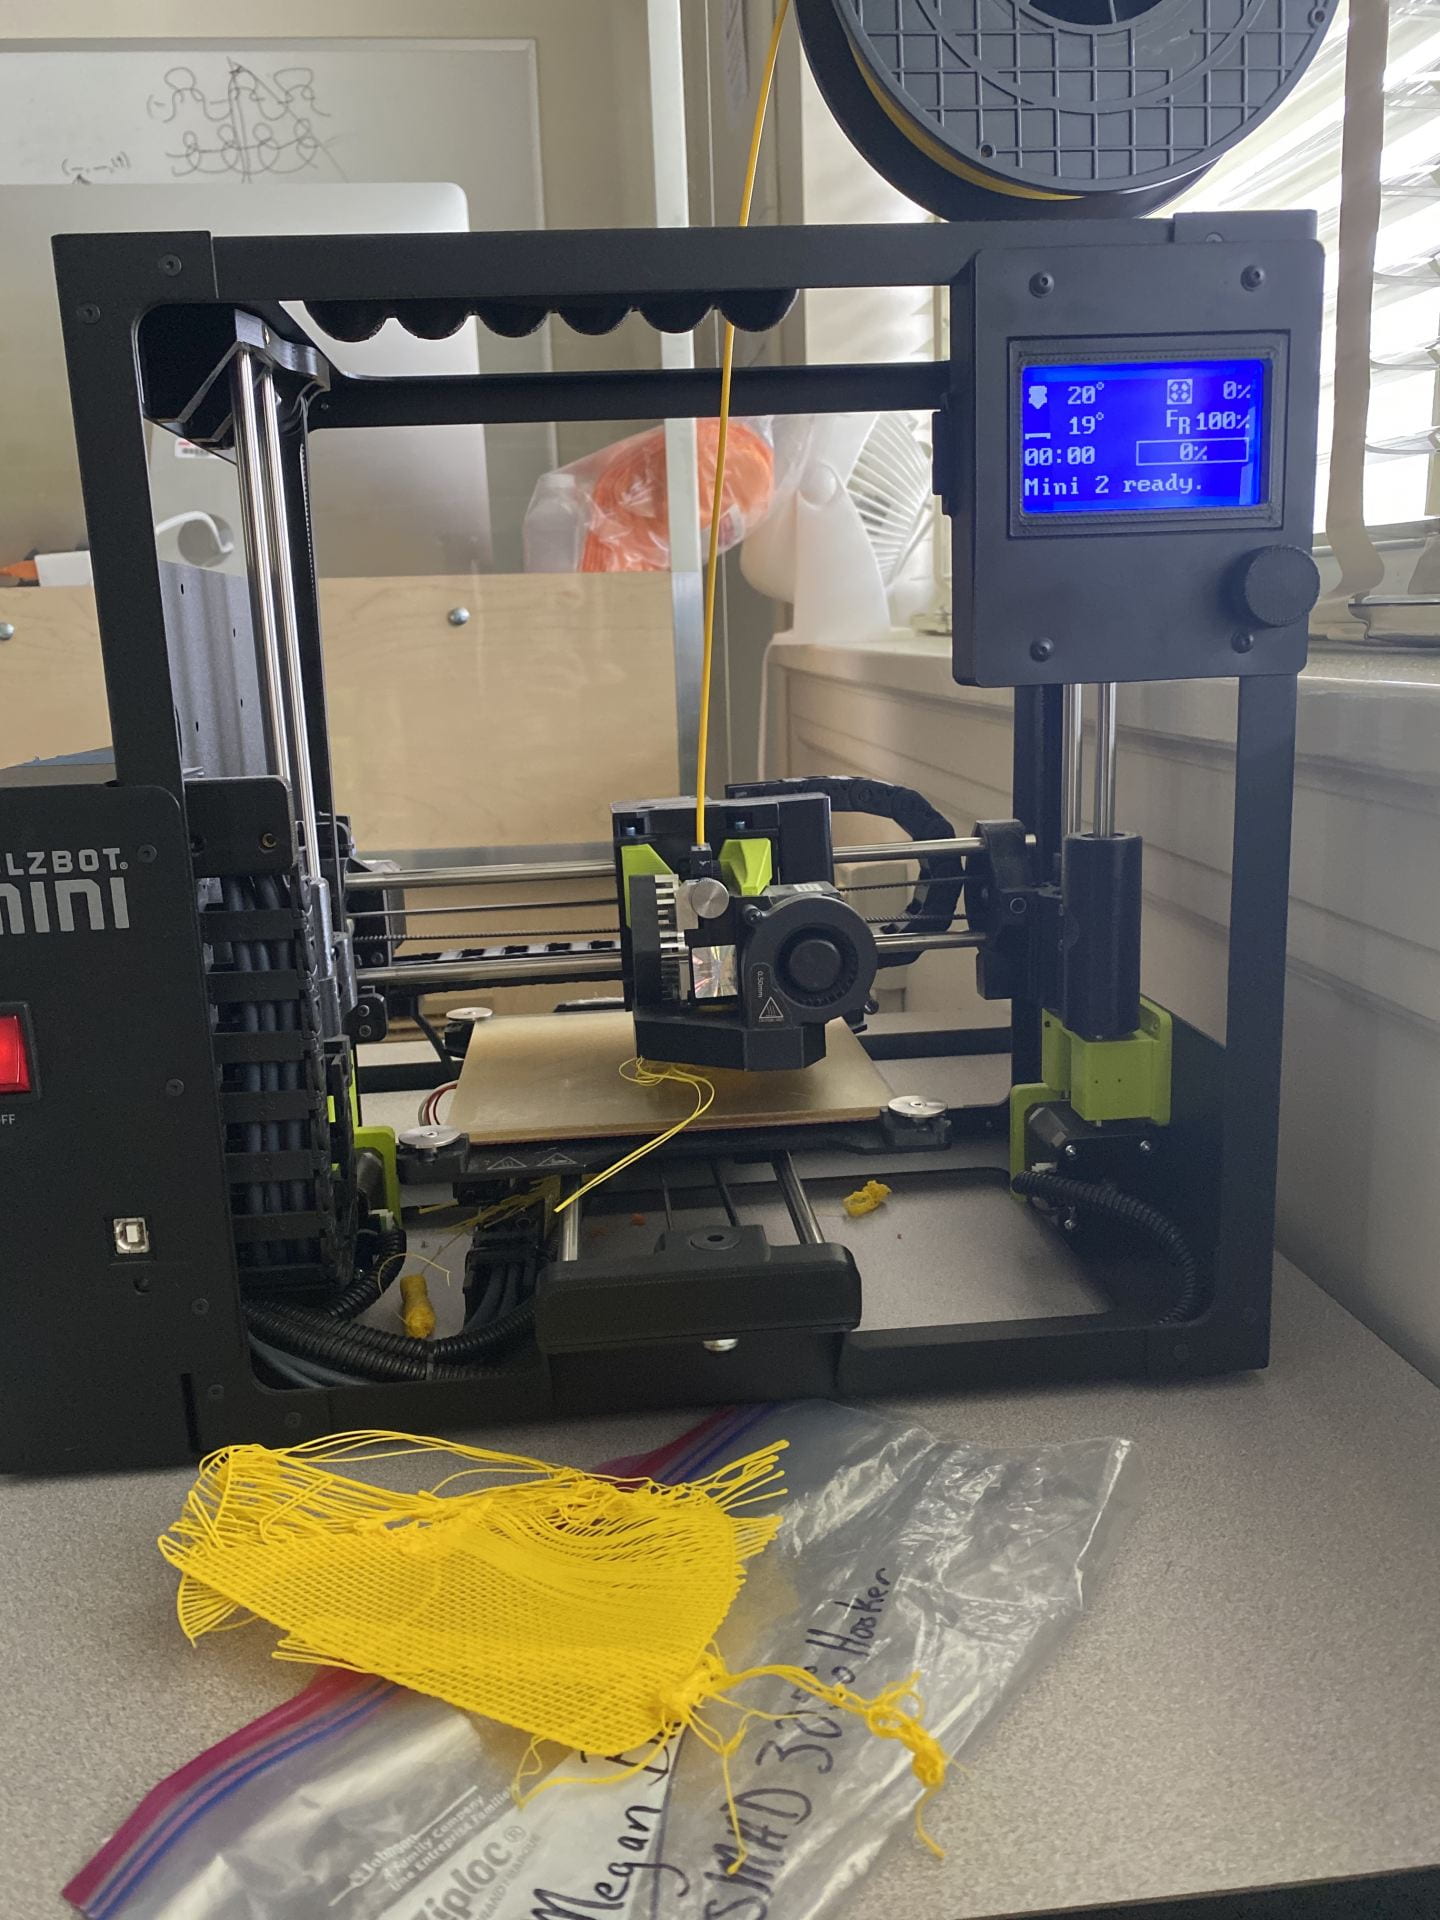
After reviewing the original drawings of my designs, I decided that I would make the puzzle my final self-expression print. While examining the design and the dimensions of a typical coaster, I soon realized that if I were to make every coaster a piece of a puzzle, as I had originally planned, it would be too big to be a functional puzzle. Instead, I decided to make each individual coaster a puzzle of its own. Not only did this help add more of a playful touch to the object, but it made it an overall better product.
To make the design come to life, I ended up using a mixture of the apps Shapr3D and TinkerCad. I found both of these apps useful in their own ways. Shapr3D was helpful initially in designing the base of the puzzle, but TinkerCad proved useful later on as I began making additional iterations.
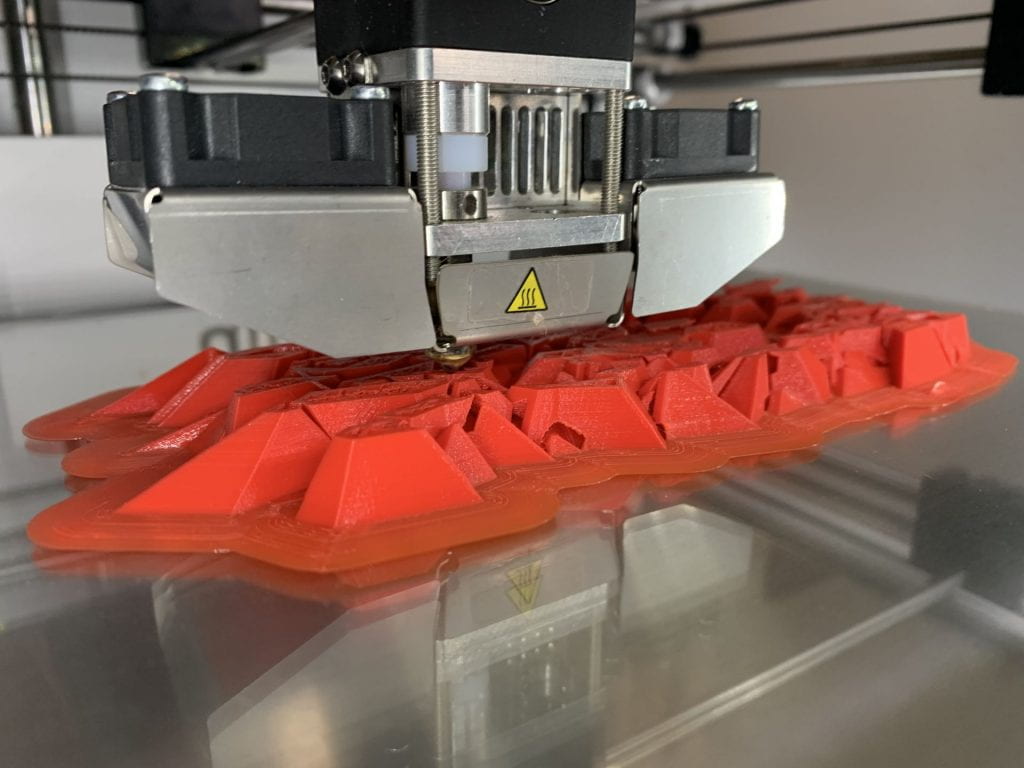
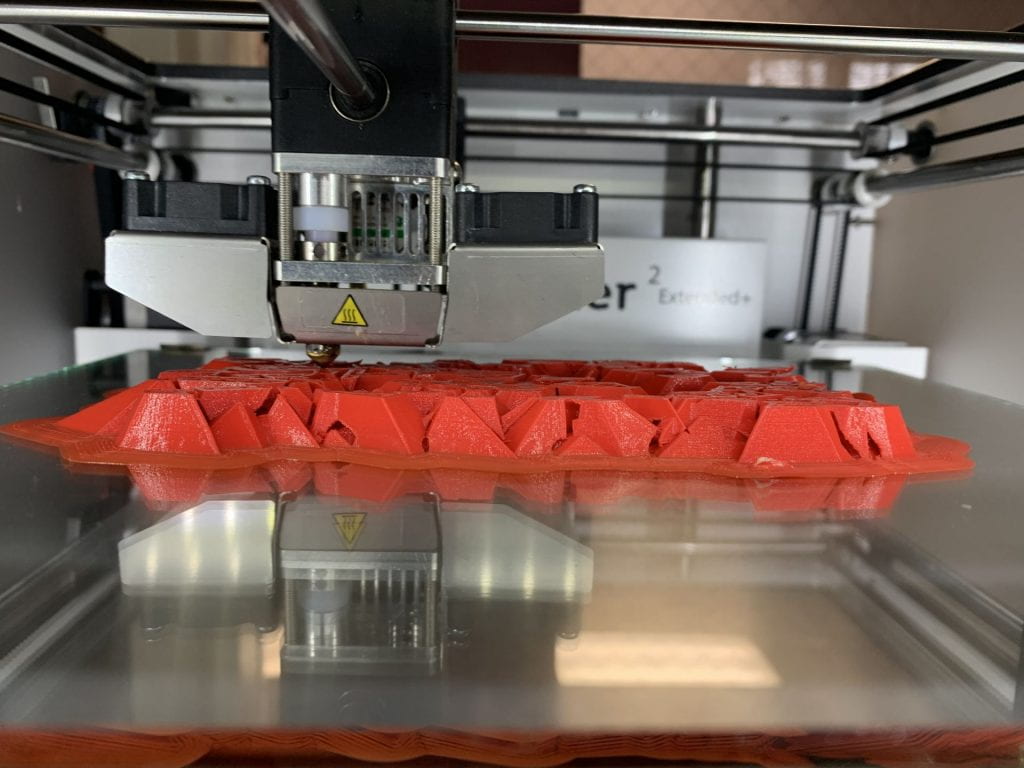
After attempting to print my design the first time and witnessing the disaster pictured above, I quickly learned that I needed to print the design without a raft and change the dimensions. I changed the coaster from six by six inches to four by four inches and I increased the height from one millimeter to two and a half millimeters. This made the puzzle print smoother and sturdier. I also made the decision to switch from the Ultimaker Cura Lulzbot mini to an Ultimaker Cura 3, which seemed to make the printing process flow a lot better as well. While tweaking my design I also decided to add JMU| SMAD to the coaster to make it more like a real puzzle with a design on it.
Pictured above is my final print for right now, while there are still a few adjustments I would like to make the model still came out well. A few things I would change would be making the design of JMU|SMAD more prominent and deeper into the coaster since the JMU section didn’t print and the SMAD portion isn’t that noticeable. I would also make the puzzle pieces more compact by changing the arms of the puzzle pieces to be more of a tear-drop shape instead of a circular shape.
Overall, I would say that this was a project that really challenged me. It taught me a lot about incorporating playfulness into everyday objects and puzzle making, as well as that not everything that seems simple to design will be simple to produce.
Final Print:
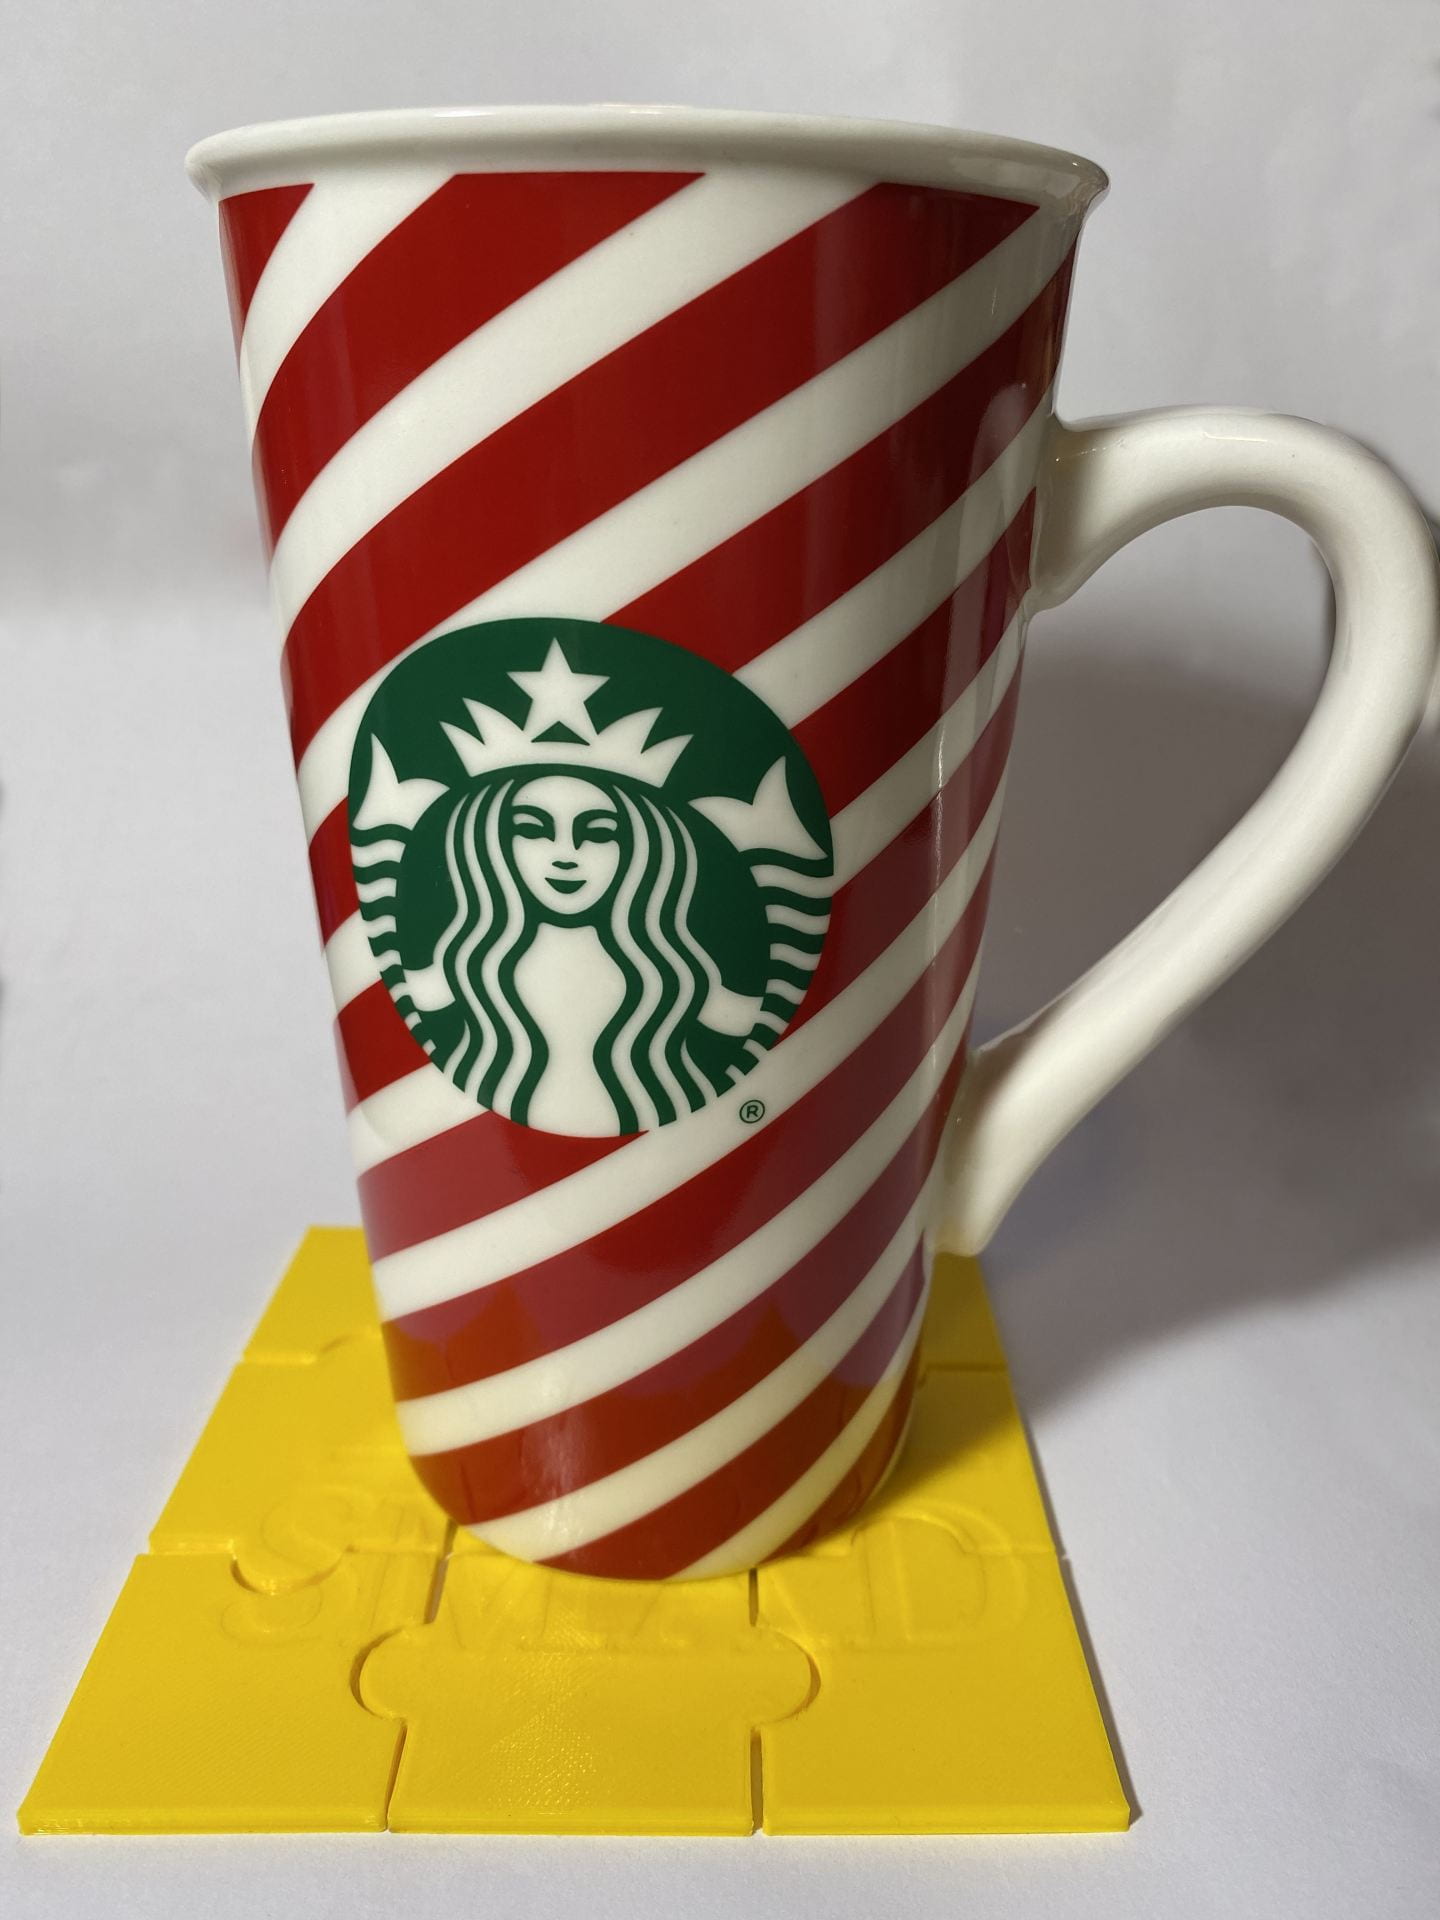
After reflecting on feedback from my peers I decided to go with my original idea of making the puzzle pieces into individual coasters, instead of making the coasters into puzzle pieces. To make this switch I ended up having to change the dimensions of each puzzle piece to 19.05 mm tall, 122.6 mm long, and 127 mm wide and then print each piece separately. While this was more time-consuming it ended up creating a more functional and playful final print.
Upon changing the dimensions of the model I ended up making other adjustments that some peers had suggested from my original model to make the final print better. Some of those adjustments included changing the holes and knobs of the puzzle pieces so that they would fit together better and making the letters more prominent in the print by embedding them deeper into the model.
Overall, this final print doesn’t have any problems or other adjustments to be made. All of the pieces fit together pretty well and work as both a functioning puzzle and coasters which is why it is my final print.
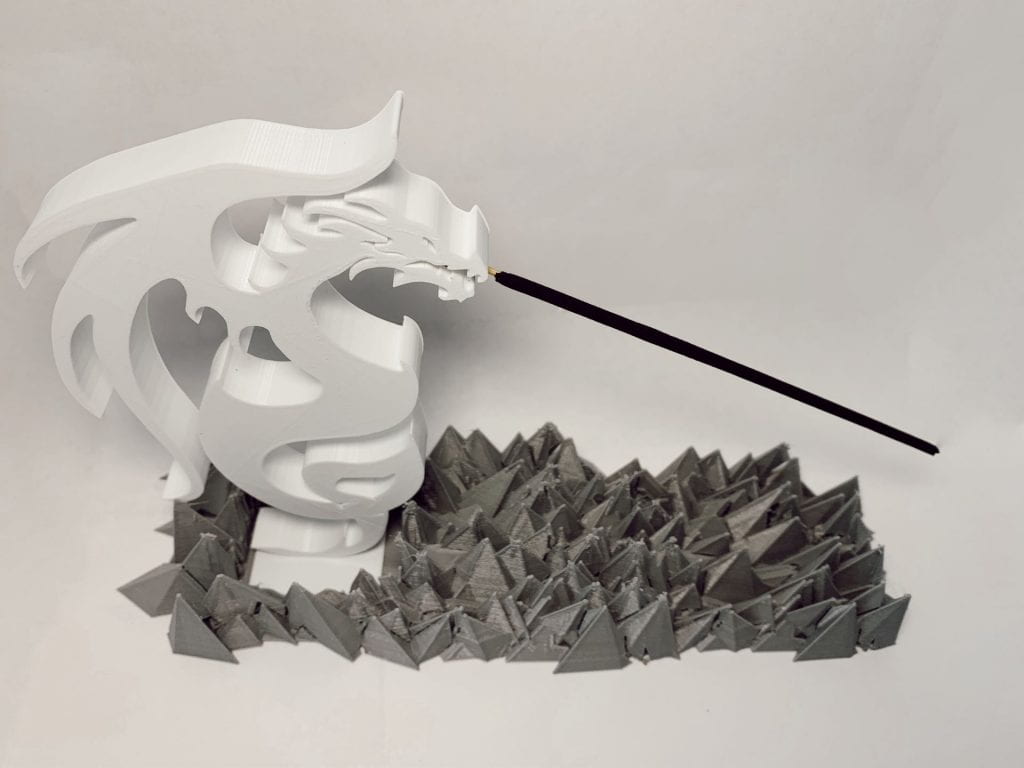
When thinking of objects that I could incorporate playfulness into I wanted to find an object that was something I could use often and that was part of my everyday life. While looking around my room I found an old incense burner that I had broke. After finding the burner I realized how it was very simple and plain it was so I decided that it would be a good object to inject a little playfulness into. I found more examples of incense burners and came to the realization that most incense burners are either very simple or solely acts as a decoration. Very rarely do the form/function of the object match its playfulness. The burner as a whole is designed as a tray that holds a burning incense while also catching the ash the comes off the incense stick as it continuously burns. There is usually a small hole or indent in the object for an incense stick to be placed in so that it can stand on its own and a tray that accompanies it to catch the ash that falls out. When I saw the form and shape of the incense burner I knew that this was the specific type of burner that I wanted to incorporate a whimsical aspect to.
After looking at the object for a while I realized that the incense stick reminded me of a long tongue that a snake or lizard usually has. The smoke at the end then reminded me of how dragons usually have smoke coming from their mouths. Because of that I plan on making this object whimsical by making it either into the shape of a snake or a dragon with the incense stick coming from its mouth to represent the tongue of the animal. I plan on making the tray that catches the ash into the body to imitate the shape of a snake/dragon with the tail twirling up at the end as well. Below you can find a sketch of the object.
Iterations
Unfortunately, my 3D print is still not finished and has a couple more hours to go before it is complete, but this is what has printed out so far. From what is currently printed, I am pretty happy with the outcome of the incense holder. The object looks very sturdy and the progress of the incense holder is shaping out nicely.
The process of figuring out the correct changes I needed to make for my self expression was slightly difficult. I had trouble honing in on a specific way to incorporate a whimsical and playful aspect to my self expression. I was stuck between a snake-like incense iteration and a dragon type of incense variation. I eventually figured that the function and whimsical aspect made more sense with the elements of a dragon. After finally committing to the idea of a dragon incense I had to figure out what was the most effective way of shaping the dragon so that the function of the incense stick was placed in a way that made the most sense. After receiving back some feedback I played with certain ways to shape the dragon. At first I wanted to make it so that the dragon incense holder was on its back but it was not sturdy enough on its back.
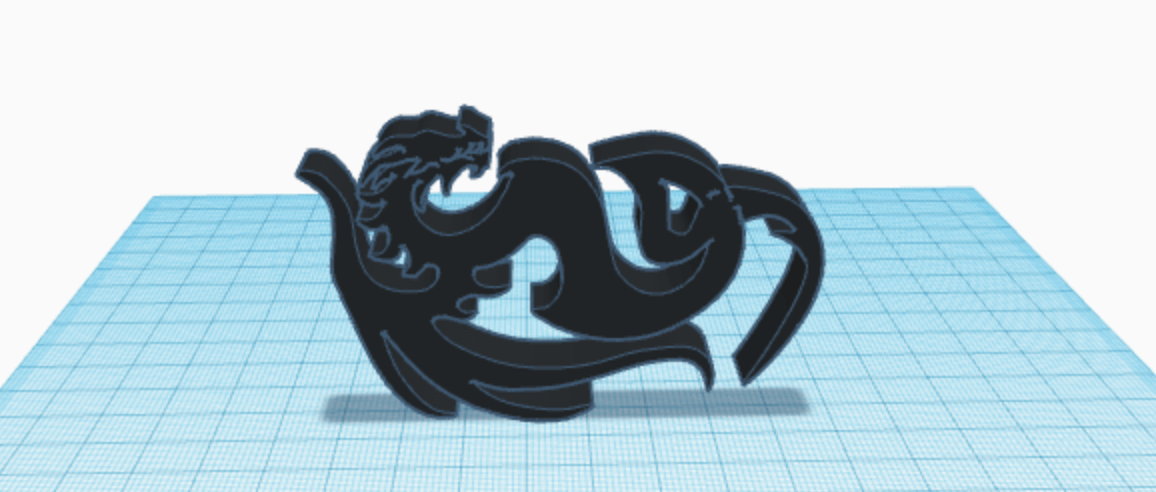
I then wanted to make it circular so that the head and tail touched but I had trouble creating a design that was circular but also effective enough to hold an incense stick in its mouth so that the stick wasn’t poking out awkwardly. After looking at more dragon incense designs on google, I then saw a reoccurring theme of placing the dragon on a mountain or on some rocks. That then gave me an idea of placing the dragon upright while resting on a valley of mountains. I thought that the mountains would be a perfect way to incorporate a tray that most incense burners have to catch the ash from the burning stick. This is how I came up with the final design below.
Below are my model iterations.
The dragon incense on its back with a lower head that is close to its body.
The dragon incense upright with a head that is raised higher.
Overall, I had trouble with coming up with the correct dimensions for certain elements of the incense holder so that it was shaped correctly and under anticipated the amount of time it would take to 3D print. After facing these challenges I now have a better understanding of how to correctly format my object and will better anticipate printing out the holder in a more timely manner.
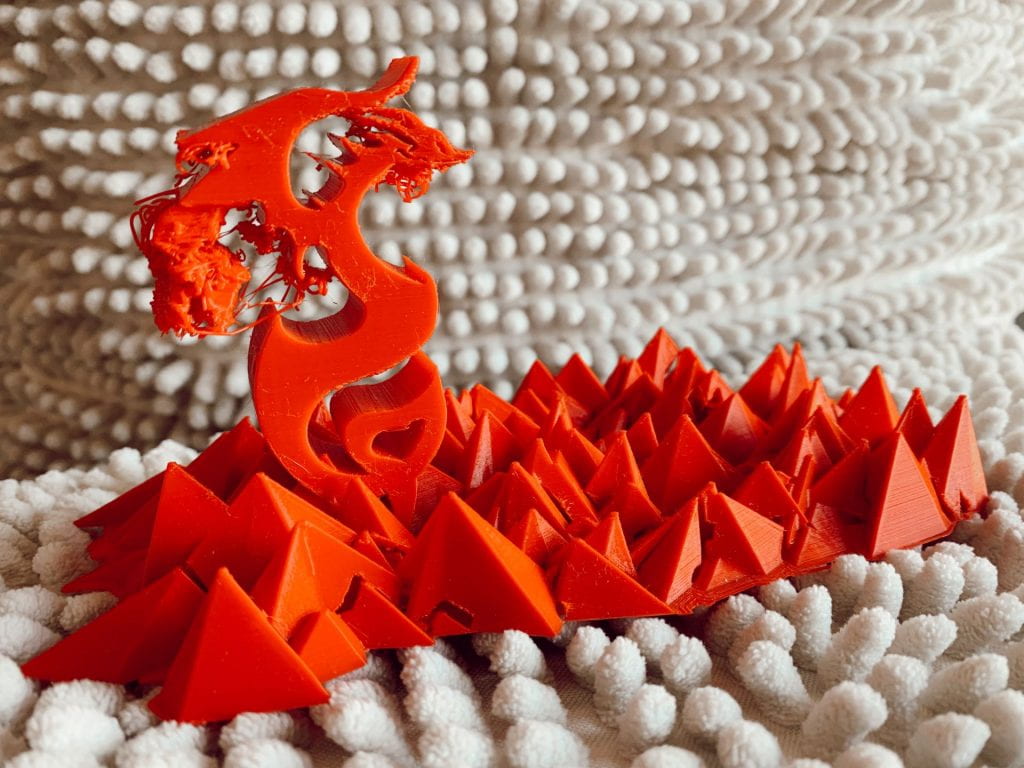
This is how the print came out altogether. The print took over 24 hours in total but still wasn’t where I wanted it to be as it was too small and very splotchy when it came to the dragon print.
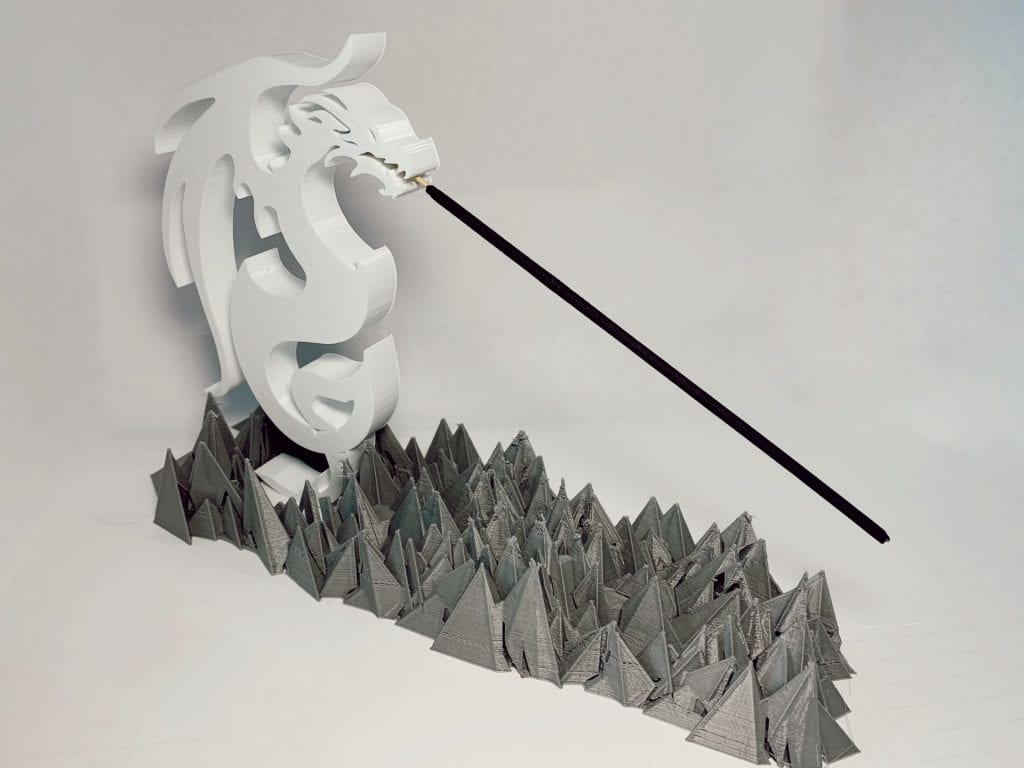
After seeing the outcome of the dragon incense I decided that it would be more effective to do two separate prints that combine into one whole object. I decided on doing one dragon print and one incense base print.
Final Print & Reflection
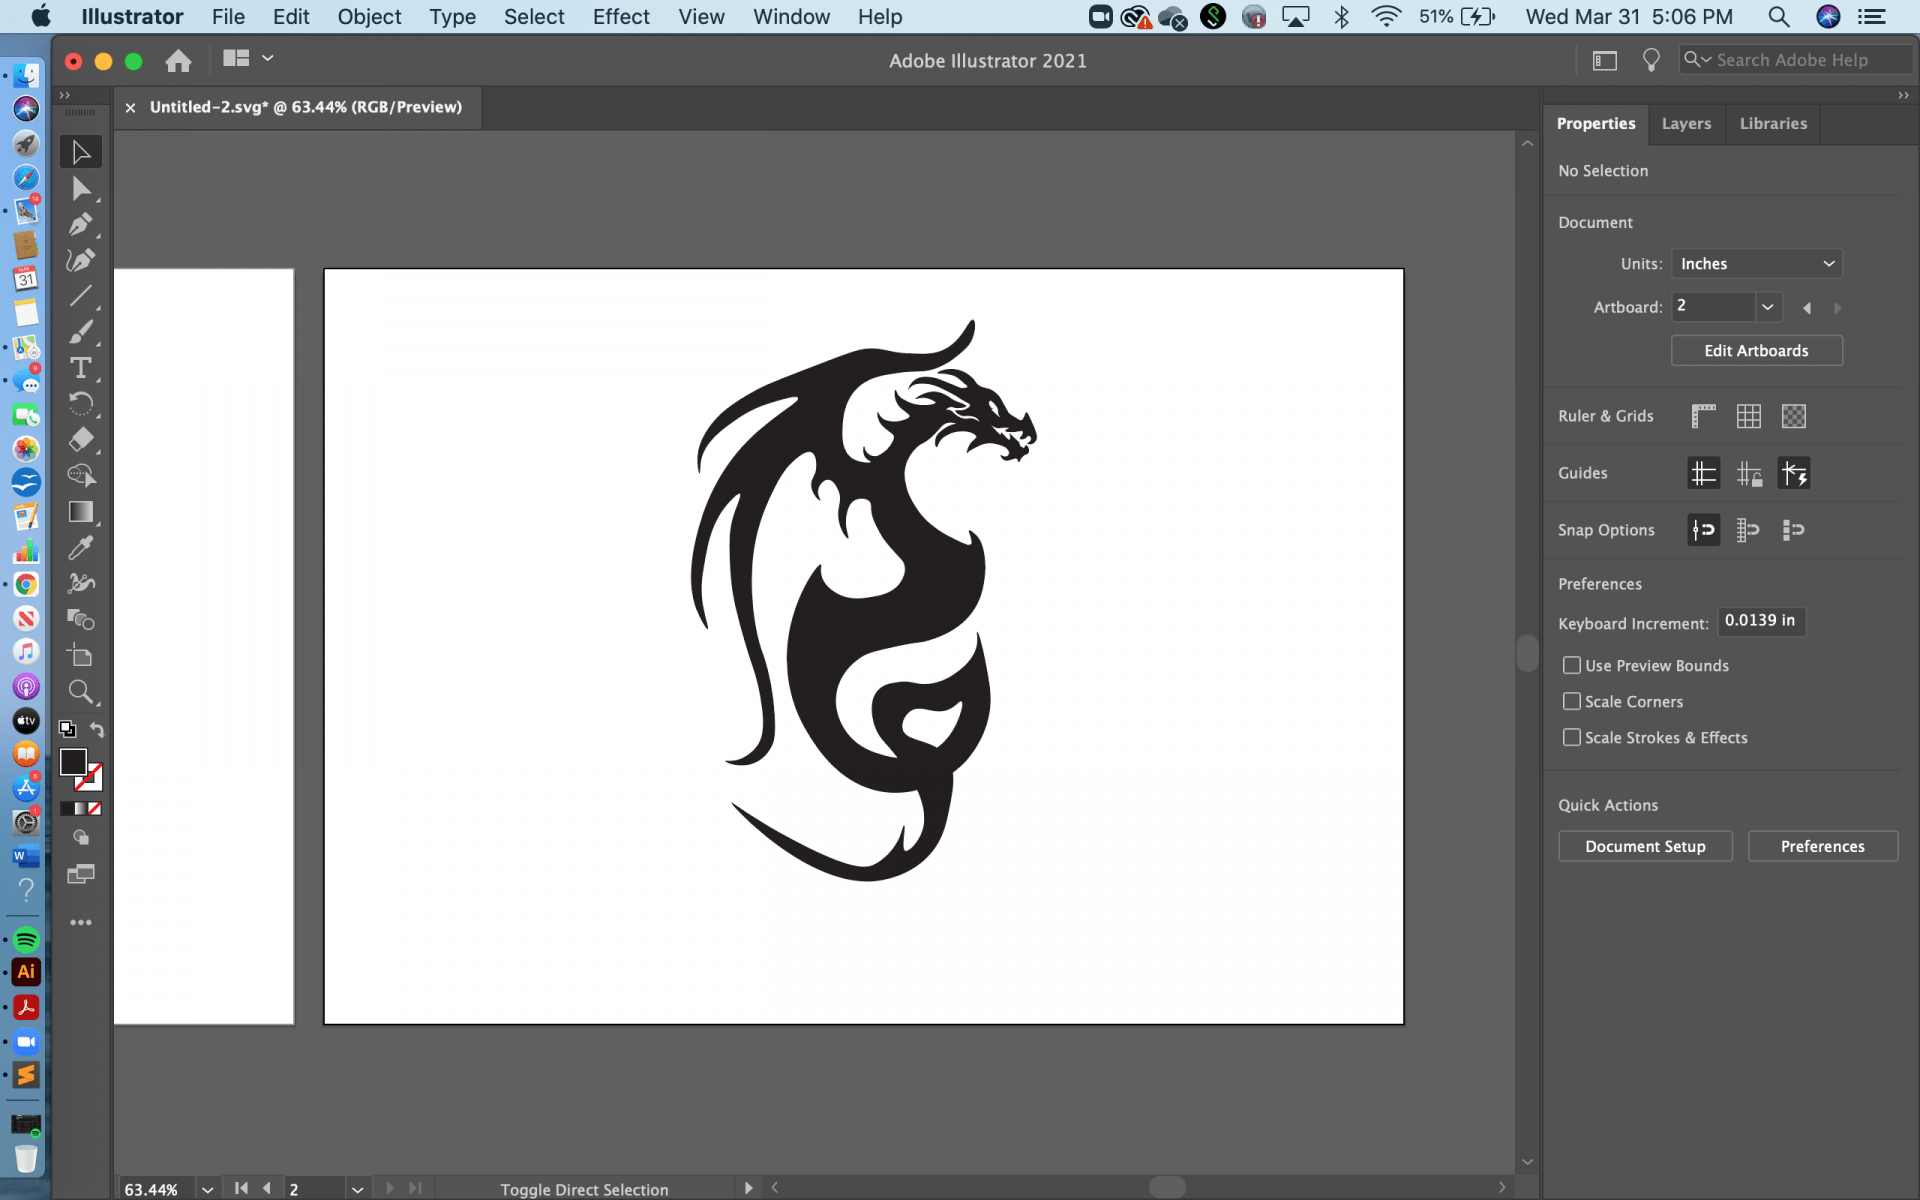
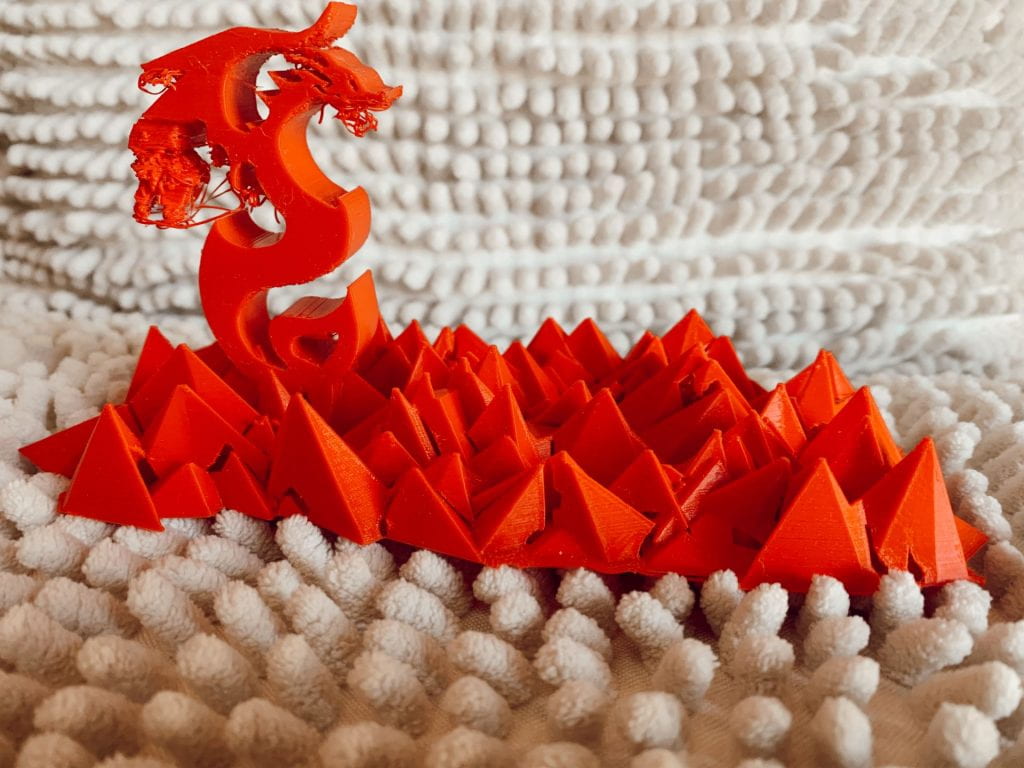
The is the final print of my dragon incense holder. The incorporation of a dragon shaped incense holder with a mountain-like tray adds a sense of whimsicalness to a normal incense holder. The stick coming out of the dragon replicates smoke and fire coming out of a dragons mouth.
For the final print I decided that it would be more effectual for the entire piece to be two separate objects. This would lessen the print time and also allow for each print to have the ability to be much larger. The incense holder as a whole came together really nicely. It’s functional and has a nice aspect of playfulness within the design. The shape of the dragon is thick enough that it makes the object sturdy and the mouth is wide enough for an incense stick to fit through but small enough for the stick to not fall out. I made the tray have a small square hole within it so that the separate dragon print would be able to fit into the tray and stand on its own. The one aspect that didn’t come out the way I would have 100% liked is the tray of mountains. In my first test print, the layers of the small mountains came out nicely and there were no holes but the next couple of times I printed the tray there were weird holes that showed up in the middle of the print. So if i were to do another round of prints of the tray I would make the mountain points slightly thicker and keep the layer height at 0.15 so that less mistakes would occur.
Overall, I really like the results of the incense holder. I really enjoyed the dragon concept and liked creating the shape of the dragon on illustrator. I think the blending of the two objects could be more seamless but as a whole I still really enjoy my incense holder and can’t wait to use it.
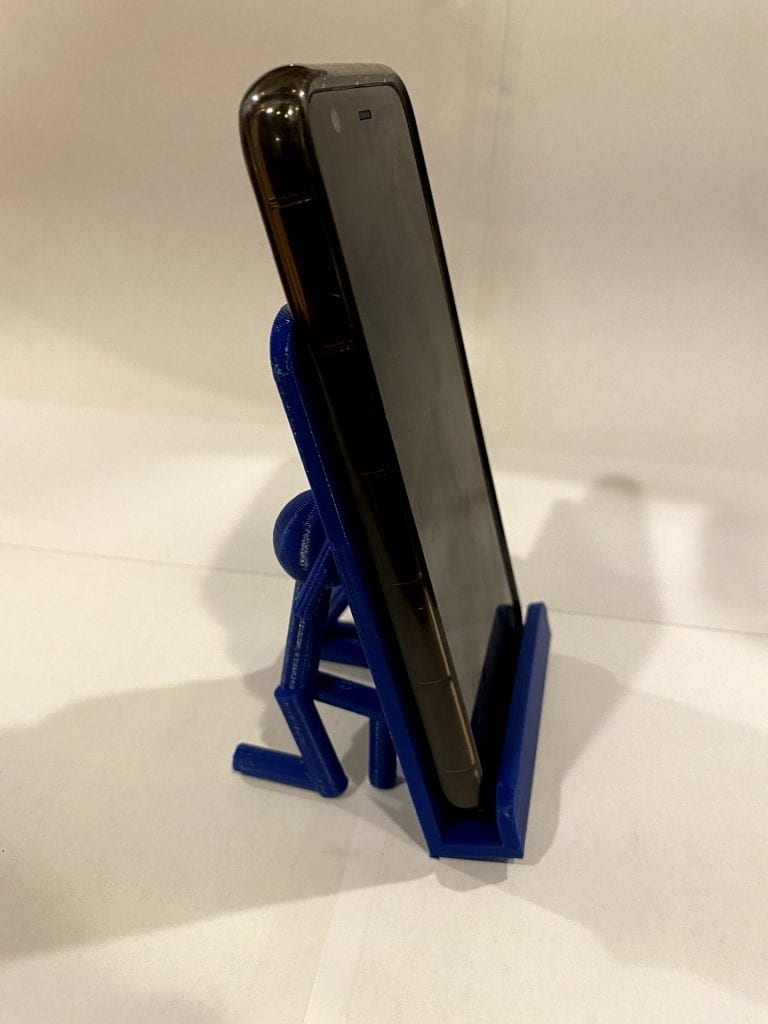
When I first started brainstorming ideas for playful objects, I initially had some trouble thinking of an object where the playfulness didn’t impede on the function. At one point I was thinking about how, since my Airpods are broken, I have been having to use wired headphones and have been frustrated with the wires getting tangled. I wanted to design an earbud cable wrapper in the shape of a person. However, I could not figure out how to make the human shape work well with the function of the object. After thinking further about what I could do with the general shape of a person, I had the idea of a desktop phone stand. There are many times where I am working on my laptop and like to have my phone nearby for easy access, so this object will definitely come in handy.
To add some playfulness to this object, I thought that the best approach would be to add people that are holding up the phone. As I develop this idea further, I will want to make sure that the measurements are broad enough to fit my phone with and without a case, and I will have to play around with the positioning and amount of people needed to create a stable support. I am also considering raising the stand up and adding a hole to allow me to charge my phone and use headphones while it is in the stand.
Iterations
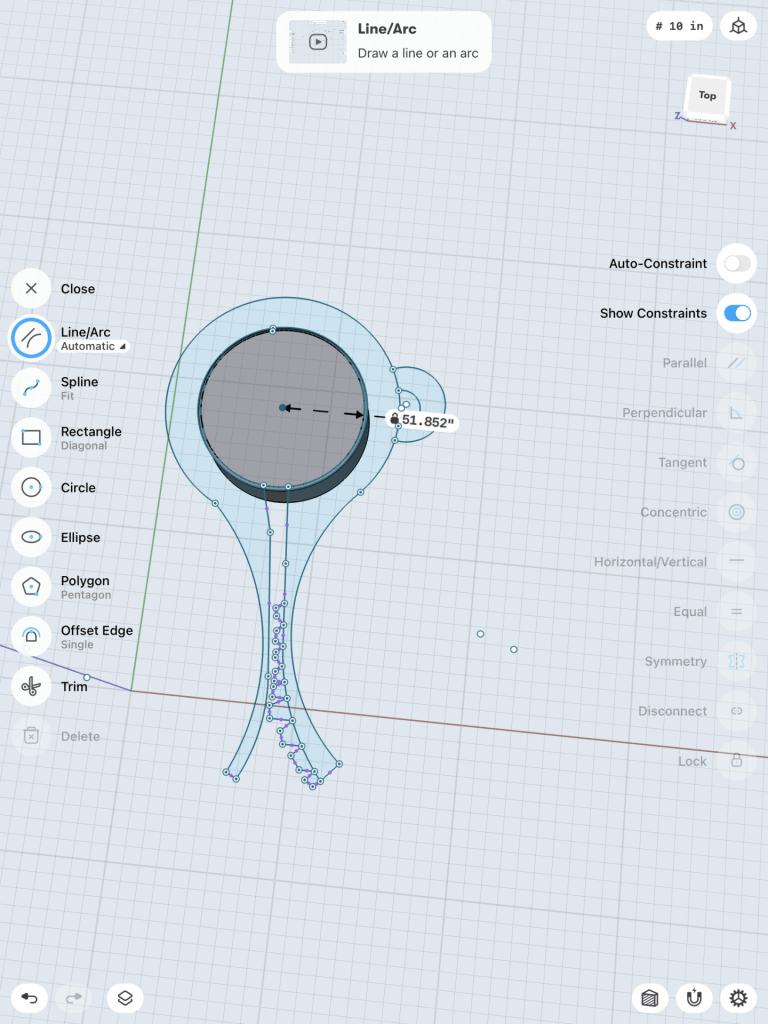
For the modeling process, I began by taking measurements of my phone to make sure the holder would fit it exactly. I went into Tinkercad and placed shapes to create the holder itself, making sure they corresponded with the measurements that I took before. I then rotated it back slightly, and arranged several more shapes to create the people that hold it up. I made sure to have the people connecting to the holder in multiple places, and I positioned them with the hope that they would be sturdy enough to hold my phone. At one point I was considering adding another person that would interact with the phone from the front or side, but I ultimately decided against it because I wanted to be certain that the phone would still be fully usable while on the stand.
After finishing the model, I began my printing process. Because the model needed to be tested at scale and is fairly large, I printed it using the “fast” preset, with 20% infill. However, about an hour into printing, the model started coming off of the plate, which was interfering with how the filament was being placed. I realized that this was happening because I used the “skirt” adhesion, so there was nothing holding the print down and keeping it stable. I cancelled the print and tried again.
For my second attempt I used the same settings, but this time I used the “raft” adhesion to be sure it would remain 100% stable while printing. Once it finished, I really had to work to get off all of the supports, but I was very pleased with how it turned out. The print is perfectly sized for my phone, and the people seem pretty sturdy and have held up well so far.
Final
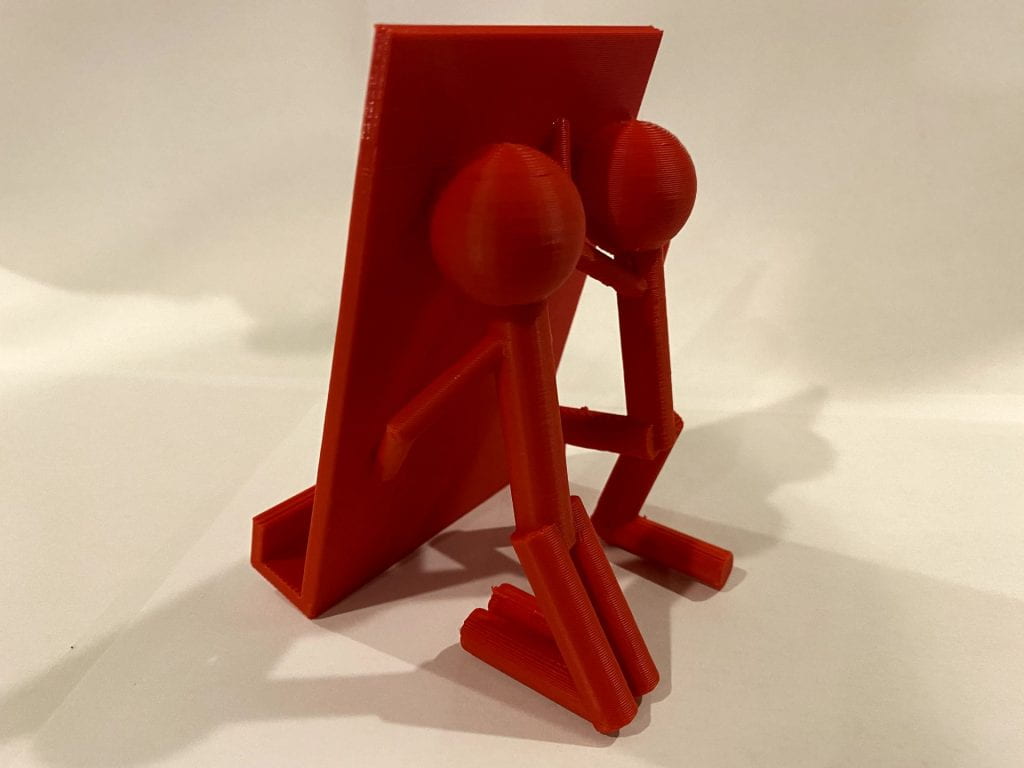
For the final iteration of my Stickman Phone Stand, I decided to make a few aesthetic changes. The main change that I made was making the people a bit smaller, in order to make it look like the phone was heavier for them and they were struggling more to keep it up. I also rounded the edges of the stand, since the corners were very sharp in the previous iterations. Finally, I added 2 small supports underneath the bottom of the stand itself to make it more stable when holding the phone.
Overall, I am very happy with how the stand turned out. The entire process of sketching, designing, and refining went well, and I always had clear ideas of what to do next throughout the process. I think that the addition of the smoothed edges do a lot to make the product look more refined, and the smaller size of the stickmen do a great job of making the phone look heavier, while still providing enough support and keeping it stable.
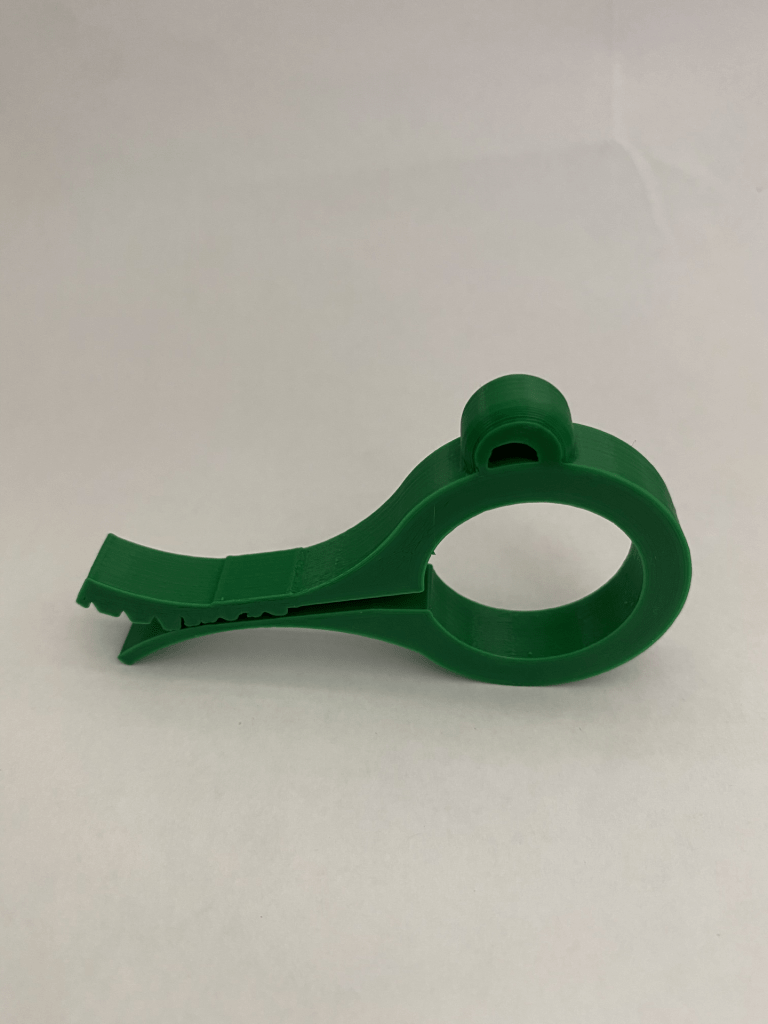
Recently I have found myself with a growing need for a bag clip as my addiction to jalapeño potato chips has only gotten stronger. Whenever I am at the store purchasing a bag clip never crosses my mind because really it is a boring item. This is why I chose this item for my self expression print. The more I looked at different images of bag clips, I quickly realized how easy it would be to inject playfulness into this typically overlooked household item.
In order to make the prospect of a bag clip more fun I decided I would make it look like an alligator’s head. I would do this by adding an sphere at the top as an eyeball and a few ridges along the top tab. I would also make the top tab slightly longer to help with opening it. The ridges that are already on the inside in the above example are very important to making the clip able to stay on the bag tighter but also add to the vision of an alligator and sort of look like teeth.
Iterations
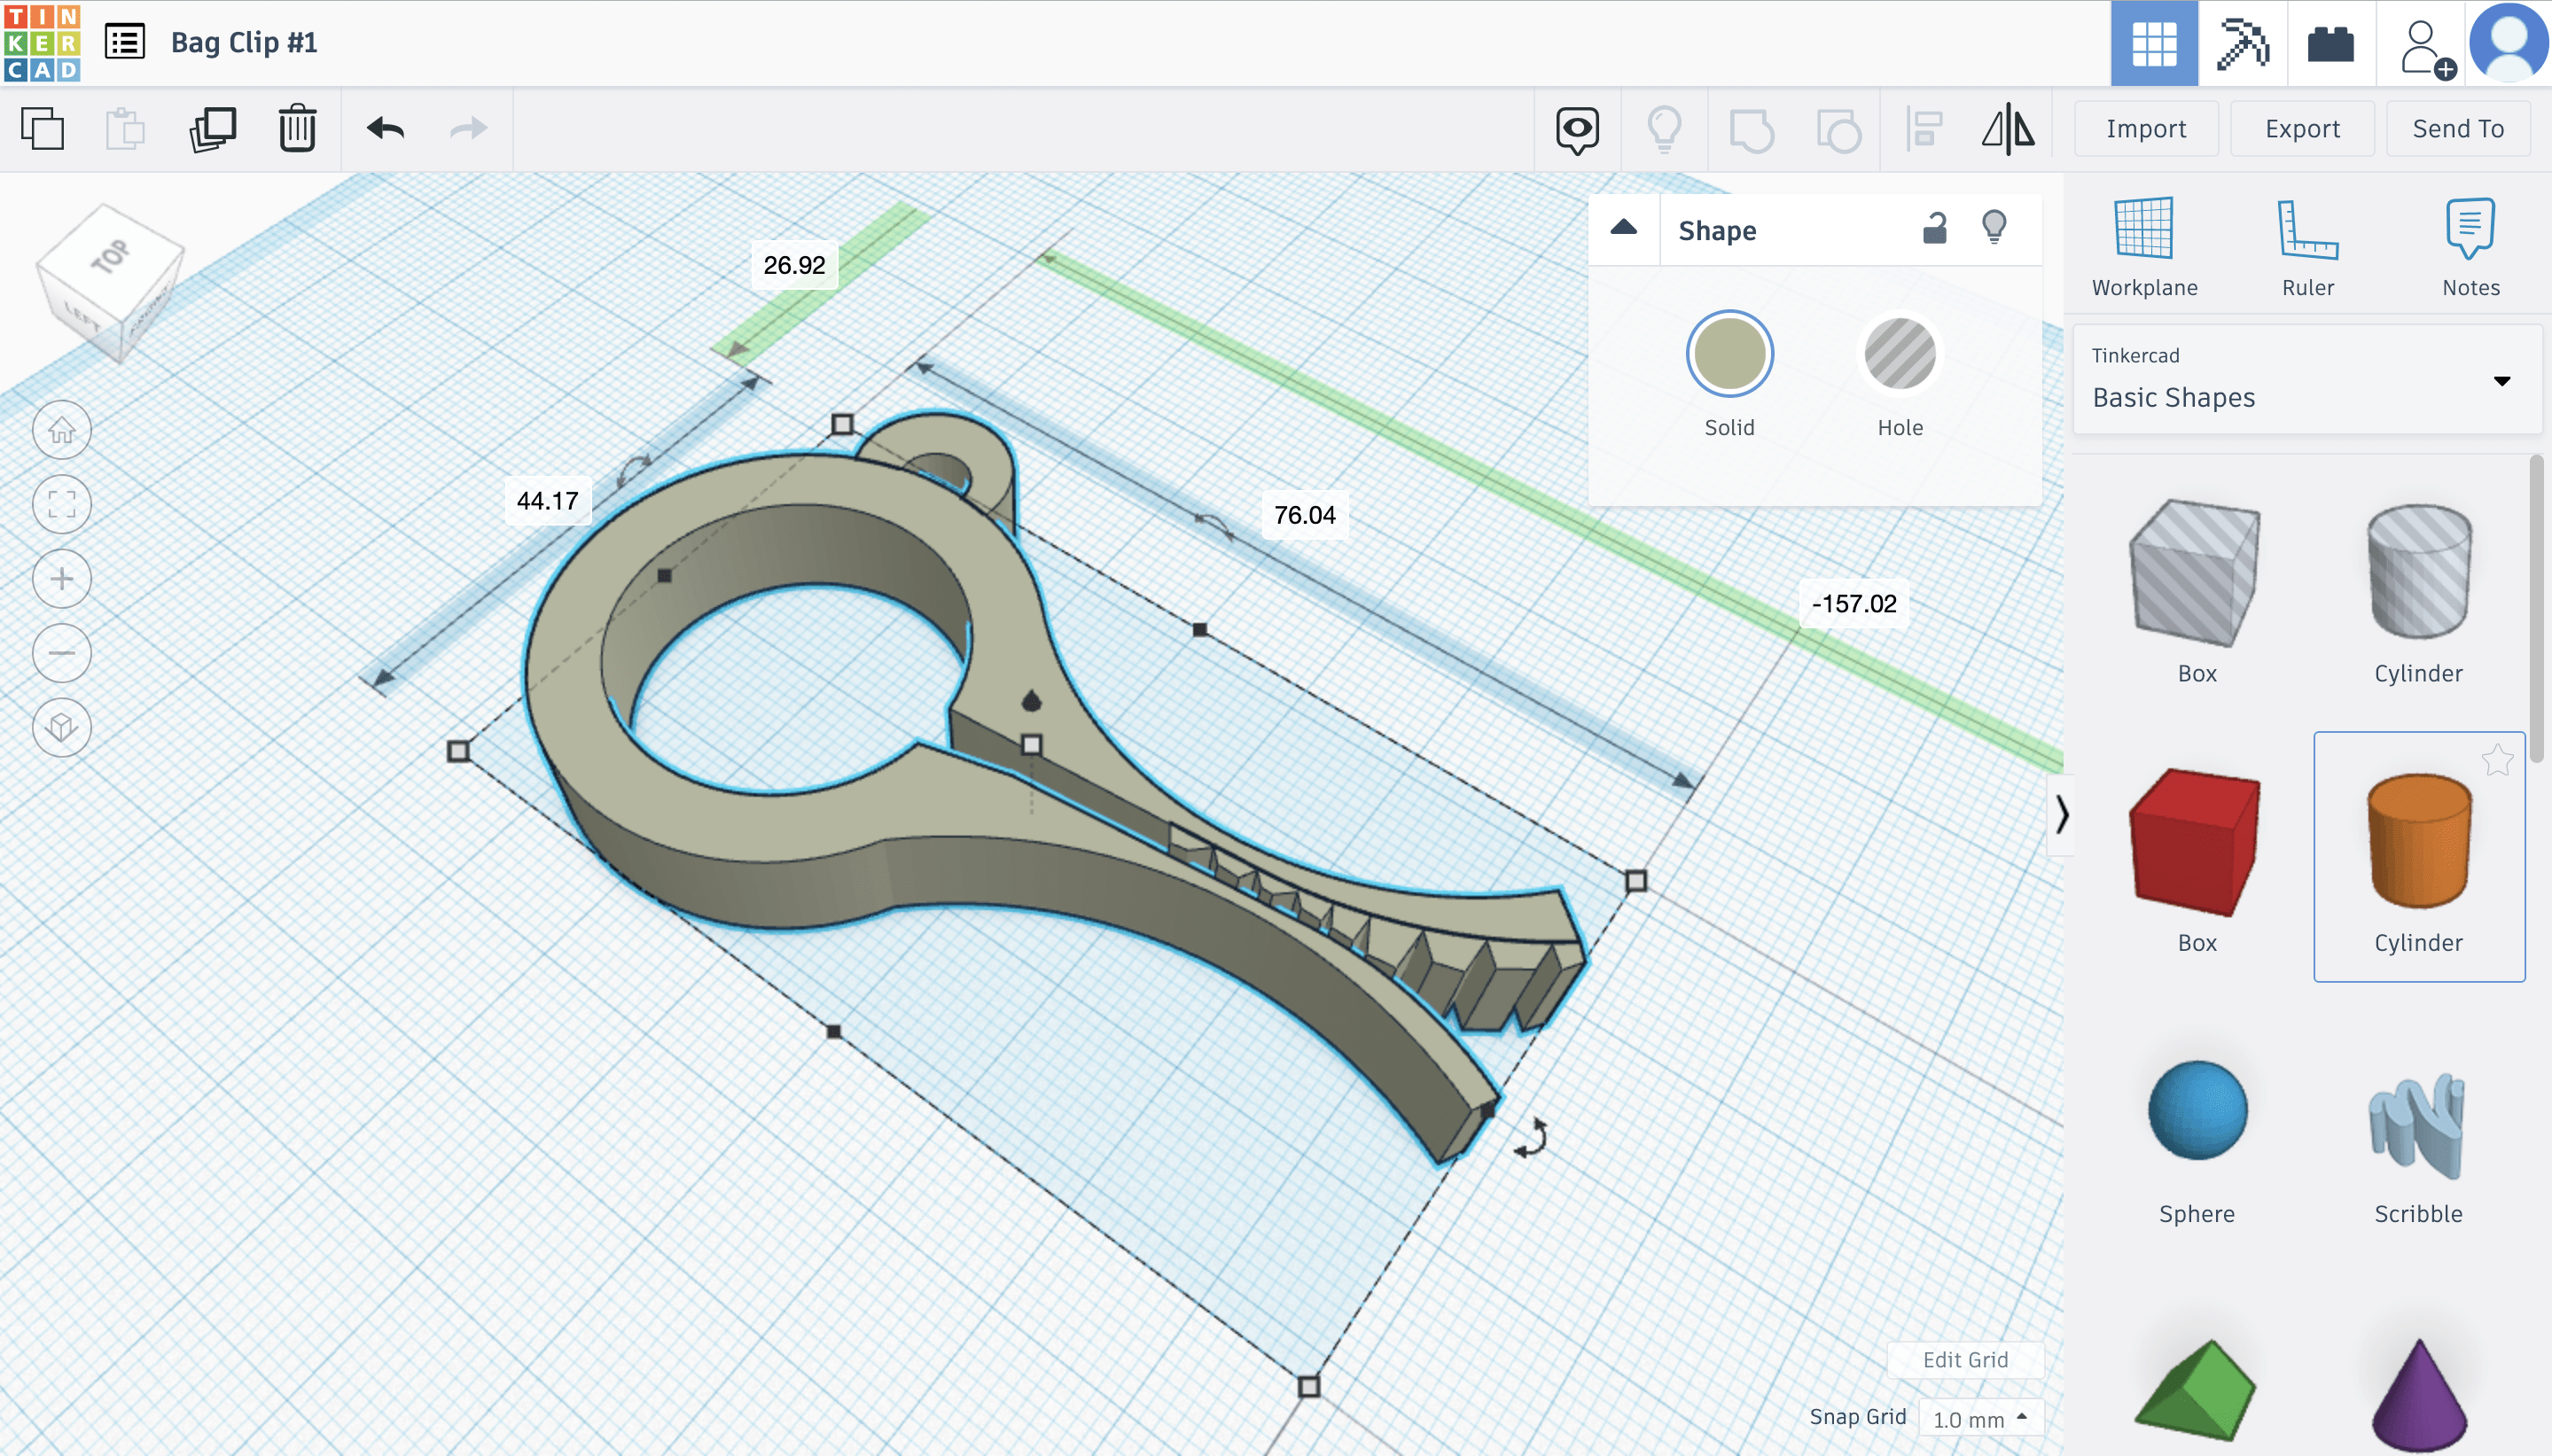
For my iterations I used Shapr3d in order to make the shape of the bag clip. I thought this would be easier because of the curved shape and it turned out being perfect because of the very specific shapes I needed to sketch for alligator’s mouth.
These are screenshots of my design in Shapr3d. It was very simple to sketch and extrude my object and it was exactly the shape I wanted. I then transferred it into Tinkercad, because I did not realize you could print straight from Shapr3d.
I then needed to resize my object because it was very small. I did not have a good concept of what size I really wanted it so this was just a guess. Now that my first prints came out I have a better idea of what size is most practical.
Unfortunately, when I moved my object into Cura Ultimaker to slice and print it, for some reason it kept appearing with a hole in it when there was no hole in Shapr3d or in Tinkercad. I decided to go ahead and print it anyway in the hopes that it would print with the hole filled but it did not.
Other than having a hole in it I thought the print came out great so I decided to keep everything the same but to figure out how to fill in the hole and reprint. To do this I went in to Tinkercad and put a box where the hole was appearing in the hopes that it would cover it.
By doing this I was able to fill the hole that was appearing on the slicer and continued to print another iteration.
This is my final iteration of my alligator bag clip. I am very pleased with the way it turned out but I think I am going to try downsizing it a bit. I also decided to put teeth on the inside of the two clamps instead of on the top like I drew in my sketch. I did this in order to make it more useful, I felt like the ridges of the teeth may make the clip grip better on a chip bag rather than having a smooth edge trying to hold together a smooth thin bag. Other than sizing it down a bit I do not think there are any other changes I would make to this design.
Final
As I said I would do before, for my final print I downsized the clip a ton. Additionally, I rounded the eye on the alligator to make it look more realistic. I am extremely happy with how this turned out and I hope people make it or remix it!
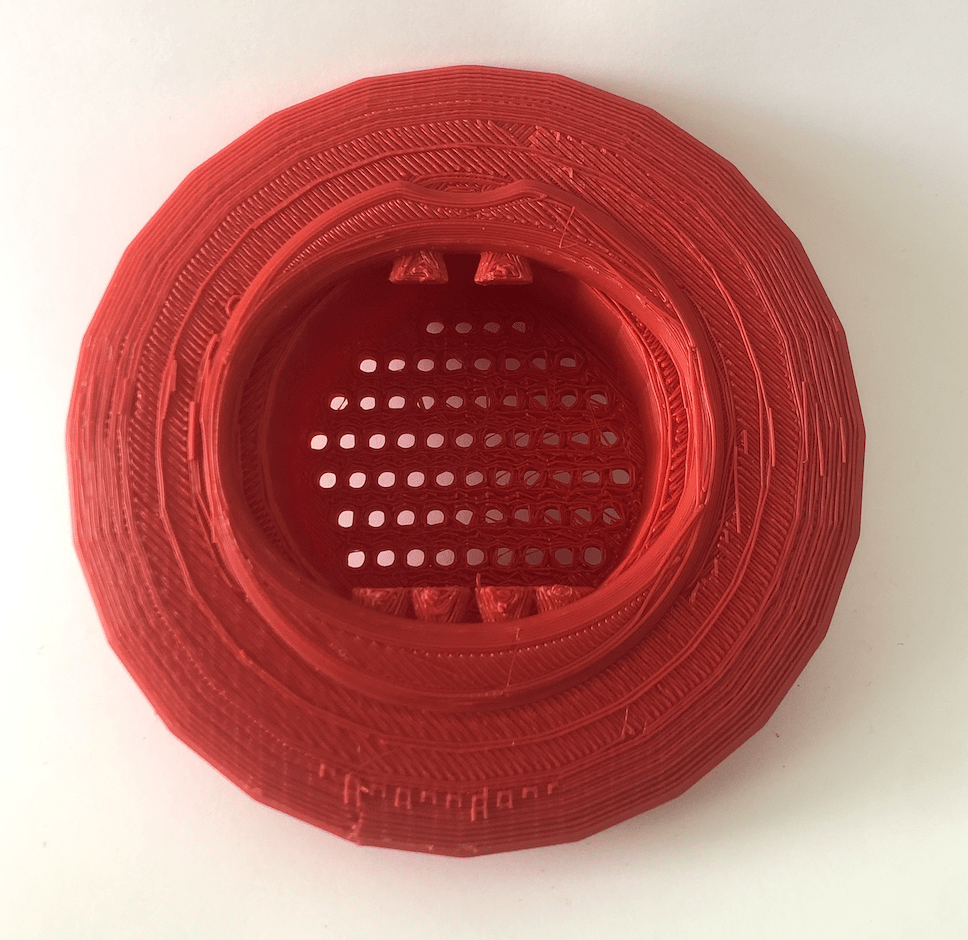
When deciding on what I wanted to choose for this project, I tried to think of things that I found most boring in my day to day life. The one I find most boring is doing the dishes, more specifically the strainer that sits in the sink. This object has so much room for creativity and playfulness as most of the time, it’s staring right back at you as the dishes are being washed. When thinking of this idea and how to add playfulness I started to think of what the purpose of the object is and how I can twist that concept. The strainer is meant to catch any food that was not disposed of prior to doing the dishes. It catches the food that never made it to our mouths. I decided to play with that idea in my concepts. In addition, I’ve noticed that sometimes people purchase strainers that sit on the side of the sink for various reasons (see image below). It’s the same concept of catching food, but with that one I wanted to continue the human anatomy theme I had going.
For my concepts, I touched on it earlier, I wanted to “humanize” the strainers. It’s a play on the purpose as well as just adds a little fun. For the regular “mainstream” design I chose to alter it into a mouth. This makes it playful, but also keeps the original purpose in tact. In addition, I created concept two with a nose design for the modern unique example. It made sense to follow the purpose of fitting the strainer into the corner of the sink as well as following the humanization factor.
Iterations:
For my iteration process, I did not have as many issues with the strainer design but more so the mouth that is incorporated on top. However, not to overlook the time invested, the strainer design as the base proved to be a little complicated in the sense that Tinkercad is not great with sphere’s or circle’s. I ran into many issues with sizing and proportions. As you can see in the images below, I had a fairly easy first print, however the strainer had incorrect proportions. As a result, the strainer did not fit into the sink seamlessly. I’m not quite sure if this is because of the dimensions I found online, or Tinkercad just being difficult.
Moving forward, I printed a second time adding the mouth decoration that I had initially intended to. When working in Tinkercad, I ran into so many issues trying to implement curvature that I ultimately decided to just make a print with comical looking teeth as the sole feature. I also adjusted the opening in the middle to be perceived as more of a mouth and not a perfect circle. Some issues with the print were the strings that were much more prevalent in the second print as opposed to the first. I had to do a lot more work cleaning the print up the second time, but I’m fairly positive that is because something I added in between to make the second print slimmer. Otherwise, the teeth printed good and actually, I like the strings that occurred in the mouth, so I kept them. Besides the strings being an issue, the strainer now fits into the sink and could actually be sized up a little more.
For the future, I have quite a bit to go in designing a more complete mouth, but I am interested to see if this is plausible in Tinkercad or if I should pivot toward another program. If lips do not work more to my advantage, I feel as though I could add other features that would still give the same playful experience. Unless something changes, I would like to focus on other features of the mouth, rather than add more curvature with lips.
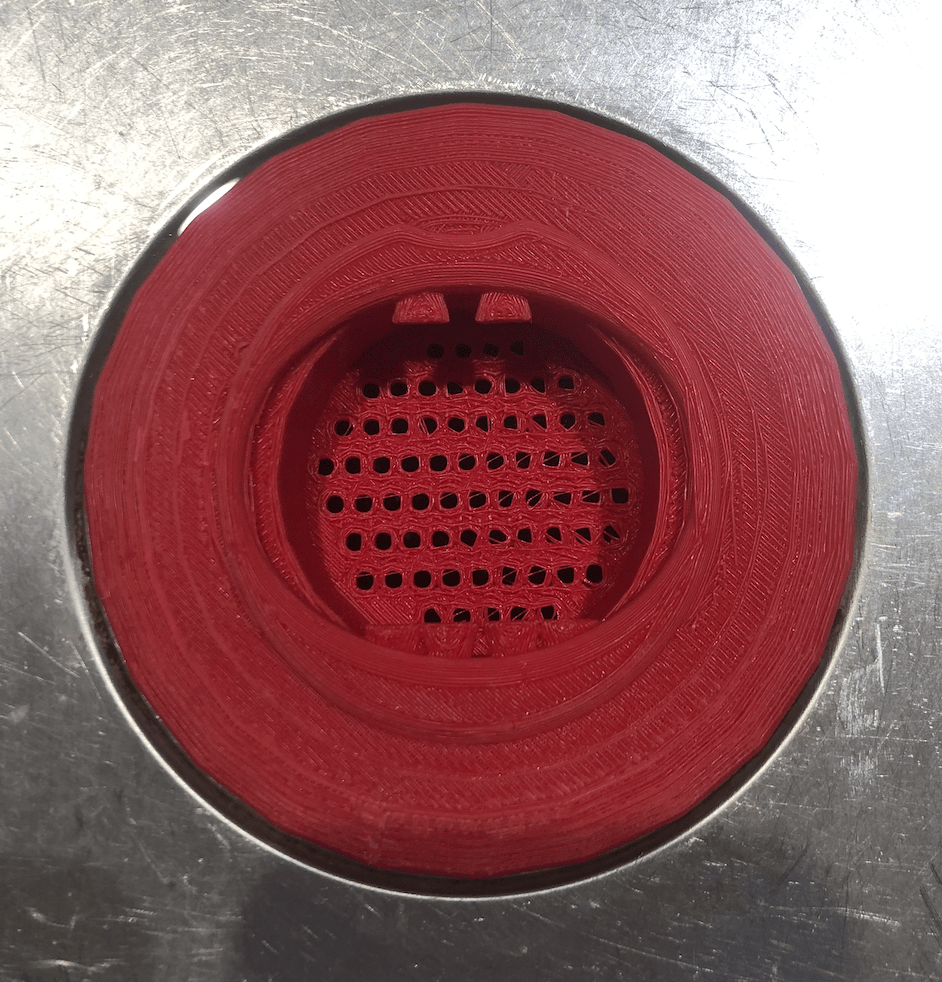
Final Print and Reflection:
My final print went much better than expected thanks to professor H. The changes I made from iterations to the final were a changed base design to fit easier into the sink, a rework of the top to adjust for lips, a lip/mouth design extruding from the top, and finally, alterations to the teeth. Some of these things were minor with the lips design being the main feature I addressed in the final product. I modeled a mouth/lips in Shapr3d. This process was MUCH easier than in Tinkercad. Again, with the guidance of professor H, this went very smooth. After creating that, I went back into Tinkercad to put the top lips piece to the modified base. This also went smoothly as the dimensions were already set. I will list the exact dimensions below. Other than connecting the pieces, I separated the teeth to add a more whimsical effect. As far as printing, I had issues printing right side up so I flipped the design and added a raft and supports to make the final print look much better. Overall, I am very happy with how this project turned out. I furthered my knowledge of 3D printing and got to use shapr3d for the first time.
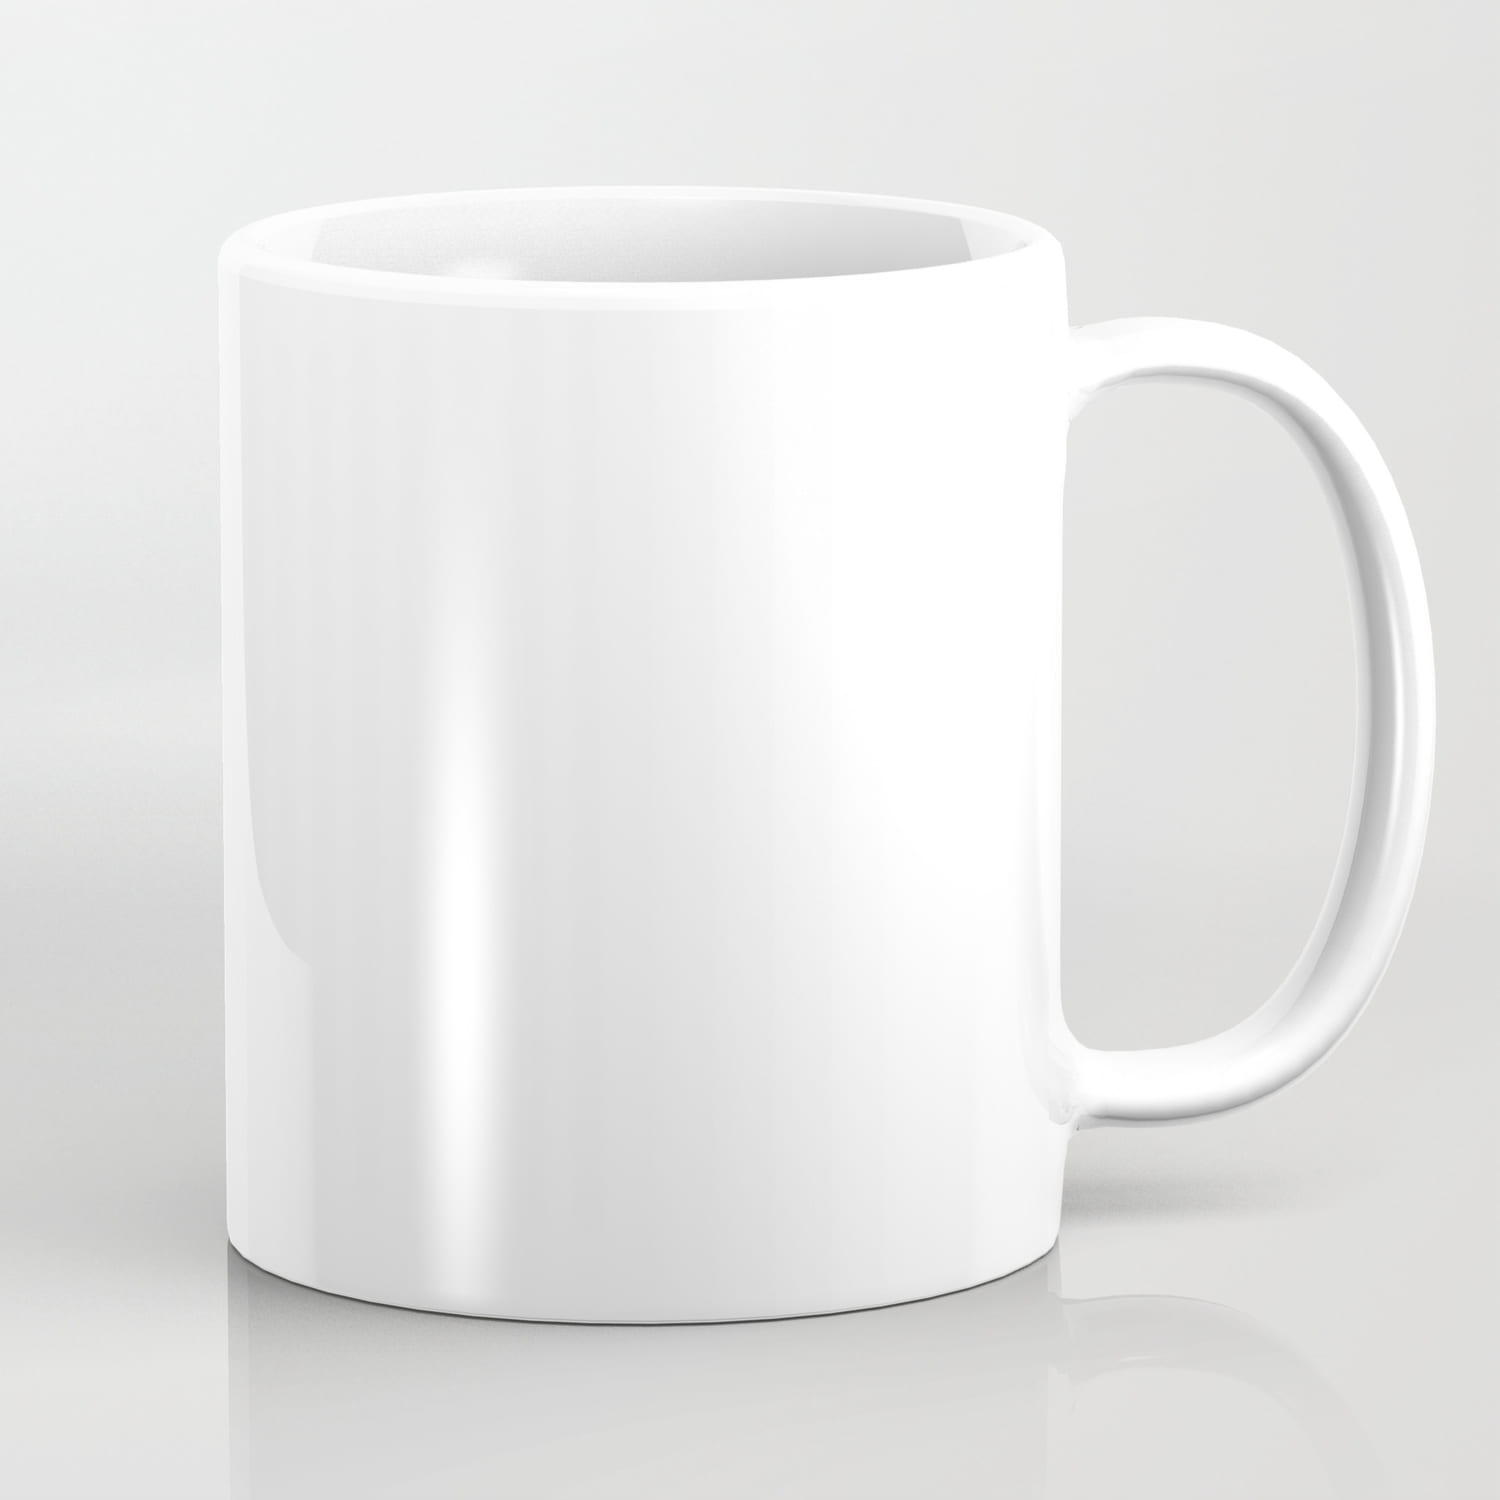
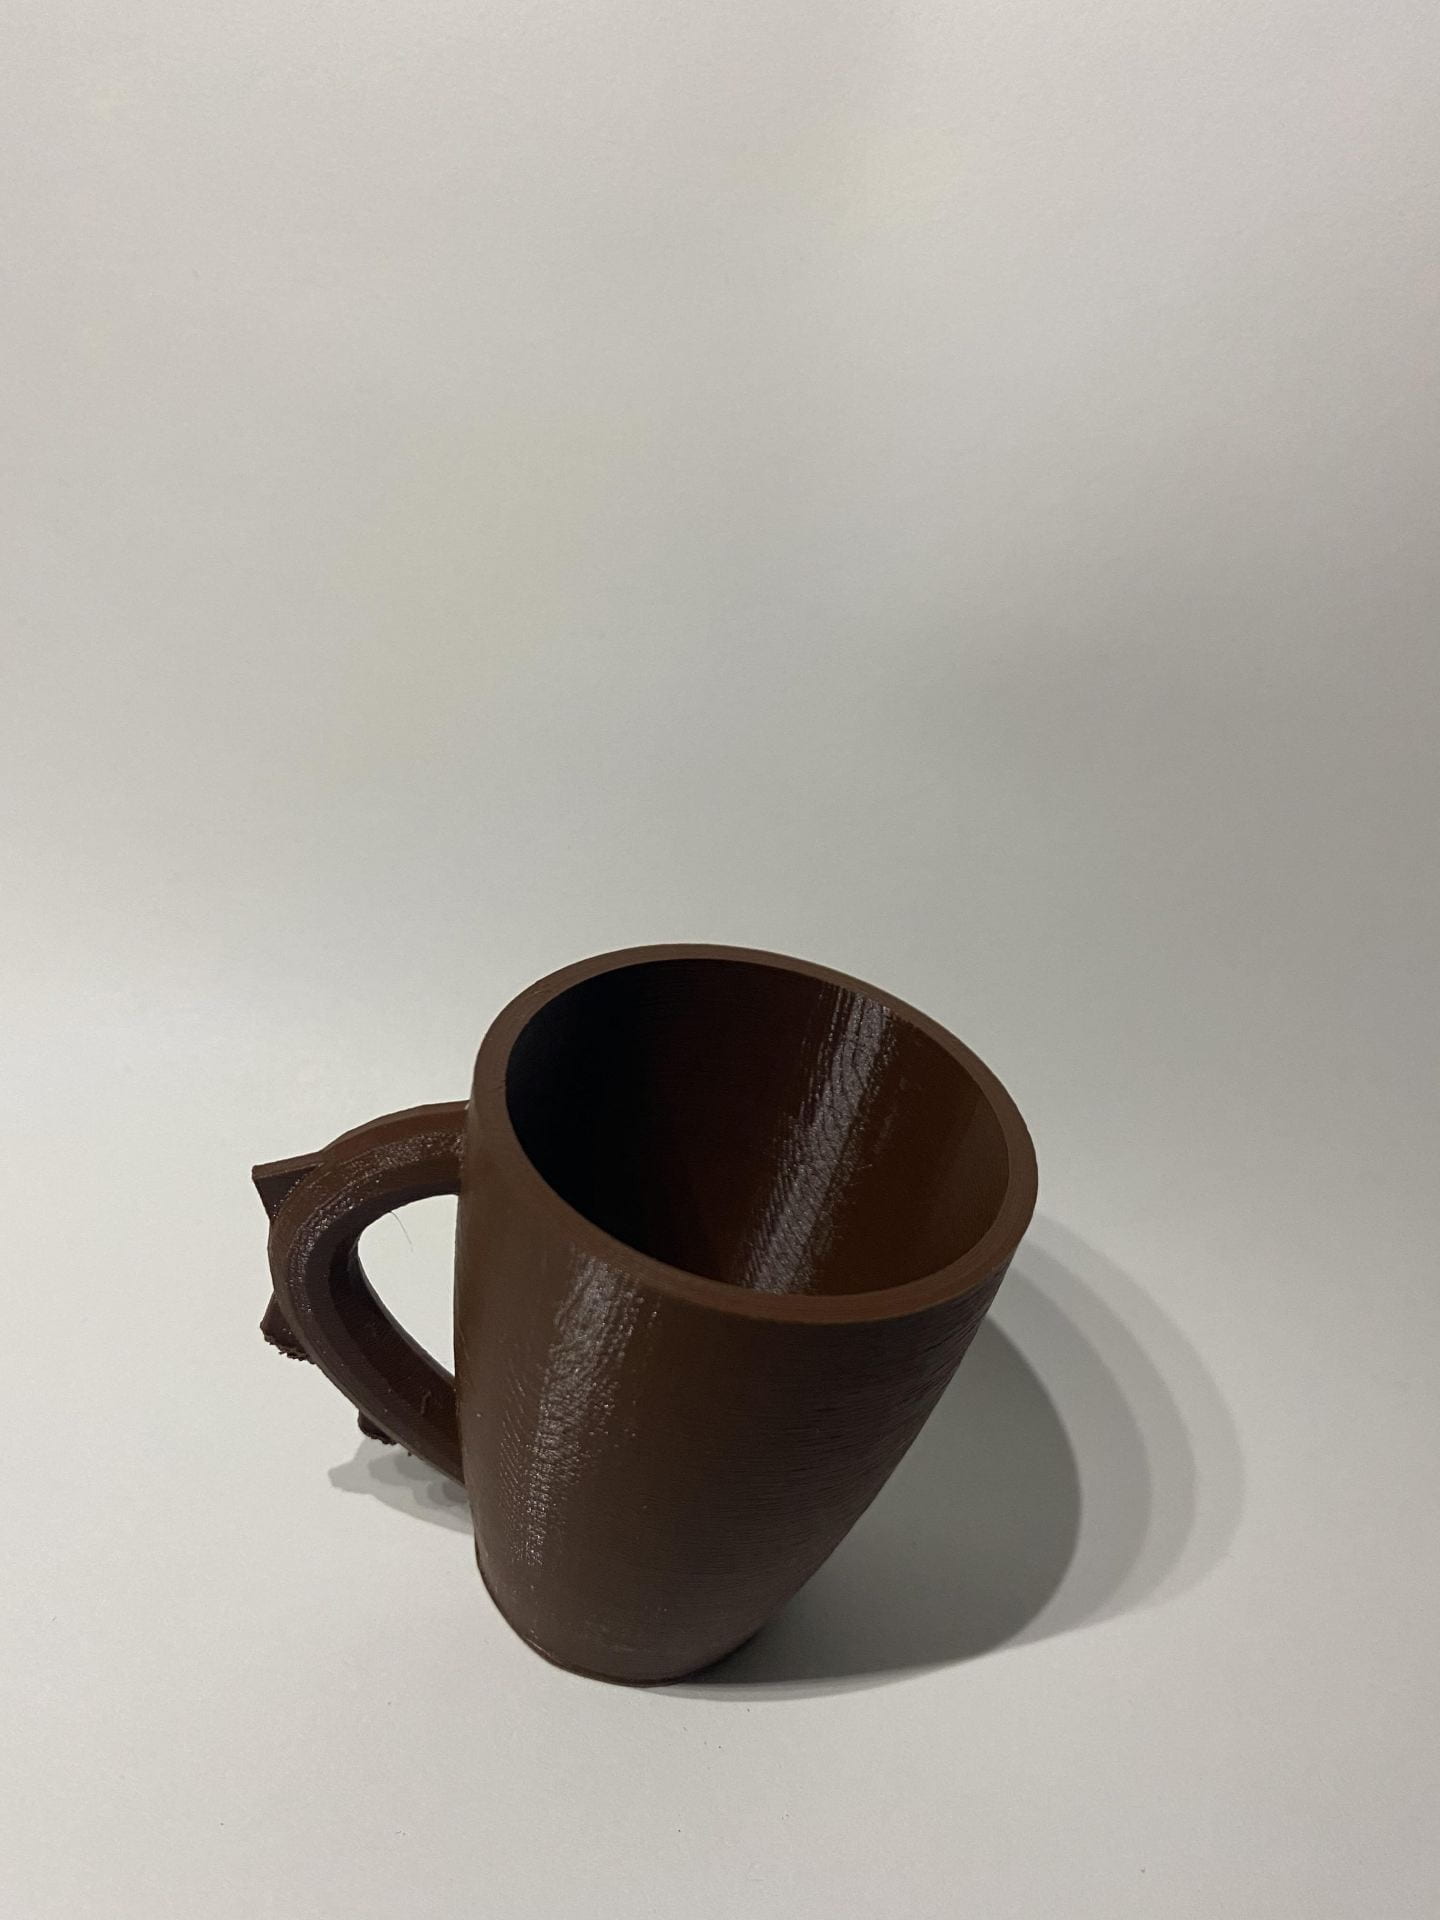
The functional form I want to add playfulness to is this white coffee mug. All the coffee mugs that I have in my house are plain white mugs just like the one in the picture and they are all boring to look at. I feel as if I had unique mugs that were in my cabinet that I looked at first thing in the morning it would automatically brighten my mood.
Above is the original picture of the mug and below is the alterations that I would make to it to inject playfulness into it. I decided to turn the cup into a dinosaur. I out dinosaur spikes on the handle of the mug so that it replicates the tail of a dinosaur. I put the face of a dinosaur on the opposite side of the handle to give the mug the full body dinosaur experience. For the colors I want the handle to be green and the spikes to be orange. I want the body of the mug to be camouflage with light green and dark green.
Iterations
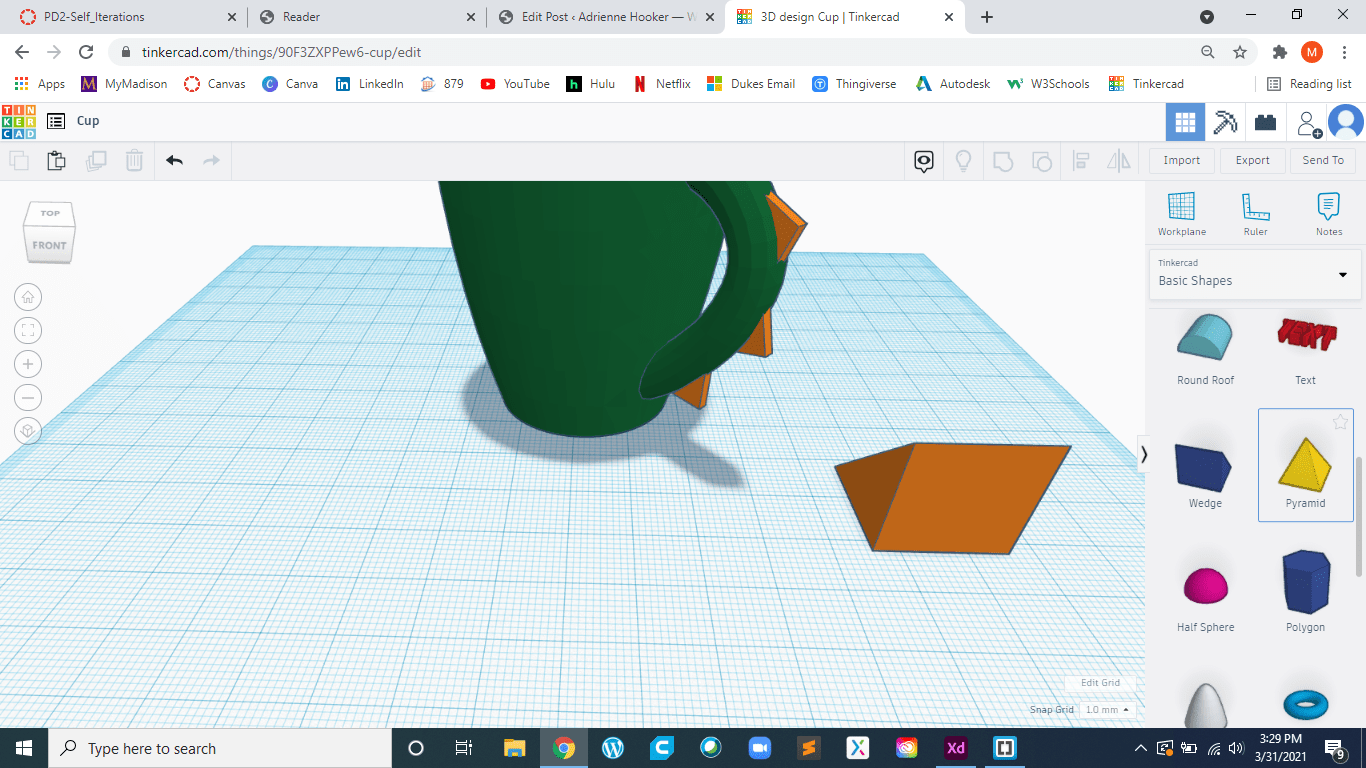
For my first iteration is used Tinkercad to create my print. I originally thought using Tinkercad would be a lot easier than using Sharpr3D but I feel as if I was wrong. For this iteration of my dinosaur cup it was very hard to adjust the angle of the dinosaur bumps that are supposed to replicate the tail of a dinosaur as the handle of the cup due to the fact that I was using Tinkercad on my laptop. I feel as if using the stylus on the iPad in Sharper3D will allow for more fluidity so I may have to look into using that application as I continue to make improvements on my iterations of this item.
One of the main differences between my research section and my iteration section is that the size of the cup is much smaller. I underestimated the size of creations in Tinkercad vs. how they would come out as a 3D print.
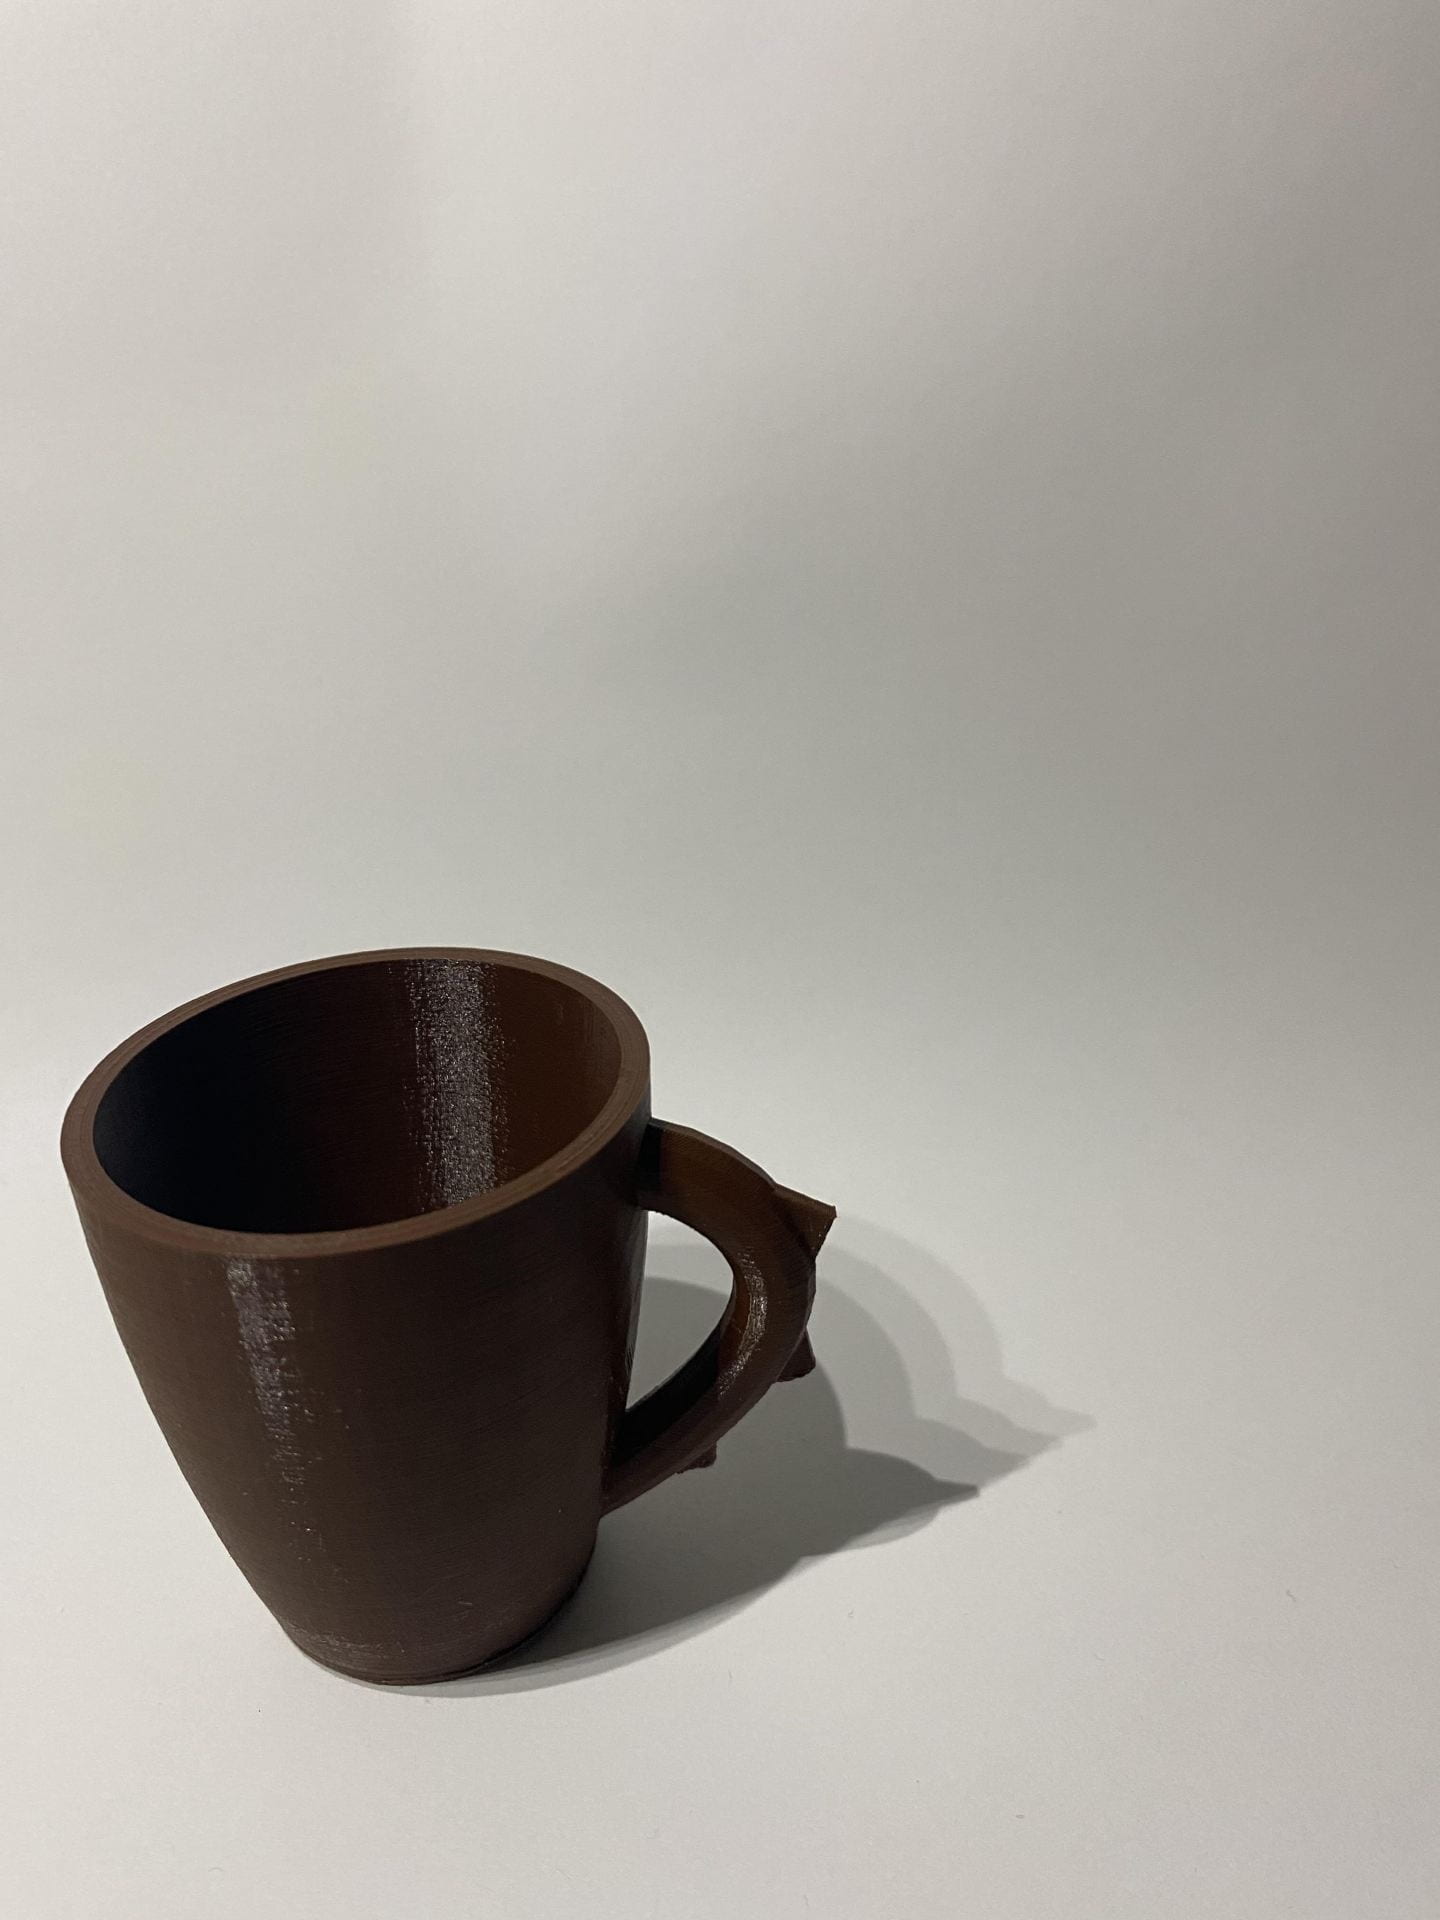
This iteration came out well my only problem is that the dinosaur bumps on the tail did not come out like I thought they would. For future iterations I will adjust those so that they will appear more prominently. Other than that, the shape of the cup came out well all though it was a lot smaller than originally intended.
I fear that the overall aesthetic o f the cup is not truly showing the playfulness that I intended it to have. Some of the ideas that I have for this problem is to add a tail like figure that extends off of the cup . I also would like to add a dinosaur face on the front side of the cup to increase the playfulness of the item.
Final Print
For my final print my original plan was to add a tail on the cup to make it look more like a dinosaur. I then decided to add a face on it to add on to the ‘playfulness’ element. After printing my second iteration I realized that the face was not coming out as I expected and would not be a good idea to add to the final print.
After my second iteration I decided to add text to the side of the cup. I put the phrase ‘rawr’ on the side of the cup which I think was a great touch to the playfulness element.
Unfortunately the print did not turn out as i wanted it to
The printer did not print the tail out correctly and the text came out very sloppy.
After this I stuck to my original plan which was to fix the ridges on the handle of the cup so that it would look more like a dinosaur tail. To do this I made the ridges on the tail bigger and I also staggered them and made them uneven so that it would add a more realistic touch to it.
I initially had some trouble coming up with an idea for what I wanted to use as my original object, until yesterday when I was washing the dishes. I came to the realization that my roommates and I are desperate for a sponge holder in our kitchen. The sponge is always missing when you need it, whether it’s under the dishes or somewhere on the counter. We have a double sink so I decided to add a playful aspect to a sponge holder that would rest in between the double sink.
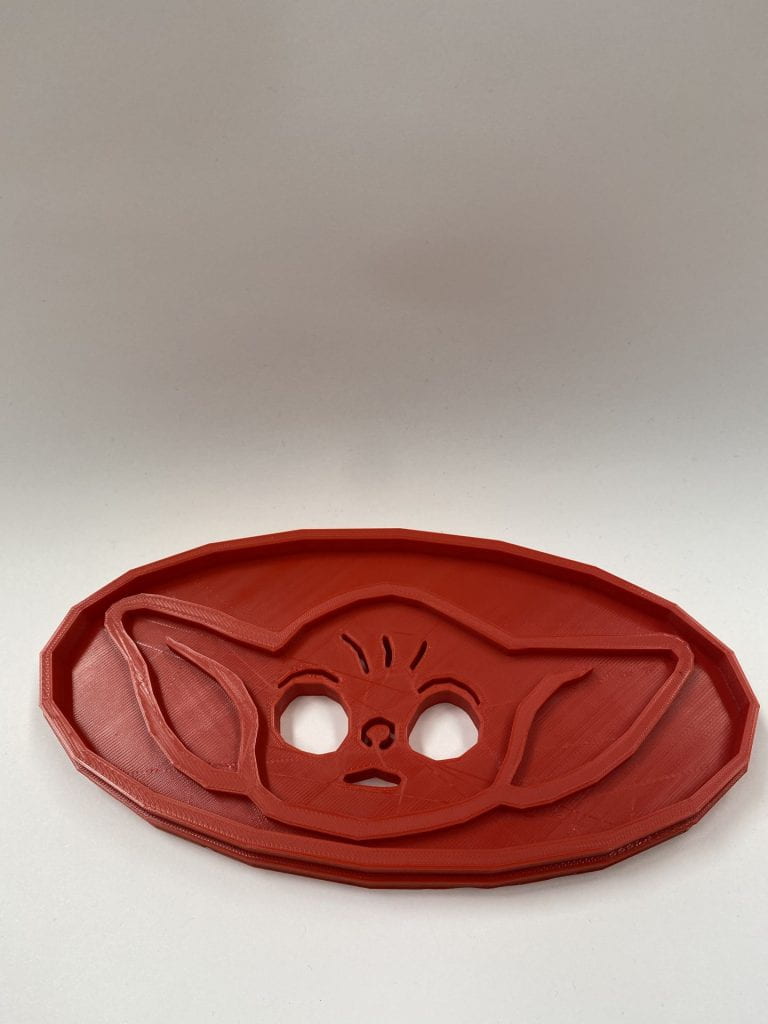
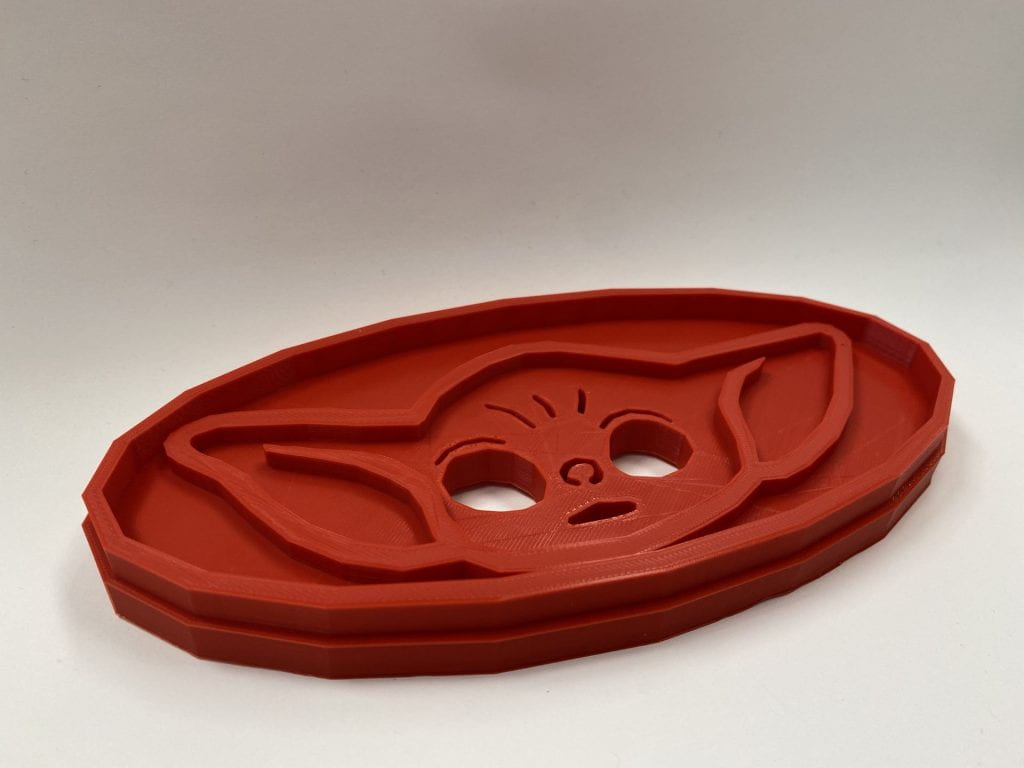
Above are pictures of the original kind of sponge holder I would like to base my self-expression object off. One of my roommates really likes baby Yoda, so I thought it would be fun to create a sponger holder that had baby Yoda’s face on it. The basic outline of the object would stay the same, but I would add a different shape to the piece that holds the sponge in and add indents to that piece to create an image of baby Yoda’s face.
Iterations
For my original design, I wanted to make the type of dish sponge holder that went over the middle of a two-compartment sink. After reviewing my design and our sink I came to the conclusion that this was not the most practical design for our sink because the two compartments are very small and we need as much space as we can get to wash dishes. I then decided that I would do a sponge holder that the sponge can rest on, on the side of the sink instead. I took the face side of the original idea and used that to model my new idea.
I began by attempting to create a vector in Adobe Illustrator, when importing this into Tinkercad it did not turn out the way I had hoped. I tried printing it anyway and as you can see in the slideshow, something was not working right. I ran into multiple issues trying to print and when I finally got it to print it, the print did not turn out. I came to the conclusion that these issues were due to the fact that I made it with shapes, so I thought I would try making something on Adobe Illustrator using the drawing feature on my iPad. It ended up working very well and I really enjoyed the way it came out in Tinkercad. I added a bottom portion and a circle to outline baby Yoda’s face. I used his eyes, eyebrow, and worry lines to act as a draining portion so that the wet sponge could dry once it was placed on the sponge holder. I was able to print with no problem once I tried out the new vector.
My first print with the new vector came out well, but it came out with a support plate which I did not want. It also came out with bumps on the surface, which I didn’t like the look of. I decided to print one more time and my last print came out perfect! I really am happy with the way it turned out and I know my roommates will love our new sponge holder!
This is my final self-expression creation, I chose to make a Baby Yoda sponge holder for my sink. This design worked really well and turned out better than I had hoped. I was not able to go with my original idea, but I really enjoyed the final piece. I chose this as my final design because I think it works well and looks aesthetically pleasing. It holds a sponge perfectly and could possibly be used as a soap holder as well. The holes are made with the details of the face so that the sponge can dry. After iterations, I didn’t run into much trouble creating the final piece. I smoothed the edges so that the dish would be more round. Overall, I had a lot of fun in this process and am pleased with the final piece.
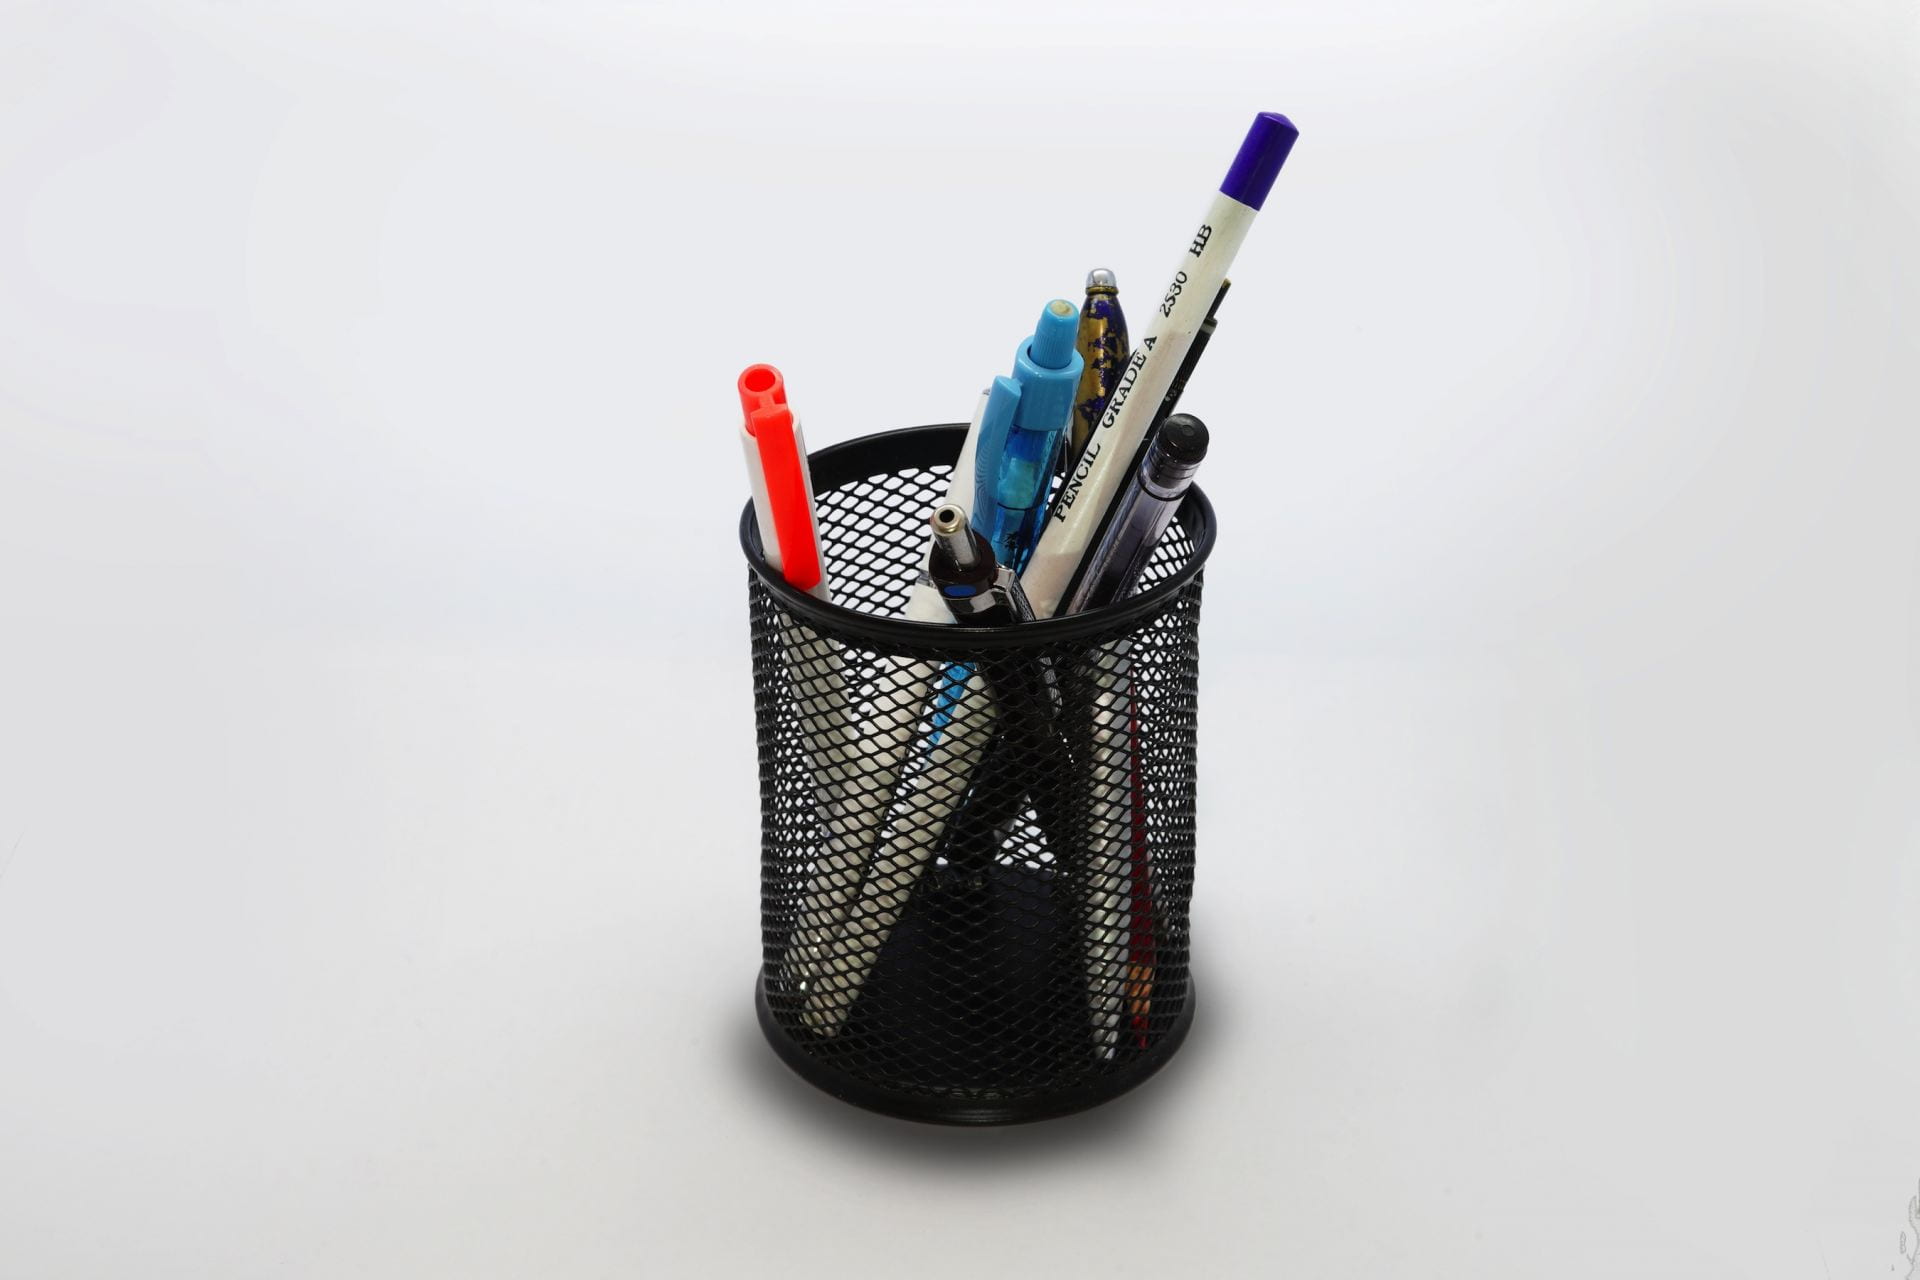
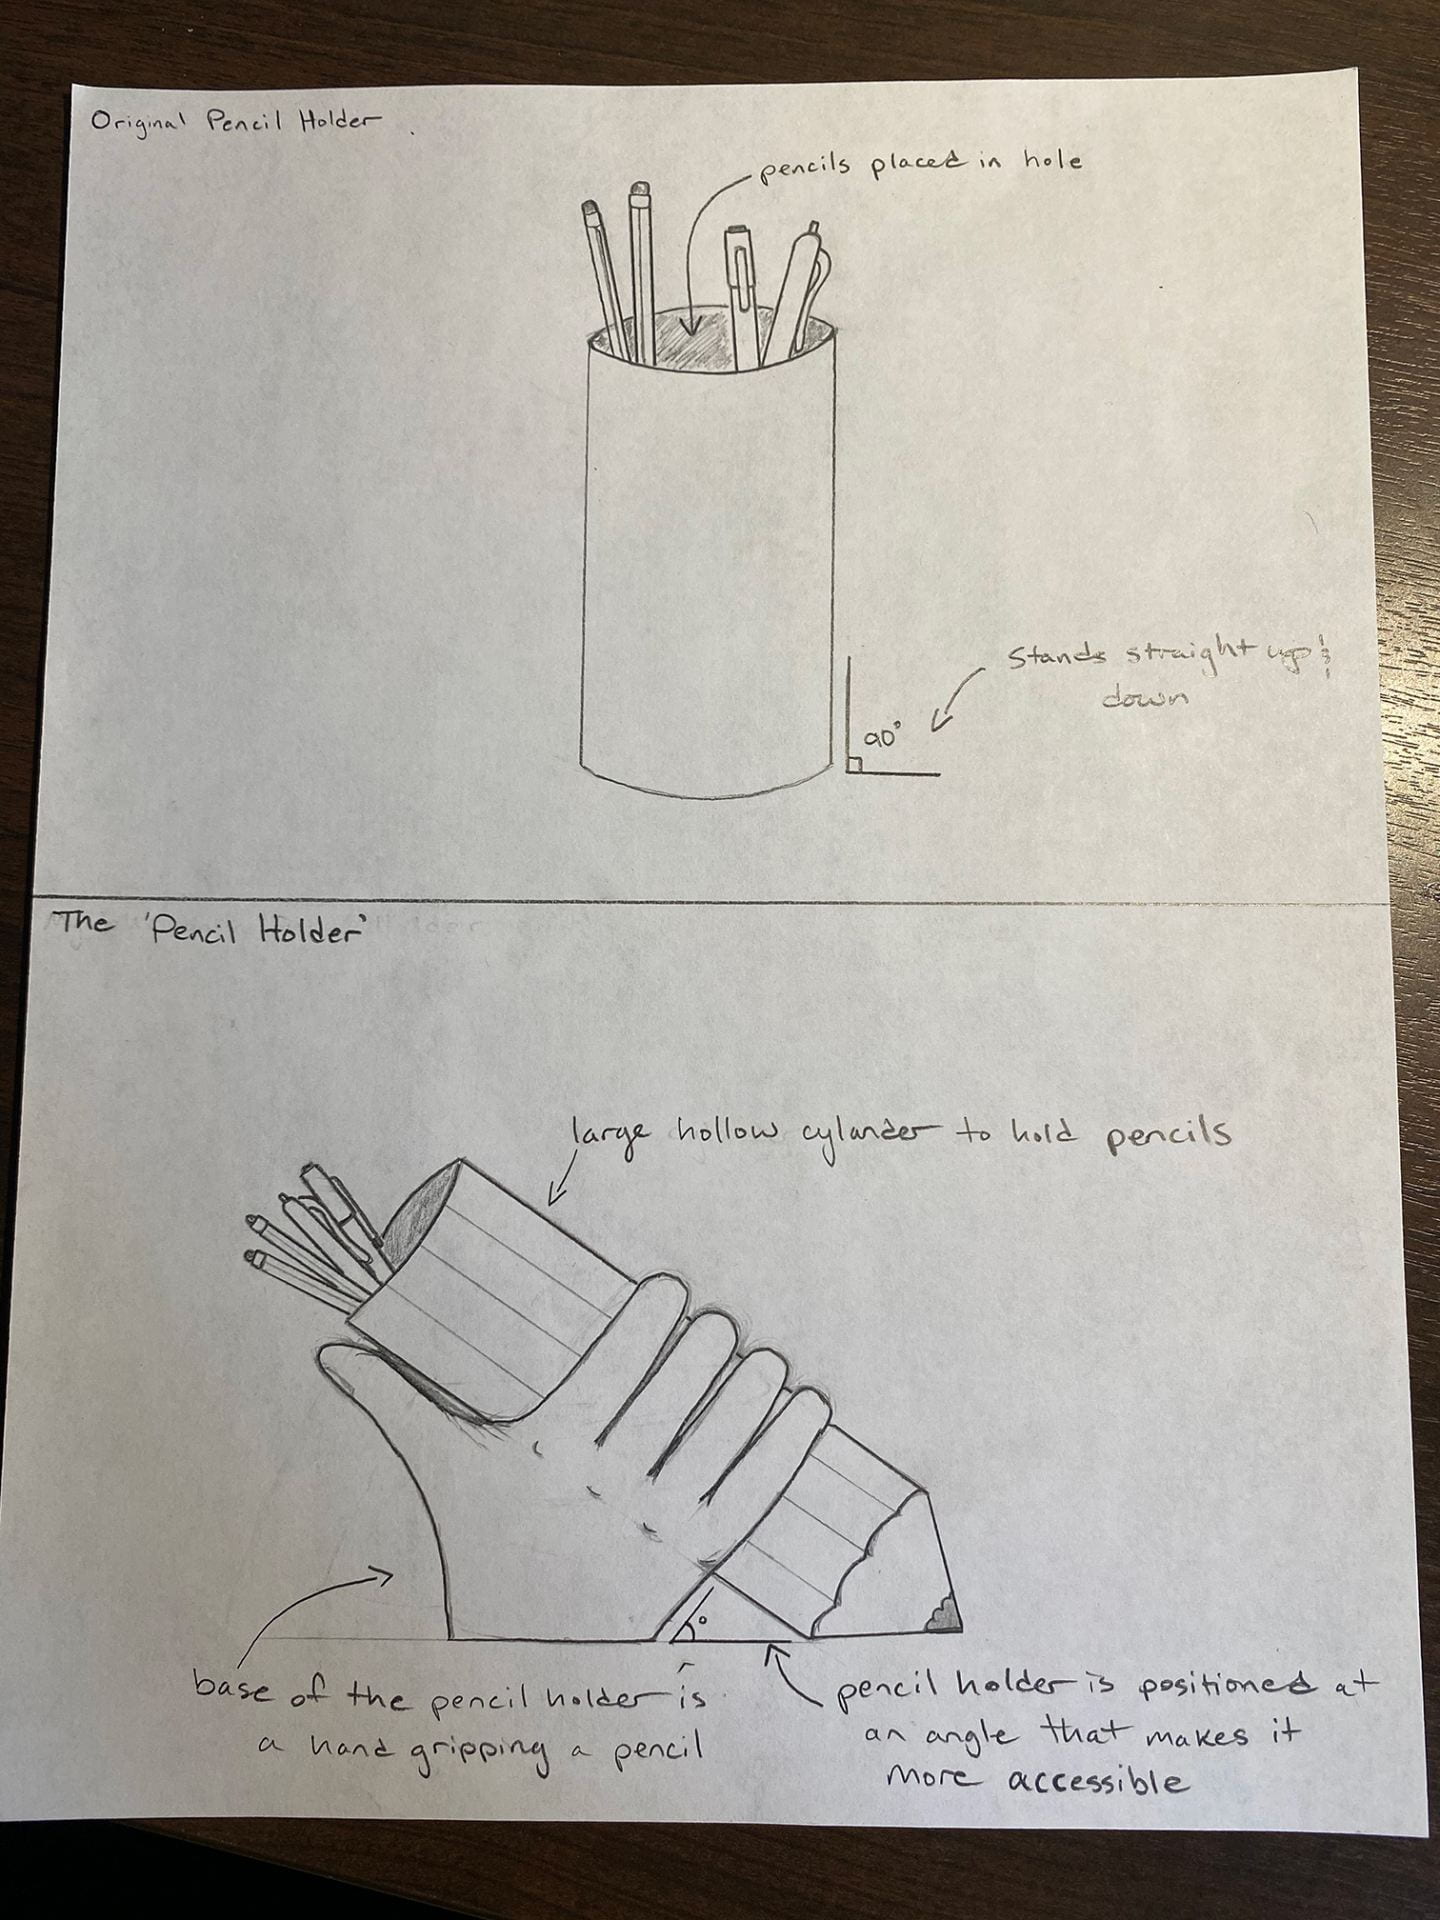
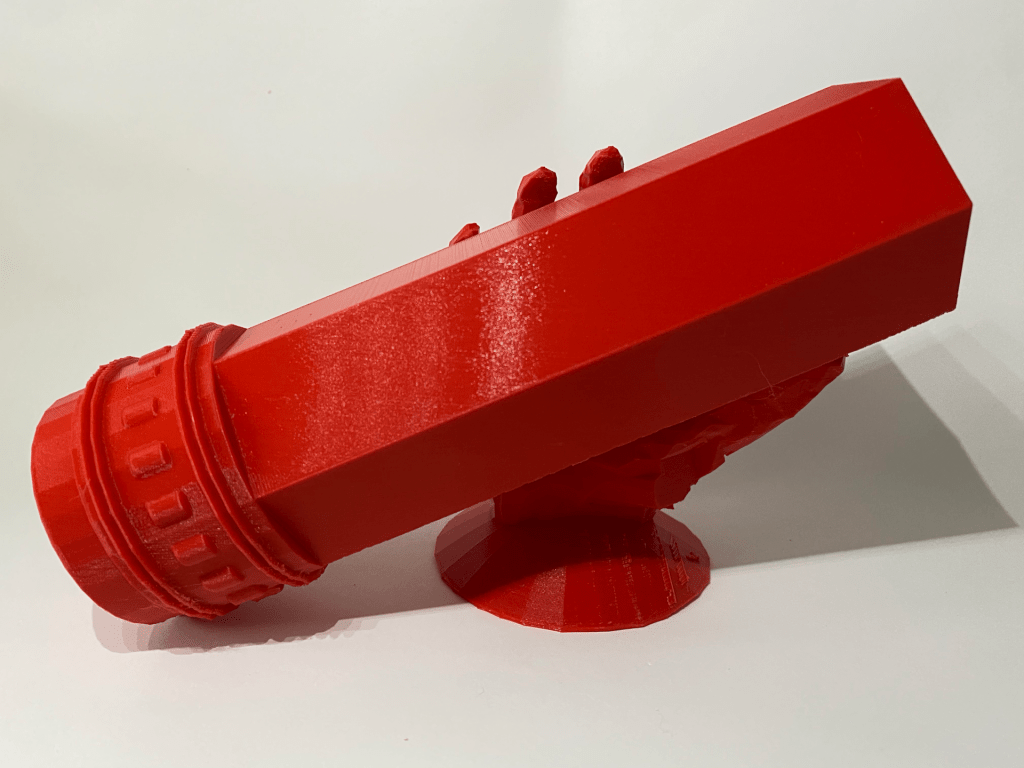
When considering what functional object that I wanted to inject whimsicality and playfulness into, I began brainstorming by considering the things around me which I most frequently use. This led me to my pencil holder. A pencil holder is a commonly owned household item, providing users with great organizational benefits. In order to save desk space, users can insert any type of pen, pencil, marker, or even scissors into it. This item is generally distributed in boring and uncreative shapes, such as cylinders or rectangles. They are fairly straightforward items, found in most department and office supply stores. In order to house writing utensils, the shapes are hollow and lid-less. My current pencil holder isn’t even designated for its job, as it is merely a cylindrical coffee mug with no sense of inspiration or playfulness.
Concept
To make this object more playful, I decided that I would ironically intertwine the object’s functionality and purpose with its literal name. I plan on designing the pencil holder in a way that emulates a hand holding a pencil. To do so, I will couple a pencil container, representing a pencil itself, and a base––the hand. The hand will position the holder at a slight angle, allowing the stored writing utensils to be more accessible to the user. Instead of an eraser at the end of the ‘pencil’, there will be a hollow opening into which users can drop their pens and pencils into. This tongue-in-cheek design is a good representation of my humor, and it will also serve me very well, as I lack adequate storage for my writing utensils. Although one can hold their pencils in almost anything that is hollow and has a hole on the top, I am seeking to add a touch of my creativity into this simple yet functional object.
Iterations
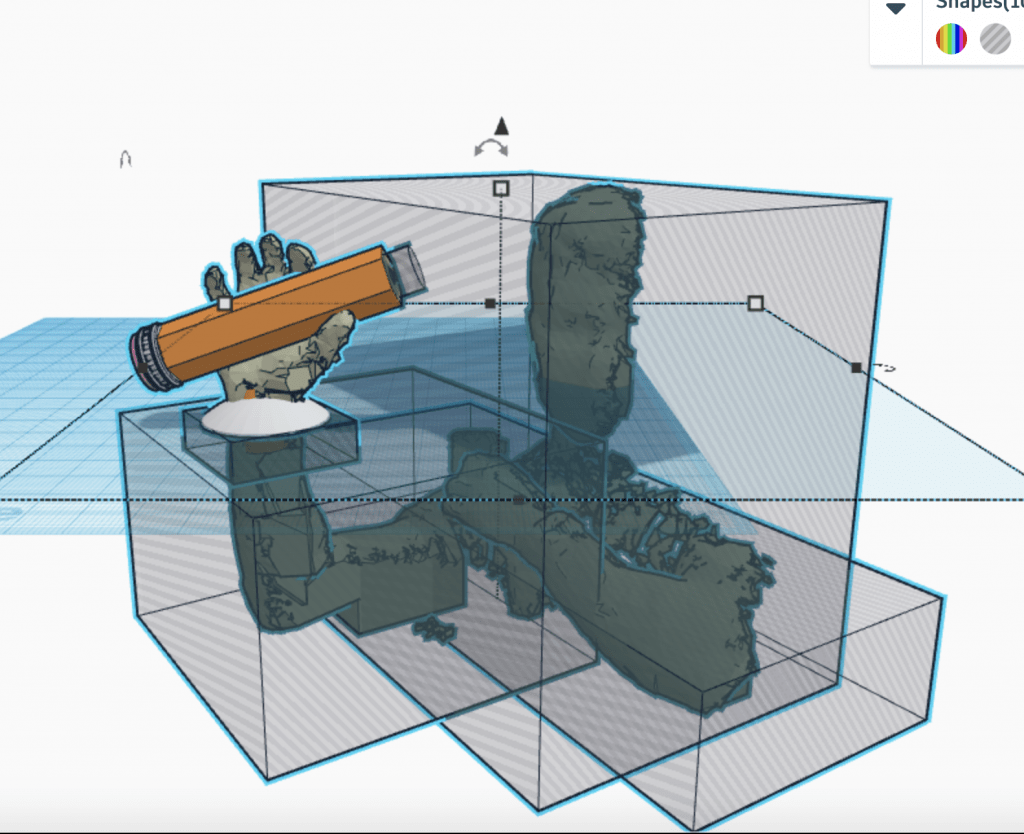
After completing my research and created a concept sketch, I was ready to start designing the object in Tinkercad. There was only one problem: how was I going to design a hand with the available software? The answer to this problem came about while I using an iPad mounted LiDAR camera, paired with the Monocle Structure Scanner application while working on the 3D Bust Scan project. During the process, I realized that I could use the camera and scanning software to create a 3D scan of my hand, which I could import to Tinkercad. With the help of Professor Hooker, I held my hand in a manner that emulated the position of the hand-drawn in the concept sketch in the previous section. After transferring the .OBJ file of my scanned hand onto my computer, I converted it into a .STL file in Tinkercad.
Below are a series of pictures that document the transformation process.
As seen in the pictures above, I had to utilize numerous ‘holes’ in order to isolate my hand. Besides that, the design was pretty straightforward. Thankfully, in Tinkercad’s ‘Making At Home’ list there was a readily available 3D model of a pencil. I merely inserted a cylindrical hole into the pencil to make it hollow, grouped them together, and then positioned the pencil in a way that allowed for the hand to grip it. Finally, I added a saucer where the wrist meets the palm, in order to create a wider and more stable base for the holder.
Due to time constraints, I have only been able to print out one iteration. In order to save time and resources, I printed a scaled-down version of the model, to make sure there were no glaring issues regarding its printability. There are a few edits I need to make in Tinkercad and Mesh-mixer, but other than that, I am quite satisfied with how my 3D model turned out. Upon viewing the iframe, one may notice that part of the hand intrudes into the hollow part of the pencil. I tried to address this issue with no success, but am certain this design flaw will be solved by the time I make my final print. I also plan on using Mesh-mixer to better conform the hand’s grip to the pencil.
The current model is roughly 4cm in height and 6cm in width. In order to function properly, I will have to print the model on a much larger scale. The only problem that arose during the print was on the printer’s end. As evident in the pictures above, the printer’s under extrusion resulted in the deformation of the pencil’s base and left an unwanted hole as well. In conclusion, this iteration has helped to point me in the direction I need to take, in order to achieve the results I am looking for.
Final Print & Reflection
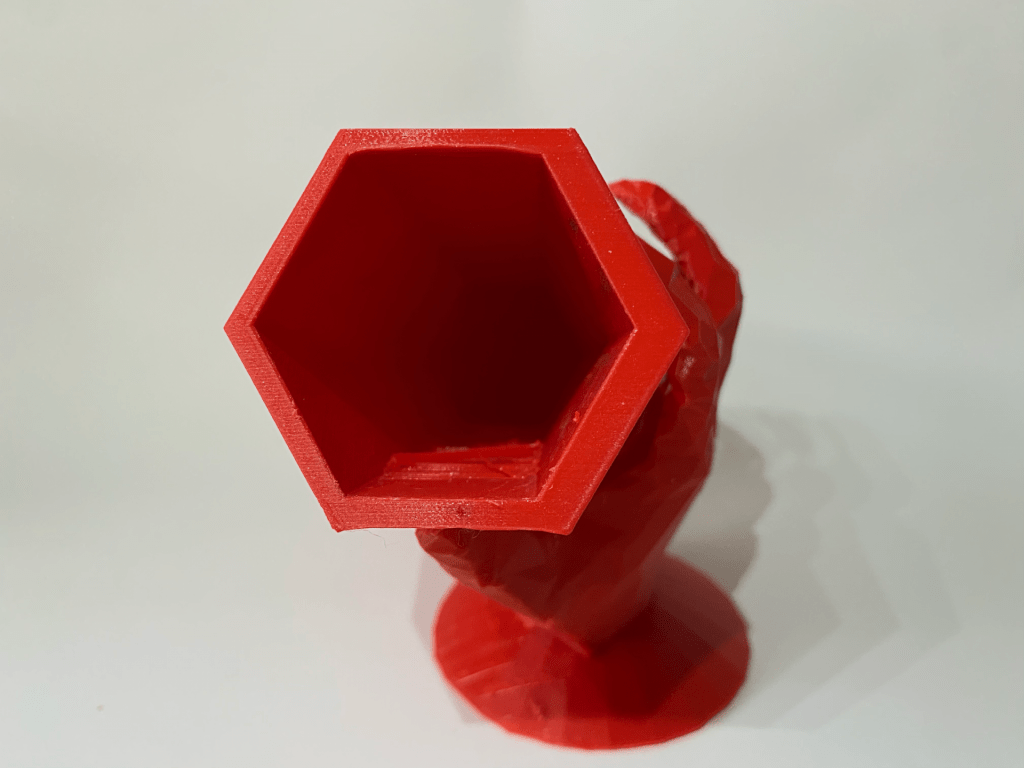
For my final print, I decided to make the ‘pencil’ that the hand is holding much larger, and changed the hole from a cylinder to a hexagon in order to maximize storage space. By widening and lengthening the ‘pencil’ part of the pencil holder, I hoped to ensure that there was enough counterbalance present. This would allow me to house an adequate amount of pencils, without worrying about it tipping over. I also modified the ‘pencil’ part of the pencil holder by making sure that its base would be level with the base of the hand. Although I tried my hand at Meshmixer, I was unable to smooth out the hand or change up the grip to make it conform to the pencil more tightly. I spent the better part of an hour and a half trying to rescan my hand with professor Hooker, but it was to no avail.
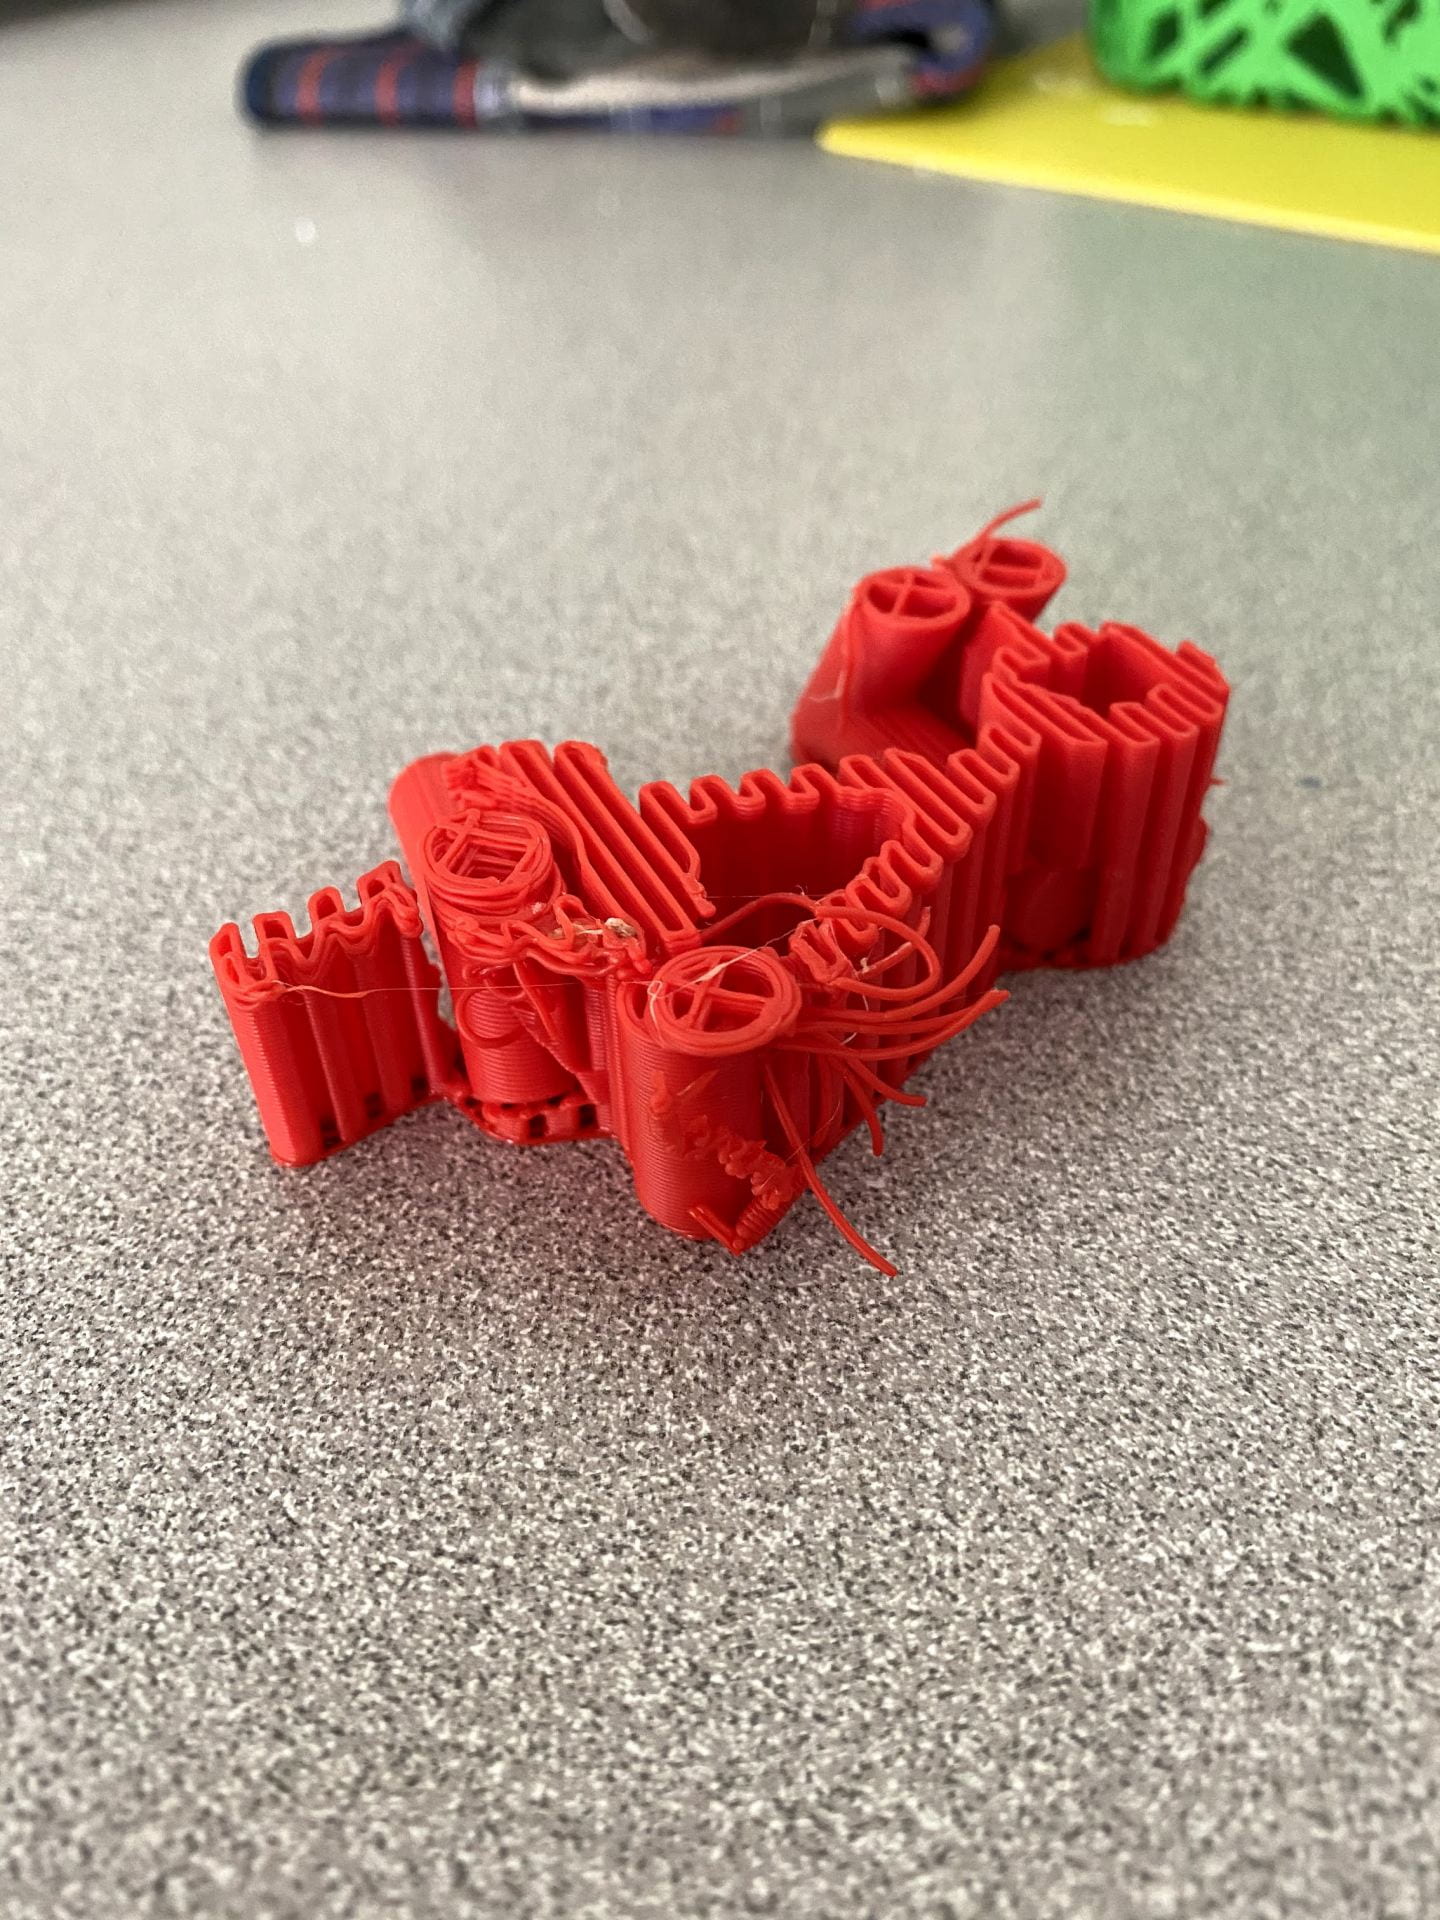
After multiple printing attempts, I still remain unsuccessful in obtaining a finished product. Below is a screen capture of the print settings I used and the estimated printing time. Currently, I am in the process of making my third print. I will have to post an update regarding its outcome. So far, it seems as if the problems stem from over-extrusion and lack of printer cooperation. Unfortunately, this process has garnered more pain than pleasure, but I guess that is all a part of the learning experience. I have been able to avoid any major problems in my previous prints, but that success has not carried over to this project. I am really hopeful that I will be able to obtain a good print by the end of this process.
Below are a couple of pictures that capture the various issues I have faced throughout this process.
Upon closer inspection, and two failed prints, I realized that the reason for the misprints was due to my incorrect calibration of the print settings. Professor Hooker brought it to my attention that I might have forgotten to add supports to the print settings, which was in fact the case. Upon making this correction, I was able to obtain a successful print of the pencil holder. Below are a few pictures that showcase the successful print.
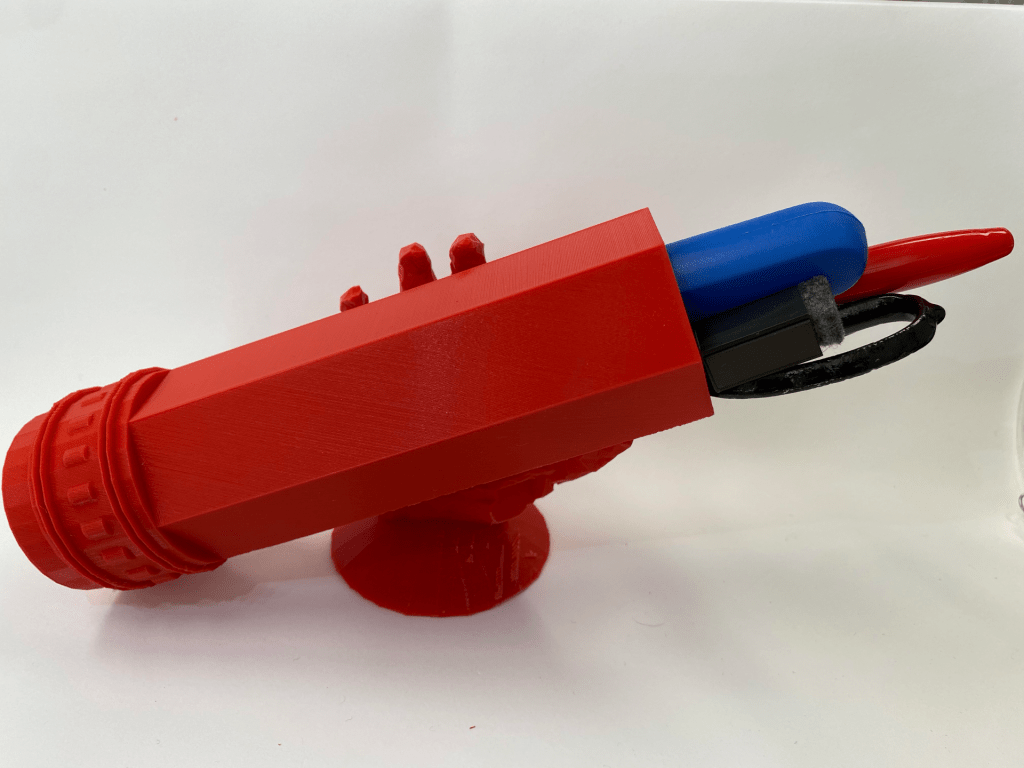
I purposely made the sides of the holder that come into contact with the hand thicker, in order to ensure that none of the hand bled into the hollow space of the holder. Overall I am pretty satisfied with how the print turned out. Although the third picture makes it seem like objects placed into the pencil holder are easily accessible, thus fulfilling its function, the holder is actually longer than all the mechanical pencils, pens, and highlighters that I own. Unfortunately, this negatively affects its usability to a degree. Other then that