Adrienne’s Story

Dimensional Letterforms

Jump to: Research | Concepts | Iterations | Final Reflection

My final dimensional letterforms

Twenty-six forms that represent sounds combined can create words with meaning that develop story. The visual depiction of these iconic symbols can be as simple as the scribbles of a preschooler to structural objects as seen in Lo Siento’s 4D alphabet.

Lo Siento 4D alphabet

Research

OOOOOooooooo

Both capital and lowercase letter “O”s are the same form and structure. When thinking in three dimensions, I immediately think of spheres, donuts, and targets. Taking this glyph further than extruding the surface to make a three-dimensional form is a goal.

  1. Vectorstock-circle-spherical-design-element-vector
  2. laundry-amazon
  3. www.notimeforflashcards.com
  4. Isamu Noguchi’s Skyviewing Sculpture in Red Square at Western Washington University
  5. Torus-istockphoto

Lowercase h

Or is it a chair? The stem and leg of this glyph brings ideas of architecture and furniture design. But when looking into the visual vocabulary of the lowercase “h”, I discovered how to draw a bird or to craft a house. I do love a good Old English form too.

  1. Chair + h SandroJalabadze-Dribble
  2. www.drawinghowtodraw.com
  3. www.notimeforflashcards.com
  4. logodix.com/chair
  5. Old English printableletters.org

Lowercase g

The lowercase “g” is the glyph to understand what a typeface can do for you. It’s form is versatile and unique with an ear, bowl, sometimes loop, other variants are tails. It is an obsession, just as the ampersand, to most type geeks. So much character can be derived from one character.

  1. https://qz.com “Can you recognize the letter “G”?” by Thu-Huong Ha & David Yanofsky
  2. free-printable-gothic-calligraphy-lowercase-letters-gothic-calligraphy-lowercase-G
  3. G. Ogaki Poster display typeface by Aron Jancso
  4. commons.wikimedia.org/wiki/File:G-samples
  5. The italic ampersand from Baskerville and the g from Newzald.

Back to Top

Concepts

The beginning of letterform exploration in two dimension…

Sketches by Adrienne Hooker
Sketches by Rowan Wang

Back to Top

Iterations

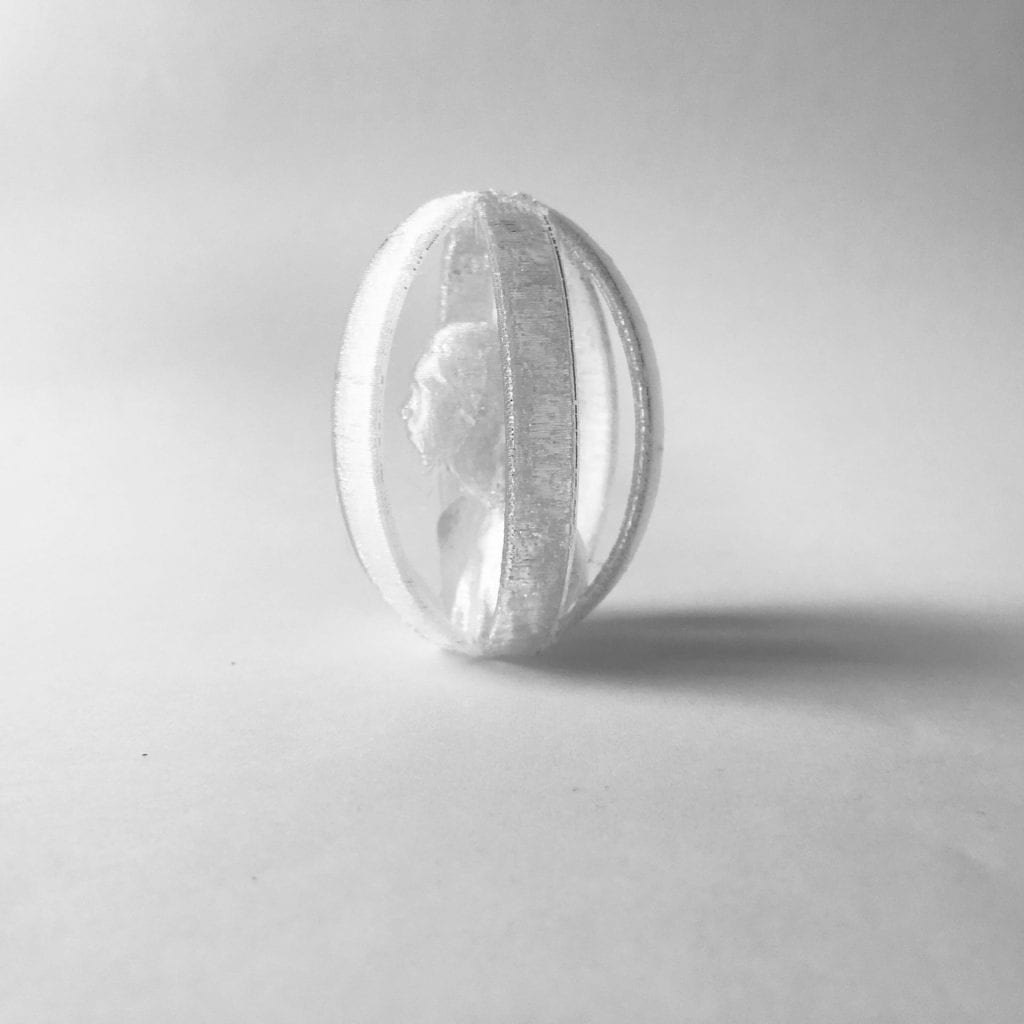
I wanted to tackle the patterned torus for the letter “O” but unfortunately time ran short so I had to settle for my oldest child, Oscar, being encased in multiple O’s. It was my first attempt at bringing in a 3D scanned model into Shapr3D and the program handled it well.

My next letterform is the lowercase “h”, fashioned after a modernist chair. It was fairly quick although a couple of the edges could be rounded better.

The letterform that took the most trial and error was the lowercase “g”. This glyph has so much character, I wanted to try and sculpture a two-story version in the round.

Test Prints

After modeling each letterform in Shapr3D, I test printed each on my Jellybox printer to get a sense of form but also how the models worked together. Each model took approximately 1 1/2 hours to print.

The C‘h’air felt more like a loveseat rather than a chair with the 65mm 50mm dimensions. So I’ll reduce the width to 35mm for the final print (as seen in the 3D view below).

First test print, 100% scale, coarse preset, no raft/supports, printed on side
Predetermined dimensions of 65mm x 50mm are more of a sofa than a chair.

The caged Oscar test print results were better than expected. The top connections of the multiple O’s need to thicken, but overall the bust and curves held up well.

The sculptural lowercase ‘g’ is still a work in progress, but I was successful in creating the top sphere with ear and the bottom tail. I’d like to refine the connection between the two stories. The 3D view is at low resolution since Tinkercad couldn’t handle a model with more than 300,000 triangles in the mesh. Initial print 100%, coarse preset with raft and supports. The ball of the ear snapped off when removing supports and still need to remove more support material underneath the top story and in between the tail.

Timelapse of 360° view of test print. Need to flatten bottom a bit to stand upright.

Back to Top

Final Prints & Reflection

Deadlines always push the limits to what we can achieve. I attempted to print my final letterforms at home so the class could use the 3SPACE lab, but unfortunately, my Jellybox said no. With a thermal runaway error midway through the prints, I had to go into the lab.

Jellybox final prints never made it past 50% due to temperature errors.

But I would say my printing issues at home were kismet. For the first time all term, being in the lab provided that in-between time with students. It felt good to have those teachable moments again (just as much for me as them). I thoroughly enjoyed this special topics class, and I hope I can dive into the 3D relm with students another time.

Below are the final prints of my three letters: lowercase h, O/o, and lowercase g. Not sure why it took me this long to realize I chose the letterforms for “hog”. As for printing, I would like to try my c‘h’air standing upright since the side on the plate didn’t keep it’s soft edge, and my lowercase ‘g’ has been printed on its side and upright with neither keeping it’s ear. The flattening of the bottom does help it stand better, but I’m not quite satisfied with how to finish it since the supports are difficult to reach or roughs up a beautifully pristine sphere. The caged O needed a little egg top and flattening of the bottom. Overall the 360° view of the letters are where I want them to be.

Back to Top

3D Scan

I didn’t even know that 3D scanning was something that existed before starting this project. I didn’t know how the technology worked or what to use to do the scan itself. It was even more interesting to learn that I can do it at home using my front camera. The process of scanning wasn’t the smoothest sailing because it took a lot of trial and error to get it right and there were still certain annoying imperfections but overall my scan came out well.


Below are some screenshots of my original scan.

Here is the model in Tinkercad.

In hindsight, I wish I had taken off my mask for the scan.


I finally got into the 3Space lab to plug the STL file into the 3D printer. While looking at my scanned model, I noticed a lot of inconsistencies in the bottom so I decided to put myself on a base of sorts in Tinkercad.

I have no idea what happened.

3D Scan

To create this scan I had Professor Hooker take a 3D scan of my head. I then sent the file of my head scan to my phone then transferred that to Tinkercad.

I did not like the original size of the scan so I enlarged the overall size of the scan in Tinkercad so that the features of the print are more noticeable. I then downloaded the scan into Ultimaker Cura, sliced it, and then downloaded into the 3D printer. The results of the print are pictured below.

3D Scan

The process of getting a 3D scan of myself took a lot of trial and error. At first my partner and I used ScandyPro on our phones to scan each other but we came to realize that the app wasn’t very accurate. The app only was able to pick up the front of our bodies but was unable to scan the top and back of our heads. We both decided that the iPad was a better option so we switched to using the Monocle Structure Scanner app to get an accurate enough scan to print. When we scanned each other we had to stand very still while the other person went around and got precise shots of our body. We had to angle the camera in the correct positions as well to be able to get detailed enough scans. The iPad allowed us to get scans of the back of our bodies as well as the top of our heads so in the end we stuck with the scans of ourselves from the iPad.

After I got the scan of myself that I thought was the best to 3D print I airdropped the files onto my computer. I downloaded the obj file of my scan and then imported it into Tinkercad. After importing the 3D scan into Tinkercad I then had to clean up my scan because it picked up some random objects but other than that the scan turned out well.

3D Scan


In order to create this 3D model, we had to learn how to 3D scan. I worked with another classmate to practice the 3D scanning process on the iPad that was provided to us during class. We each took turns using the LiDAR camera attachment on an iPad paired with the Monocle Structure Scanner application to get a good 3D model of each other.

The 3D scan process essentially consisted of one of my classmates walking around me and taking pictures from all angles, while I sat as still as possible. While scanning each other we noticed how hard it was to get certain aspects and features of ourselves to show up in the models. For example, in my final scan, there are some spots in my hair that are missing as well as features of my face like my nose being not as defined. It took a few tries but eventually, we managed to get a good enough scan to 3D print.

Once I got a sufficient scan I airdropped the file to my laptop and began adjusting it in Tinkercad. I changed the model by scaling it up about 2000% and removing two millimeters from the bottom of the model so that there were fewer holes and more detail in the final print. Once I was satisfied with my model in Tinkercad, I downloaded it as a .stl file and then imported it into Ultimaker 2+ Extended and then printed it. Below is the final 3D print of the scan taken of me in class.


3D Scan

For this project, I had to create a 3D scan of my head. At first, I attempted to do this using the FaceID camera on my phone and the Scandy app. However, I soon realized that it was difficult to get a clean 360 scan with it. The app did work as intended, but it was not ideal because I could only use the inner FaceID camera, which could only scan a few inches in front of it.

Instead, I used an iPad Pro with a LiDAR scanner to capture the imagery. This was much easier to use, but it did take several tries to get a good scan. The first scanning attempt went very slowly, and the model came out looking very strange. The issue was that the scanner was not calibrated properly and wasn’t capturing a smooth image, and a simple recalibration made it work much better. After recalibrating, the second attempt went much smoother. I had to stand completely still as a classmate moved the iPad around my body to capture a full 360 scan. Overall, the scanning process as a whole was very easy and straightforward once we worked out the kinks.

After transferring the .obj file to my computer, I imported it into Tinkercad. The model imported very well, with only a few floating pieces that I removed using hole shapes. There were no large gaps or abnormalities with the model, which made it simple to print and turned out well. Overall, I really enjoyed the process of 3D scanning and was surprised at how it can now be done so well with only a mobile device.

3D Scan

3D Scanning was a very new experience for me but this project was extremely fin nonetheless. Using the IPad to scan myself and others was a pretty cool experience and seeing how detailed it could capture me was almost a little scary. Although it was difficult at first to get a good scan, once the camera’s were recalibrated it was much more simple. I then had to transfer the .obj file of my scan to my laptop and I opened it in Tinkercad.

I then added a stand for my bust and covered the logo on the bottom. There were no holes to fill luckily and nothing to cover up. I could not however, figure out how to stand my figure up straight so I ended up having to print it on its side which was fine it just made a plate and some stilts that I was able to remove.

When I was finally ready to print I saved this as an .stl and sent it to the printer but unfortunately it did not print the first time. I sent it again on a different printer and finally got my final product.

Overall, I am very happy with how this turned out. My dimensions are sort of off I think which I didn’t realize until it was printed. Regardless, this was a very cool experience getting to print something so personal and I am now super interested in 3D scanning and have been very curious about what else scanning is used for.

3D Scan

This was my first 3D print and scan of a model of myself. The process was very interesting. Normally for us students, we would need to download the app, Scandy Pro, on our phone. However, it requires an iPhone that is iPhone X or later, and I did not have that type of model. So during class, I decided to use the school iPad Monocle Structure Scanner to scan. I first wanted to scan my Airpods case with the iPad, but due to the camera on the iPad not being able to correctly scan my Airpods case, I decided to scan a model of myself. After attempting to scan my Airpods case, our professor reconfigured the program and then approached to scan a model of myself. The process was very interesting, in the app, there is a 3D cube that captures the model within the box. So, to capture an accurate model of myself, I had to sit on a chair and not move to the best of my abilities. My professor then started to capture me sitting in the chair, circling around me, trying to capture every part of myself. It is an interesting process, that usually takes two people to complete. After capturing myself, the model looked very accurate of what it has captured. The files were OBJ format so I downloaded the files, then imported the files to my google drive, saved the folder onto my desktop, and then imported it onto Tinkercad. On Tinkercad, I increased the size of my model since it was very small when it was first imported. I then downloaded the model as an STL file, then transferred it to the Ultimaker program at the lab. I decided to add a raft at the bottom of my model so the print would go smoothly, and my model will stay upright thanks to the bottom raft. After the print, the model came out great, the print looked just like as in Tinkercad. I’m amazed of how it captured the details of my hoodie and beanie that I was wearing. I can’t wait to see what other types of 3D scanned objects I will be printing towards the future.

Chance’s 3D Scan

3D scanning is far more complex than I initially perceived. Professor H, made it look very easy during our demonstration which threw me off after my first failed attempt. What I learned it that technology is amazing, but going slow to help it out is necessary. When scanning it’s also easy to miss tiny parts of the scan which result in odd deformations in the final product. For my scan I did multiple tries in an effort to get the best result and I feel as though that’s the best method. To scan we used a LiDAR camera attachment on an iPad. After the scan, I took the product into tinkercad to upscale it. This was very easy as it is familiar software. To export it from the 3D scanning software I had to export as an OBJ which I airdropped to my Mac and then imported through tinkercad. After I scaled the scan up (to about an inch and 1/2) I exported as an STL file and printed in the lab. Print time only took about 4-5 hours, but honestly I’m pretty surprised at the detail it captured. I have very wavy/curly hair and it did a good job of picking it up still. Overall, I enjoyed the experience and would like to explore the technology more in the future.

Initial 3D Scan Using “ScandyPro”

Tinkercad Mockup

Final Print

3D Scan

I created my 3D bust scan in class, working with a group of 3 other students to get a sufficient 3D scan using a variety of formats. We took turns using the LiDAR camera attachment on an iPad paired with the Monocle Structure Scanner application to scan each other, and while we tried the ScandyPro phone application, I found that the LiDAR attachment worked the best. None of us could manage to get the color on the scan to come out well, even after the LiDAR cameras were reconfigured. I had to stand completely still as a classmate circled me, capturing pictures of me of all angles. It took a few tries to perfect because my height made it hard for people to reach overtop of me and so my scans kept having holes at the top of my head, but eventually I got a scan that captured a perfect shape of me, not missing any areas or details, although the colors were not great.

The Monocle Structure Scanner application captured a series of images that configure into an .OBJ file, of which I Airdropped to my computer. Once on my computer, I used Tinkercad to increase the measurements to 42.0 x 53.0 x 24.0 mm and make other adjustments including adding a block to the bottom of the bust to give it a stronger base and a hole at the bottom to get rid of the extra pieces. From Tinkercad, I then exported the file as an .stl and opened it into Shapr3D where I adjusted the layer height to 0.5mm, infill density to 20%, and the plate adhesion to raft.

The process of creating the 3D scan took some work and a fair amount of trial and error, while putting it in Tinkercad, Shapr3D, and then finally printing the 3D bust was pretty simple once I realized what I needed to do to make it print in the best way possible.

Unfortunately, I unknowingly printed my 3D bust on a broken printer, so the back half of my 3D printed bust is very stringy and disorderly, and the front seems like the adhesion was messed up too. Because of this, I would say that my 3D printed bust did not come out as great as I hoped; overall the bust is very chaotic looking and the integrity of the design did not carry over. No amount of filing would help the look of this print because the filament is not connected, so it would all fall apart more than it already is.

3D Scan within Monocle Structure Scanner

3D Bust in Tinkercad