Melissa’s Story

Letterforms are made through by putting together various shapes in specific ways to create a certain configuration. Each letterform has a specific configuration and regardless of the style or font used to show the configuration, you can identify which letterform it is. You can express the letterform in any set of dimensions and it will still communicate the same meaning.

First Glyph (W)

The first glyph I chose was the first letter of my last name, “W”. I find this letterform interesting because it is essentially a letter created out of doubling another letter, both visually and within it’s name. It is formed through taking two “V” shapes and connecting them together to create the “W” shape. It can also be written by doubling the letter “U”, just like it’s name.

Second Glyph (a)

For my second glyph I chose a letter that comes up in my name twice, the letter “a”. For my specific letterform I chose the lowercase style. I chose this leterform because I think it’s interesting all of the different ways it can be written. You can create this letterform by creating a hook and adding a circle to the bottom of the hook or you can add a circle to a simple line. I have also seen when it is written that you can draw a simple circle and just continue that circle until it has a tail, which turns it in the letter “a”.

Iterations

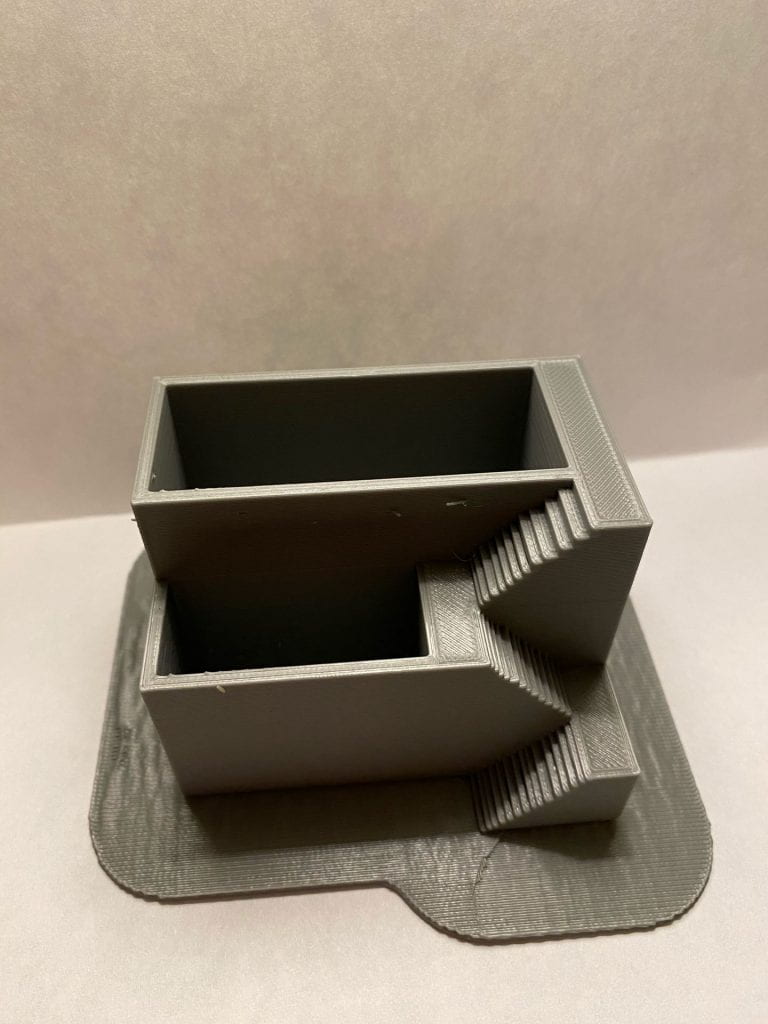
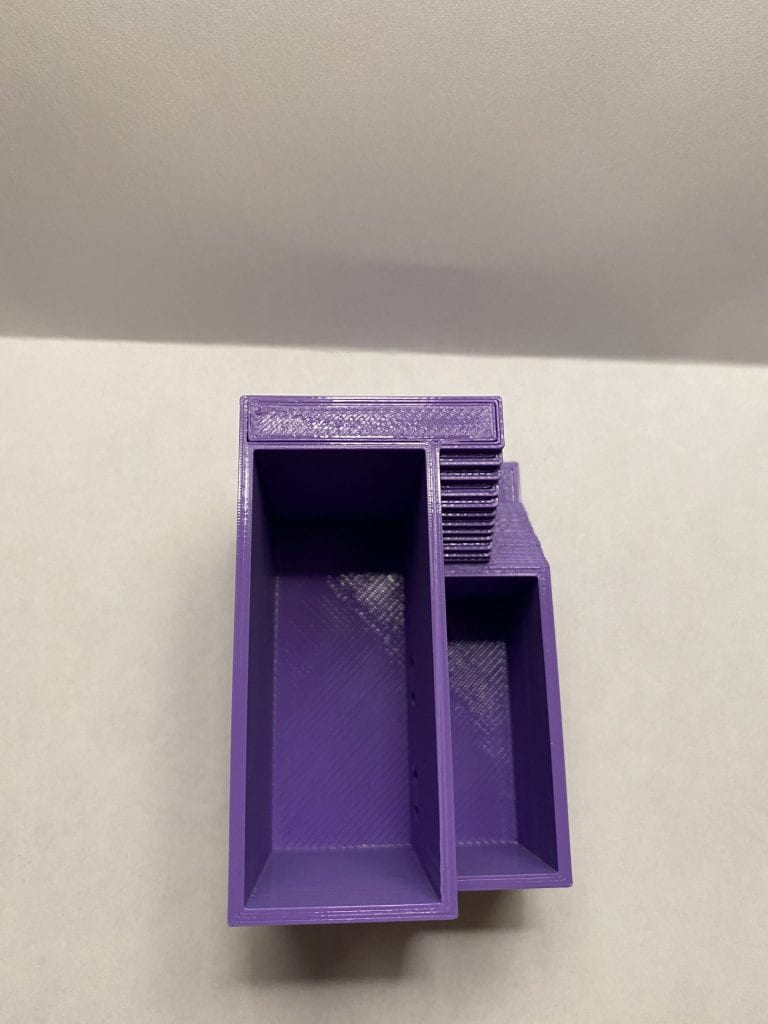
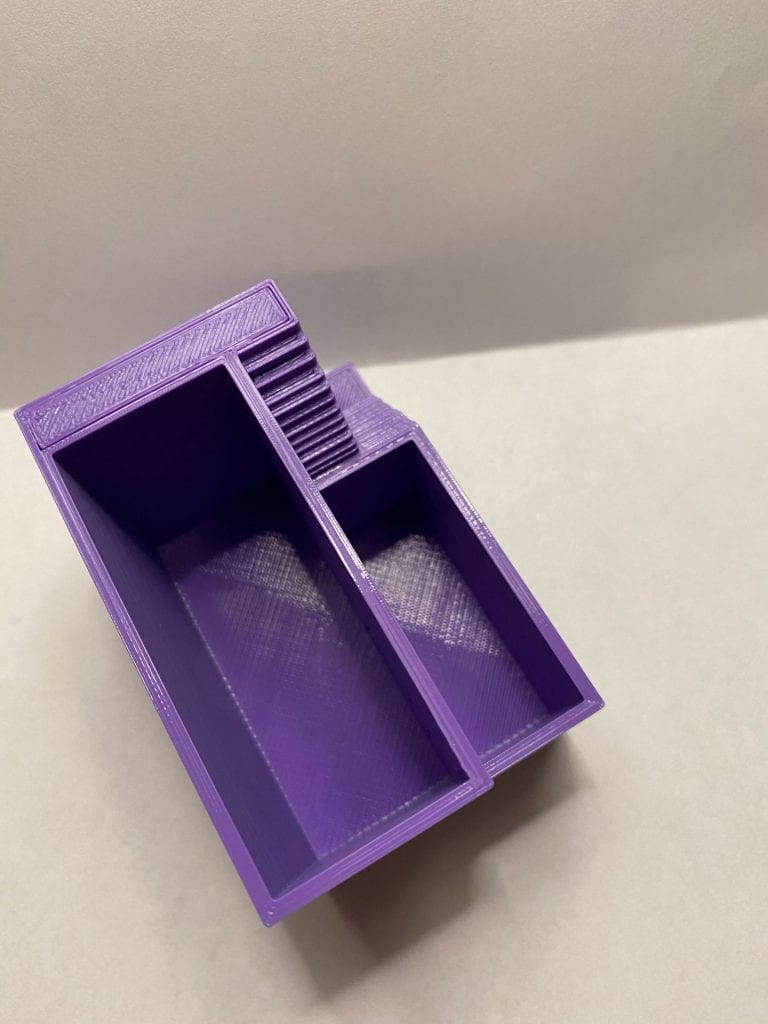
For my first letter, I decided to go with the block design that I drew out for my concept. I create each block individually and then stacked them on top of each other one by one to create the look of a lower case “a”.

When testing out different forms of the lowercase letter “a”, I was really set on stick with the block idea that I had come up with originally. The first letterform printed with supports on every side. At the time I did not realize that you could take these off, so I tried again using a different version of the letterform that I created in Tinkercad. I thought the bigger cubes would help with the sturdiness of the print. I still ran into issues with the print made of bigger cubes.

For my second letter, upper case “W”, I decided to try out two designs. One was the design with the stacked rectangles. I really like how this design turned out. I think it’s cool that when you first look it may be somewhat confusing, but when you place it right, it resembles a “W”. For my second design, I used the draw feature in Tinkercad in order to create a whimsical “W”. I’m also really pleased with this design as well, I think it would be a playful way to create a simple letter.

For my uppercase “W”, the first print I made came out exactly the way I wanted it to. I was realy happy with how this print turned out and had no difficulty in printing it. I assume that this is due to the simplicity of the form of the print.

Final Print

I was really happy with the final result of this project. I was able to learn so much through printing these two pieces. I did not run into any issues with the “W” letterform and I was so ecstatic about how it turned out, it was exactly what I had imagined. For my lowercase “a” I ran into quite a few issues. But, through printing this letterform a learned a lot about supports. I had not even needed to use supports before, so when I saw them I was initially confused. Eventually, I discussed with Professor Hooker and learned that what was on my first print was the supports and that you can take them off! To get my final print, I laid the print on its side in Cura and put supports on the bottom that was touching the surface of the printer. After printing, I took off the supports and the final product turned out exactly how I wanted it! I think overall, I was able to learn more about printing in the process of creating these.

Shapr3D First Models

Bracket

I first began by creating the bracket with this sketch.

I then extended the sketch to create this object.

I then rounded the edge of the object and created a second sketch on top of the object. I used this sketch to extrude a part of the object.

Once I extruded the side of the object, I created a plane and drew the next sketch that I would use to extrude through the top of the object.

I then selected “intersect” to creat this shape.

Then, I created the bottom section of the bracket by creating a square sketch, which I then extended into an object. After this, I created 4 circular sketches, which I then used to cut through the piece to make the holes.

Lastly, I put the top and bottom of the bracket together and smooth the edges to add detail.

Stylus & Base

For creating the stylus & base I used this tutorial.

I first began by creating a sketch of a pen shape. I then used the “revolve” tool to get a 360-degree view of the object. I then used a rectangle sketch to extrude the side of the stylus.

After this portion of creating the stylus I began to run into some issues.

I was able to create the stylus holder by creating a sketch, which I then turned into a 3D object using the “revolve” tool. I also had troub

I then rounded out the edges to add detail, as well as detailed the inside of the object.

3D Scan

In order to create this final model we had to start with creating a 3D scan of ourselves in the classroom. We used the iPad that was provided and scanned each other one by one. It took a lot of trial and error to get a good scan because the subject had to stay completely still the entire time. The person creating the scan had to make sure that they were scanning the person from all possible angles, which again added an element of difficulty to this project.

Once we got our final scan done, we exported it to our phones as a .obj file using Airdrop. I Airdropped the file to my iCloud drive so that I would have it right on my computer. Once I got home from class I imported the .obj file to Tinkercad to look at my scan. At first there was an extra piece that showed up next to my arm, but I used the “hole” tool to cover that up so that the print wouldn’t have a piece hanging off of it.

After fixing any issues in Tinkercad, I exported the file as a .stl and sent it to my Gmail. When I went into the lab I downloaded the file, put it in Cura and printed the file with a layer height of .05, an infill of 20%, and a plate adhesion as raft. I then downloaded it to the SD card from the Lulzbot, inserted that into the Lulzbot, and printed my final print. I was really happy with the way the print turned out, the only problem was the support plate. This didn’t show up in Tinkercad or Cura so I’m not really sure why it printed the way it did.

Melissa’s Self Expression

Research & Concept

I initially had some trouble coming up with an idea for what I wanted to use as my original object, until yesterday when I was washing the dishes. I came to the realization that my roommates and I are desperate for a sponge holder in our kitchen. The sponge is always missing when you need it, whether it’s under the dishes or somewhere on the counter. We have a double sink so I decided to add a playful aspect to a sponge holder that would rest in between the double sink.

Above are pictures of the original kind of sponge holder I would like to base my self-expression object off. One of my roommates really likes baby Yoda, so I thought it would be fun to create a sponger holder that had baby Yoda’s face on it. The basic outline of the object would stay the same, but I would add a different shape to the piece that holds the sponge in and add indents to that piece to create an image of baby Yoda’s face.

Iterations

For my original design, I wanted to make the type of dish sponge holder that went over the middle of a two-compartment sink. After reviewing my design and our sink I came to the conclusion that this was not the most practical design for our sink because the two compartments are very small and we need as much space as we can get to wash dishes. I then decided that I would do a sponge holder that the sponge can rest on, on the side of the sink instead. I took the face side of the original idea and used that to model my new idea.

I began by attempting to create a vector in Adobe Illustrator, when importing this into Tinkercad it did not turn out the way I had hoped. I tried printing it anyway and as you can see in the slideshow, something was not working right. I ran into multiple issues trying to print and when I finally got it to print it, the print did not turn out. I came to the conclusion that these issues were due to the fact that I made it with shapes, so I thought I would try making something on Adobe Illustrator using the drawing feature on my iPad. It ended up working very well and I really enjoyed the way it came out in Tinkercad. I added a bottom portion and a circle to outline baby Yoda’s face. I used his eyes, eyebrow, and worry lines to act as a draining portion so that the wet sponge could dry once it was placed on the sponge holder. I was able to print with no problem once I tried out the new vector.

My first print with the new vector came out well, but it came out with a support plate which I did not want. It also came out with bumps on the surface, which I didn’t like the look of. I decided to print one more time and my last print came out perfect! I really am happy with the way it turned out and I know my roommates will love our new sponge holder!

This is my final self-expression creation, I chose to make a Baby Yoda sponge holder for my sink. This design worked really well and turned out better than I had hoped. I was not able to go with my original idea, but I really enjoyed the final piece. I chose this as my final design because I think it works well and looks aesthetically pleasing. It holds a sponge perfectly and could possibly be used as a soap holder as well. The holes are made with the details of the face so that the sponge can dry. After iterations, I didn’t run into much trouble creating the final piece. I smoothed the edges so that the dish would be more round. Overall, I had a lot of fun in this process and am pleased with the final piece.

3D SVG

For this first design, I wanted to keep it simple. I had old logos on my computer, but they didn’t come out the way I wanted them to so I decided to create a fun vector to use. I created the vector using the star, ellipse, and arc tool to create this smiling star! I then exported the file as an SVG and imported the SVG file into Tinkercad. At first, it was too large for the workplace, so I changed the width to 200mm so that it would fit.

Form | Function

F|F Research & Concept

This is the original Thingiverse object!

https://www.thingiverse.com/thing:2183259

This is a 3D printed plant pot. The purpose of this object is to hold small plants such as flowers or succulents. There are two deep cut-outs that allow space for both the plant and the dirt that it requires in order to grow. The object includes mini stairs for an aesthetic look. This object also allows for the owner to place not one, but two different kinds of plants within the object, which would provide for a more aesthetically pleasing look.

Personalizations & Improvements

I really love the design of this object and I think that aesthetically it looks really good. One improvement that I think would really help would be the addition of small holes in the middle wall. This would allow for even distribution of water and allow for wiggle room, should you over water one of the plants. The small holes would give you the added luxury of only having to water one side. Another change I made was that I made the object 25% smaller. I thought that this would be beneficial in regards to printing time and it would make the object that much more versatile, you could put it in so many small places! Lastly, I made an aesthetic change, I thought the pot might look more cohesive and interesting if the first set of stairs went into the object itself.

F|F Iterations

Original Object by @AndresQuijas on Thingiverse

Tinkercad Iterations

3D Print Iterations

I found this process so exciting and interesting! I began with printing the original object, but when I put it in Cura it was going to take a day and a half to print. After talking with Dr. Hooker I decided to scale it down by 50% with a .2 layer height and 5% infill. With this, I was able to cut down the time it would take to print by a lot. After printing the first print, I realized that it came out with a bottom piece part attached to it. I wasn’t really too fond of the way it looked and also thought it would add to the print time. The next day when I went to print my object with iterations, I realized that the different printer I was using printed even faster! As it printed I watched and I found that the printer I switched to did not add that bottom piece, which I think works better for the object aesthetically.

When I was adding iterations in Tinkercad I worried my iterations would be uneven, but eventually, I got it down. When I printed the second object, it came out perfect. I did end up making what I would call a “happy mistake”. When I printed the altered object, the holes weren’t completely hollow, but I actually liked the way it looked a lot better. I also think that it would function better for plants. This way the water can seep through slowly if you over water one side and it also makes the holes in the object more discrete. In addition to this, I really liked the way the object looked without the third set of stairs and the extension of the lower crevis.

F|F Final Print & Reflection

This is my final remix of AndresQuijas flower pot, more about my remix can be found on Thingiverse.

Reflection

Throughout the process of working on this project, I have been able to learn so much about 3D printing that I never knew before. I started out feeling discouraged when I realized that the specific flower pot I chose to print would take a day and a half to print. With help from Professor Hooker, I was able to adjust aspects of the print in order to get the printing time down. I started by adjusting the sizing by 50% with 0.2 layer height, and 5% infill. After printing the original in with those adjustments, I printed my iterations with them as well. I was content with the way my iterations came out and for my final print I wanted to make the print true to size, so I did. My final print is the actual size that the piece was supposed to be, so I was able to put actual plants in the print, which was so cool. I enjoyed seeing the print “come to life” and be put to real use. I watered the plants on one side and check the soil to see if the holes I put in were doing their job, and it worked! Through this project, I have learned that 3D printing is a big game of trial and error, so when I got to my last print and was satisfied with it, it was a really gratifying feeling.

Melissa’s First Print

I really enjoyed my first 3D printing experience! When we first started printing I ran into some trouble with getting the file to the printer so that it could print. After some trial and error, Professor Hooker helped us figure out that we needed to put the USB into the computer to switch the .stl over to the 3D printer. As I watched the printer, I noticed that as it prints, it creates a criss-cross design within the shape, I assume that this is for stability for the shape. I never knew how 3D printing actually worked so it was interesting to see that the material used was a long strip of something that looks like plastic. I also thought it was cool that the base and the printing piece itself both move in different directions in order to print the object. This model was created by @mathgrrl on Thingiverse.

Hi, I’m Melissa

Hi, my name is Melissa Ward. I am from right outside Philadelphia, Pennsylvania. I am a junior majoring in SMAD with a concentration in interactive design and a minor in sociology. I am a member of Phi Mu here at JMU. In my free time, I enjoy listening to music/ podcasts, cooking and running.

I tend to do a lot of things haphazardly and my brain is always running at a million miles a minute, but I also have a method to my madness. So, I don’t think there’s just one object that would describe me. I ended up choosing a junk drawer. While junk drawers are messy and haphazard, a lot of people know exactly what is in their own junk drawers and how everything should be organized.

https://www.thingiverse.com/ward4mm/designs

https://www.tinkercad.com/users/dylNNdKVJyf-ward4mm