3D Scan


In order to create this 3D model, we had to learn how to 3D scan. I worked with another classmate to practice the 3D scanning process on the iPad that was provided to us during class. We each took turns using the LiDAR camera attachment on an iPad paired with the Monocle Structure Scanner application to get a good 3D model of each other.

The 3D scan process essentially consisted of one of my classmates walking around me and taking pictures from all angles, while I sat as still as possible. While scanning each other we noticed how hard it was to get certain aspects and features of ourselves to show up in the models. For example, in my final scan, there are some spots in my hair that are missing as well as features of my face like my nose being not as defined. It took a few tries but eventually, we managed to get a good enough scan to 3D print.

Once I got a sufficient scan I airdropped the file to my laptop and began adjusting it in Tinkercad. I changed the model by scaling it up about 2000% and removing two millimeters from the bottom of the model so that there were fewer holes and more detail in the final print. Once I was satisfied with my model in Tinkercad, I downloaded it as a .stl file and then imported it into Ultimaker 2+ Extended and then printed it. Below is the final 3D print of the scan taken of me in class.


3D Scan

For this project, I had to create a 3D scan of my head. At first, I attempted to do this using the FaceID camera on my phone and the Scandy app. However, I soon realized that it was difficult to get a clean 360 scan with it. The app did work as intended, but it was not ideal because I could only use the inner FaceID camera, which could only scan a few inches in front of it.

Instead, I used an iPad Pro with a LiDAR scanner to capture the imagery. This was much easier to use, but it did take several tries to get a good scan. The first scanning attempt went very slowly, and the model came out looking very strange. The issue was that the scanner was not calibrated properly and wasn’t capturing a smooth image, and a simple recalibration made it work much better. After recalibrating, the second attempt went much smoother. I had to stand completely still as a classmate moved the iPad around my body to capture a full 360 scan. Overall, the scanning process as a whole was very easy and straightforward once we worked out the kinks.

After transferring the .obj file to my computer, I imported it into Tinkercad. The model imported very well, with only a few floating pieces that I removed using hole shapes. There were no large gaps or abnormalities with the model, which made it simple to print and turned out well. Overall, I really enjoyed the process of 3D scanning and was surprised at how it can now be done so well with only a mobile device.

3D Scan

3D Scanning was a very new experience for me but this project was extremely fin nonetheless. Using the IPad to scan myself and others was a pretty cool experience and seeing how detailed it could capture me was almost a little scary. Although it was difficult at first to get a good scan, once the camera’s were recalibrated it was much more simple. I then had to transfer the .obj file of my scan to my laptop and I opened it in Tinkercad.

I then added a stand for my bust and covered the logo on the bottom. There were no holes to fill luckily and nothing to cover up. I could not however, figure out how to stand my figure up straight so I ended up having to print it on its side which was fine it just made a plate and some stilts that I was able to remove.

When I was finally ready to print I saved this as an .stl and sent it to the printer but unfortunately it did not print the first time. I sent it again on a different printer and finally got my final product.

Overall, I am very happy with how this turned out. My dimensions are sort of off I think which I didn’t realize until it was printed. Regardless, this was a very cool experience getting to print something so personal and I am now super interested in 3D scanning and have been very curious about what else scanning is used for.

Chance’s 3D Scan

3D scanning is far more complex than I initially perceived. Professor H, made it look very easy during our demonstration which threw me off after my first failed attempt. What I learned it that technology is amazing, but going slow to help it out is necessary. When scanning it’s also easy to miss tiny parts of the scan which result in odd deformations in the final product. For my scan I did multiple tries in an effort to get the best result and I feel as though that’s the best method. To scan we used a LiDAR camera attachment on an iPad. After the scan, I took the product into tinkercad to upscale it. This was very easy as it is familiar software. To export it from the 3D scanning software I had to export as an OBJ which I airdropped to my Mac and then imported through tinkercad. After I scaled the scan up (to about an inch and 1/2) I exported as an STL file and printed in the lab. Print time only took about 4-5 hours, but honestly I’m pretty surprised at the detail it captured. I have very wavy/curly hair and it did a good job of picking it up still. Overall, I enjoyed the experience and would like to explore the technology more in the future.

Initial 3D Scan Using “ScandyPro”

Tinkercad Mockup

Final Print

3D Scan

I created my 3D scan while in class, and while it was challenging at first I think it turned out great. We worked in groups and use the iPad with an attached LiDAR camera to scan. At first, our app / camera wasn’t calibrated. This made our first few scans a little off center, but Professor Hooker stepped in and helped us fix the issue. Afterwards scanning was easy, and the only “hole” in my scan was on the back of my hoodie.

I don’t have any screenshots of the scan off of the app since I used someone else’s iPad and transferred my files immediately to my computer. I airdropped the .OBJ file form the iPad to my computer and then brought it into Tinkercad where I resized it, used the “hole” feature to eliminate random pieces, and then exported it as an .STL to print.

3D SVG

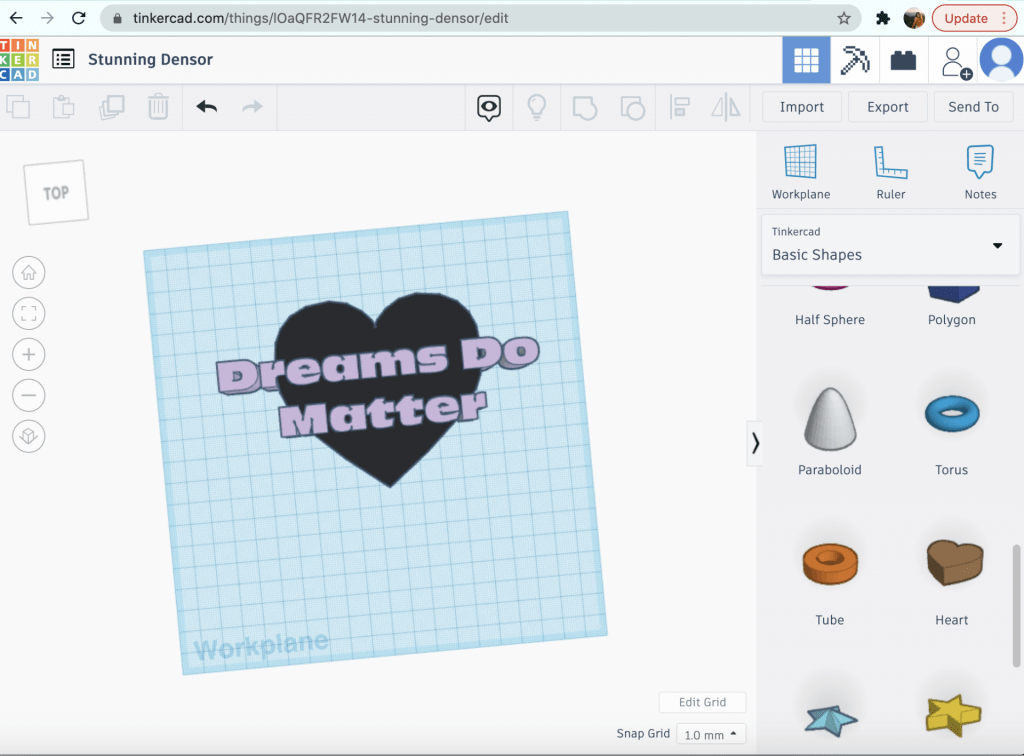
For my design I decided to use words from art that I had made inspired by my grandmother. So I took the text from the original work that was in InDesign, and created outlines around it in Illustrator. At first I tried using image trace but when I would import it on to Tinkercad the letters were negative space and all around it was solid so this would not work for what I had in mind. Once I made the outlines and converted it to svg everything went smoothly. While trying to decide what to make I started with a heart shape and had the words coming off of the heart and and I liked the way it looked with the words hanging over the heart. After playing around for a while I decided to make the words a hole in the heart instead.

This is the original art that I took from.

The last photo is my final design for this decoration that is very special to me.

3D SVG

For my SVG design, I decided that I wanted to make a simple keychain that was personalized with my name on it. I ultimately decided on a personalized keychain because at my apartment my roommates and I all basically have the same keychain holder and we often get our personal keys mixed up. Because of that I thought it would be a good idea to add on an object that is personalized for me so that my roommates and I can avoid the problem of mixing up our keys.

On Adobe Illustrator I knew the shape of the keychain that I wanted so I traced it out with the curvature tool. After creating the shape, I decided that I wanted to put my full first name rather than just my initials so I picked a font I liked and wrote in my name. I then created an outlined my name and then put in little rectangles to add more dimension to it.

To transform the 2D SVG model to a 3D model I began by importing the Illustrator SVG file into Tinkercad. Once imported the empty spaces where I wanted my name and the rectangles to be were imported perfectly as the spaces were left empty. The only element I changed was the thickness of the object. The keychain was imported with a 10mm height and I wanted it to be thin so I changed it to a 5mm height.

3D SVG

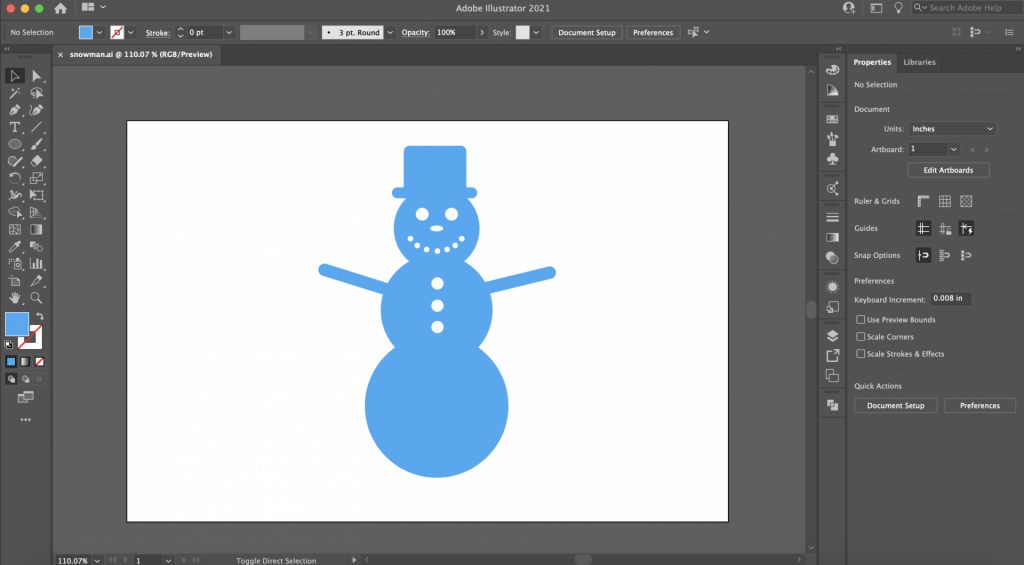
For my design, I didn’t have any logos that would translate well to a single-color object, so I kept it simple by making a little snowman (since we’ve been getting so much snow recently). I created the design in Illustrator using the shape tool, with the final object being made entirely of various circles and rounded rectangles. I created the body using three large circles, with long rounded rectangles for the arms. Once the body was finished, I arranged several small circles to create the snowman’s face. I then selected the face and head, and used the pathfinder minus-front tool to turn the circles into holes. I repeated these same steps to create the buttons as well.

After adding some finishing touches, I exported the design as an SVG and imported it into Tinkercad at 50% size. Because the SVG file used only positive and negative space, the design imported exactly as intended with no other modifications required.

3D SVG

For my 3D SVG design, I decided I would look back on some of the things I have created in the past. While there were many candidates I ultimately decided to use this logo I created for my UX Design class. I choose this design because I feel that it would really help bring my portfolio together and show off the different skills I have learned throughout my time at JMU in one cohesive project. Though, I also thought it would make a cool coaster!


To transform my 2D SVG logo into a 3D model I began by adjusting my original logo by adjusting the letters a little bit. I then saved a copy of it as a SVG file and then imported the file into Tinkercad. To make the logo more cohesive and printable I added a base to the design and cut off the corners so the base perfectly fit the original logo. Lastly, I combined the base and logo and added a hole incase I wanted to scale it down and also make a keychain.