Fusion 360 Ring Creation
I followed the tutorial provided- step by step. However, I did make my ring thicker than the one in the tutorial. I did this by making the 3-sided rectangles longer on both sides. Additionally, because of that, my ring looks a little different than the one in the tutorial. My ring looks more rounded then the one in tutorial because of the thickness. I wasn’t sure if it would print correctly because of this, but my print ended up being just the way I wanted it to be.

Meshmixer- First Print
I had many issues with my first print. I designed my ring on Fusion360 on my home computer. As this was the case- I was unable to print it originally because the computers in the 3D printing lab don’t have the updated version of the Fusion360. I fixed this by going to the Makery in Carrier and having them help me with printing it. I was able to print my ring by downloading UltraCura onto my laptop and then putting my design onto a flash drive I had. Overall, I really like my rings features and the way my first print came out.

Meshmixer- First Design
After I was satisfied with my ring- I customized my ring in Meshmixer. I tried using the stencil tool and extruded a couple of circles out of my ring. However, the stencil didn’t provide a very accurate design. Additionally, I tried to import several different stencils and none of them showed up on my ring. I was eventually able to get some of the stencils to show up by tinkering with the Refinement of the stencils. However, when I printed it, the design barely showed up and I wasn’t satisfied with it. As this was the case, I decided to do a new design in Meshmixer

Meshmixer- Final Creation
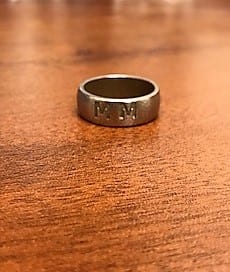
I decided to start over with my ring design in Meshmixer. This time I wanted to put my initials on my ring. I did this by using the primitives in Meshmixer. I added two MMs and tinkered with the size to fit the ring. Also, I indented the ring with my Initials. I did my first print of this ring on the UltraCua. However, the filament on this machine was clear and i could barely see the design on the ring. As this was the case, I had to re-print on a different printer and in a different color. I really liked my design. I also played around with the size of the letters on my Ring- and decided to make the M’s bigger. I printed a ring with the letters bigger but I liked the smaller letters better. I decided to send the ring with the smaller initials to Shapeways.


Shapeways Final Product
I decided to print my ring in Steel. I really liked out it came out and I didn’t have any difficulties with Shapeways and getting my ring printed and shipped to me. My ring is a little heavier because it is printed in steel which is nice too. However, people who may have smaller fingers might not want such a heavy ring because it might not be comfortable. Overall, I am very happy about how my ring came out and can’t wait to show all my friends and family the final creation!
Recent Comments