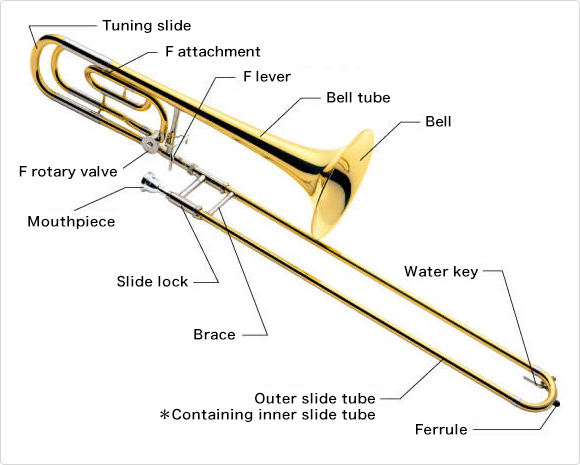
Diagram of parts of a trombone.
Unlike the other brass instruments, the trombone requires extra steps in instrument assembly—ironic in that the instrument is the simplest in terms of construction. While not onerous, the extra steps will dictate that the teacher spends extra time with students to ensure proper instrument set-up. As with the other brass instruments, students can practice hand position before actually dealing with the instrument. A sequence for teaching and learning hand and playing position on horn includes:
- Without instruments, students stand with arms relaxed and hanging by their sides.
- Each student makes an “L” with his left index finger and thumb and lifts it to just in front of his left ear.
- Student touch the tips of their right index and middle fingers to their thumbs and raise them directly in from of their mouths, rotating their hands so they are more or less parallel to the floor. The teacher can ask students to extend the right hand straight out from the mouth and back to simulate slide motion and assess the relaxation of the arm and shoulder.
To assemble and hold the trombone:
- After checking to make sure their slide locks are engaged, students should grasp the slide with their right hands and place the tip on the floor and position it vertically with the water key closest to the body. Given the delicate nature of the slide and possibility of dents, the teacher should remind students to remain aware of the length of the slides and how they move them in typically tight classroom set-ups.
- Students grasp the bell in their left hands and attach the tubing to the pipe on the slide closest to them at a 90 degree angle.
- Students tighten the slide nut and confirm the slide is locked.
- Using the hand positions they learned, students use their left hand “L” to fit around the braces on the instrument. Their thumbs should wrap around the brace on the bell, index fingers should rest on top of the lead pipe*, and their other fingers should wrap around the fixed braces on the slides.
- Students grip the brace on the moving part of the slide with their thumbs, middle, and index fingers. This grip should be secure yet flexible and relaxed.
- Students bring mouthpieces to their embouchures. Their arms should remain relaxed and slightly angled away from their bodies. Left hands and arms should support the weight of the instruments without the bells resting on their left shoulders. Heads should remain upright and straight. Other aids are available to help with weight support and positioning (insert link) although they require additional investment.
*If a student’s index finger is too short to comfortably rest it on the lead pipe, she may rest it on the brace underneath the lead pipe with the rest of her fingers.
