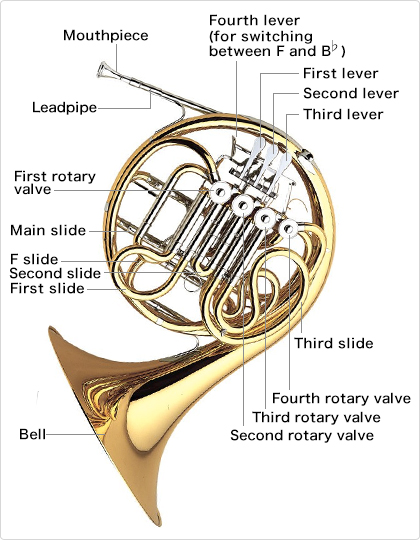
The entire tubing length of the horn is closest to that of the tuba, yet its wrap is much tighter in its circular formation. Double horns, with their separate tubing pitched in F and Bb (find more information here) have significant weight to them that, combined with the instrument’s shape can challenge good position for students. Single F horns have less weight and are a good option for younger, smaller students. University students in brass class should learn on the double horn whenever possible for its playing benefits as well as to gain the knowledge of fingerings and other variables unique to those horns. A sequence for teaching and learning hand and playing position on horn includes:
- Without instruments, students sit with arms relaxed and hanging by their sides.
2. Students raise left hands in front of left shoulder, keeping the fingers relaxed and natural. The left hand should form a “C” shape.
3. Students raise right hands to waist level, turn palms up, place their thumbs alongside index fingers and cup their hands slightly as if holding a small amount of water.
- Students rotate their right hands approximately 90 degrees until the palm is slightly past perpendicular to the floor.
- With instruments in their laps, students should position their bells to the right, grasp the instruments with their left hands, and raise the valves to approximate should height, stabilizing the bell with their left hands.
- Students place their left hand fingers on the valves, including the thumb valve on double horns, and the pinky in the ring. Some students may find that the valve paddles are too short to reach them easily with their fingertips or that the pinky ring stretches their hands uncomfortably. If these instruments are school-owned or rental instruments, they may need to try different horns if available. It is possible to attach valve extensions to the paddles and move pinky rings to accommodate smaller hands. Obviously, any such work should be approved by the entity that owns an instrument. It is vital that the teacher work with each student to find or alter equipment to achieve a natural and comfortable hand position.
- Students insert their right hands into the bell. The weight of the bells should largely rest on the knuckles of the thumb and index fingers. Students’ hands should in essence split the bell opening in half, allowing sound to travel to either side of the hand as it exits the horn.
- Students raise their horns into playing position. After reminders of good posture, students should bring their mouthpieces to their embouchures. At this point, the teacher needs to determine how to adjust the position of each horn. Each instrument should reflect an approximate 45 degree angle across the body with the bell positioned to the right and in front of the torso. If students must strain upward or lower their heads to position their mouthpieces, the teacher needs to adjust the angle of the horns across their bodies to attain a more natural position.
- The teacher should determine if a student can rest her bell on her right leg. Some students will find a good playing position with the bells on their legs, which will help support the weight of the instruments. This can be important for younger students, yet many will find this position will alter the angle of the mouthpieces. These students must learn to support the weight of their bells with their right hands to maintain proper position. Ultimately, most horn players will support their bells with their right arms due to growth or the requirements of standing while playing. Other aids are available to help with weight support and positioning (such as Ergobrass) although they require additional investment.
